volkswagen Workshop Repair Guides

Volkswagen Workshop Service and Repair Manuals

Installing > < Removing and installing fuel tank
Removing
Removing
–  Note safety precautions before beginning work → Chapter.
Observe rules for cleanliness → Chapter.
  Note
t  Before carrying out further work, disconnect battery earth strap. First check whether a coded radio is fitted. Obtain radio code first if necessary.
t  When lowering fuel tank, guide it carefully to prevent damage.
–  With the ignition switched off, disconnect battery earth strap.
–  Remove rear seat bench → General body repairs, interior; Rep. Gr.72.
–  Remove cover from fuel delivery unit.
–  Pull 5-pin connector off fuel delivery unit flange.
–  Open fuel tank filler flap.
–  Unscrew securing bolt and remove tank flap unit with rubber cup.
–  Empty fuel tank → Chapter.
–  Remove right rear wheel.
–  Remove rear right wheel housing liner. → General body repairs, exterior; Rep. Gr.66.
   
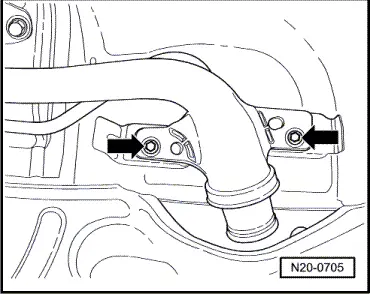
–  Remove bolts from filler neck -arrows-.
–  Unclip wire from filler pipe.
–  Remove front and rear silencers → Chapter.
  WARNING
t  The fuel and the fuel lines in the fuel system can become very hot (danger of scalding)!
t  The fuel system is also under pressure! Before opening the system, place cloths around the connections. Then carefully loosen connection to release the pressure!
t  Wear eye and hand protection when performing any type of repair work on the fuel system!
  N20-0705
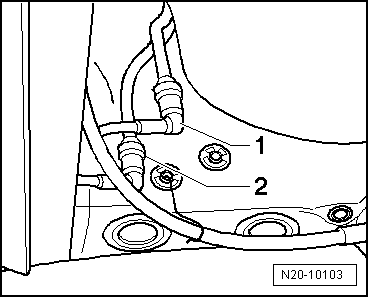
–  Separate supply line -1- and return line -2- at connections.
  Note
Press in safety ring to release fuel lines.
–  Support fuel tank using engine and gearbox jack -V.A.G 1383 A-.
–  Remove securing strap bolt and securing strap.
–  Slowly lower fuel tank. When doing this, pull fuel tank forwards, turn and guide filler neck between rear axle and body.
  N20-10103

Installing > < Removing and installing fuel tank