volkswagen Workshop Repair Guides

Volkswagen Workshop Service and Repair Manuals

Removing and installing coolant pump pulley > < Removing and installing radiator (engine codes BLG, BMY)
Removing and installing coolant pump
  Note
Coolant pump seal is bonded in position. If the seal is damaged, the coolant pump must be renewed.
   
Special tools and workshop equipment required
t  Refractometer -T10007-
t  Hose clip pliers -VAS 6340-
t  Torque wrench (5…50 Nm) -V.A.G 1331-
t  16 mm open-end spanner -T10241- (not shown)
t  Bit -T10451- (not shown)

Removing
–  Drain coolant → Chapter.
   
–  Separate fuel supply line -1- and line to activated charcoal filter -2-. Press release tabs to do this.
  N10-10177
–  Pull off hose -1- from pressure pipe.
–  Unscrew securing bolts -2- from pressure pipe and remove pressure pipe.
  N19-10228
–  Unscrew hose clip -1- on charge air pipe.
–  Open hose clip -2- and pull out hose.
–  Unscrew securing bolt for charge air pipe -3-.
–  Remove holder -4-.
  N19-10230
–  To do this, unscrew bolts -arrows-.
–  Remove bracket -1-.
  N13-10446
–  Unscrew bolts -arrows- and remove charge pressure sender -G31--1-.
–  Remove poly V-belt.
–  Removing poly V-belt (engine codes BLG, BMY) → Chapter.
–  Removing poly V-belt (engine code BWK) → Chapter.
  N21-10508
–  Push securing clip at charge air cooler in direction of -arrow- and pull hose -arrow- off.
  N21-10074
–  Remove securing bolt -arrow- for charge air pipe -1-.
  N19-10633
–  Unscrew securing bolt for charge air pipe -arrow- and remove charge air pipe -1- downwards.
Tiguan
–  Remove front exhaust pipe → Chapter.
  Note
The front exhaust pipe is only unbolted at the attaching points and placed down on the subframe.
Only vehicles with an auxiliary heater
–  Remove coolant hoses for auxiliary heater.
Continuation for all vehicles
  N21-10088
–  Carefully press locking lugs on noise insulation housing for supercharger -arrows- outwards.
–  Pull off front housing with noise insulation.
  N21-10196
–  Slacken supercharger poly V-belt by swinging tensioning element in direction of -arrow- with 16 mm open end spanner -T10241-.
–  Lock tensioning element using locking pin -T10060 A-.
  N19-10585
–  Unscrew securing bolts -arrows- for tensioning element and remove tensioning element.
–  Tightly hold compressor shaft with a spanner -1-.
  N21-10083
–  Remove securing bolt -2- for pulley and remove pulley and supercharger poly V-belt -3-.
–  Remove bracket -4-.
  N19-10415
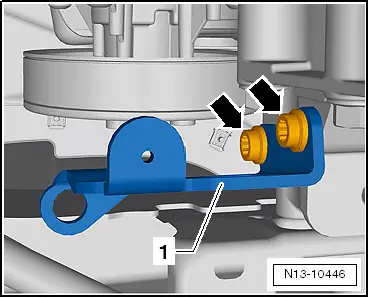
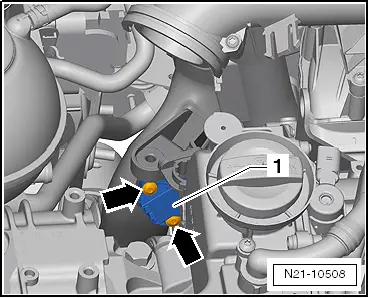
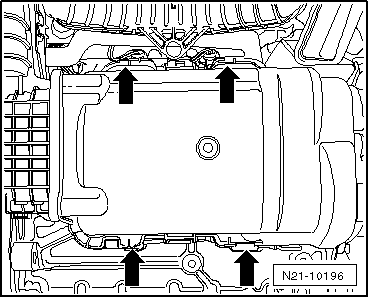
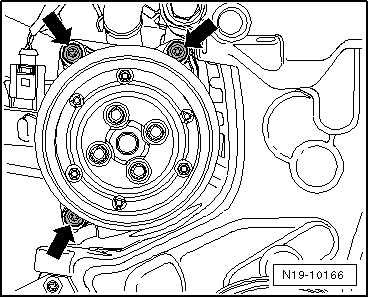
–  Loosen bolts for coolant pump with magnetic clutch for supercharger -N421--arrows- with the bit -T10451-.
–  Remove coolant pump with magnetic clutch for supercharger -N421- from cylinder block.
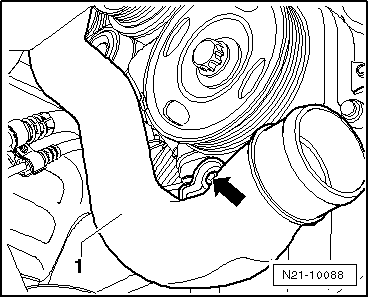
Installing
  Note
Coolant pump seal is bonded in position. If the seal is damaged, the coolant pump must be renewed.
Installation is carried out in the reverse order. When installing, note the following:
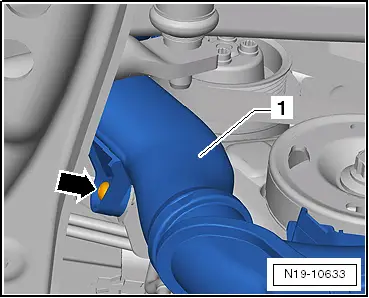
–  Insert coolant pump with magnetic clutch for supercharger -N421- into cylinder block.
–  Tighten securing bolts to 8 Nm.
–  Place poly v-belt on the magnetic clutch for supercharger -N421-.
–  Bolt on supercharger pulley with poly-v-belt and new securing bolt.
Specified torques:
Assembly overview - part I, belt drive → Chapter.
Assembly overview - supercharger → Chapter
Assembly overview - charge air system → Chapter.
–  Install poly V-belt (engine codes BLG, BMY) → Chapter.
–  Install poly V-belt (engine code BWK) → Chapter.
–  Replenish coolant → Chapter.
  N19-10166

Removing and installing coolant pump pulley > < Removing and installing radiator (engine codes BLG, BMY)