
Golf Mk5
| Assembly overview - valve gear |
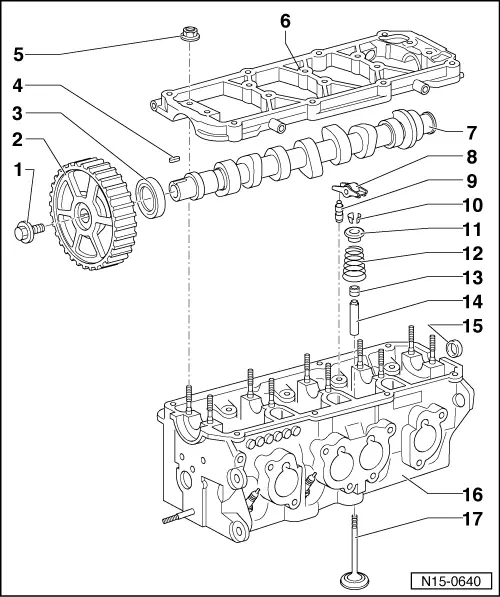
| 1 - | 100 Nm |
| q | Use counterhold tool -3415- to loosen and tighten. |
| 2 - | Camshaft toothed belt pulley |
| 3 - | Seal |
| q | Renewing → Chapter. |
| 4 - | Woodruff key |
| 5 - | 23 Nm |
| 6 - | Retaining frame |
| q | Reworking sealing surfaces is not permitted. |
| q | With integrated camshaft bearings. |
| q | Bearing 1 at belt pulley. |
| q | Observe tightening sequence of camshaft bearings → Chapter. |
| q | Carefully apply sealant D 188 800 A1 to sealant groove and lower sealing surface. |
| 7 - | Camshaft |
| q | Checking axial clearance → Chapter. |
| q | Removing and installing → Chapter. |
| q | Checking radial clearance with Plastigage; wear limit: 0.1 mm. |
| q | Runout: max. 0.04 mm. |
| 8 - | Roller rocker finger |
| q | Do not interchange. |
| q | Check roller bearing |
| q | Oil contact surface. |
| q | When installing, secure to support element using securing clip. |
| 9 - | Support element |
| q | Do not interchange. |
| q | With hydraulic valve clearance compensation. |
| q | Oil contact surface. |
| q | Checking → Chapter. |
| 10 - | Valve cotters |
| 11 - | Valve spring plate |
| 12 - | Valve spring |
| q | Cylinder head removed: Remove and install using valve spring compressor -2037-. |
| q | Cylinder head installed → Chapter. |
| 13 - | Valve stem seal |
| q | Renewing → Chapter. |
| 14 - | Valve guide |
| q | Checking → Chapter. |
| 15 - | Cover |
| q | Install flush. |
| q | To remove, pierce rubber centre with a screwdriver and lever out. |
| 16 - | Cylinder head |
| q | Reworking camshaft-side sealing surfaces not permitted. |
| q | Reworking valve seats → Chapter. |
| 17 - | Valves |
| q | Do not rework, only lapping-in is permitted. |
| q | Valve dimensions → Chapter. |
|
|