volkswagen Workshop Repair Guides

Volkswagen Workshop Service and Repair Manuals

Removing and installing oil pump with balancer shaft gear assembly > < Removing and installing sump, engine codes AXW, BLX, BLY, BLR
Removing and installing sump, engine codes BVX, BVY, BVZ
   
Removing and installing sump, engine codes BVX, BVY, BVZ
Special tools and workshop equipment required
t  T-bar and socket, 10 mm -3185-
t  Allen key, long reach -T10058-
t  Torque wrench -V.A.G 1331-
t  Flat scraper
t  Silicone sealant -D 176 404 A2-

Removing sump
–  Remove noise insulation → General body repairs, exterior; Rep. Gr.50
–  Drain engine oil.
  Note
Observe environmental regulations for disposal.
   
–  Remove securing bolts for sump to gearbox -arrows-.
–  If fitted, pull 3-pin connector off oil level and oil temperature sender -G266-.
–  Loosen sump bolts on flywheel end using T-bar and socket, 10 mm -3185- and remove with Allen key, long reach -T10058-.
–  Unscrew remaining bolts and remove sump. Loosen sump with light blows of a rubber headed hammer, if necessary.
–  Remove sealant residue on cylinder block with a flat scraper.
  A17-0219
–  Remove remaining sealant from sump e.g. with rotating plastic brush or similar.
Installing sump
  Note
t  Observe expiry date of sealing compound.
t  The sump must be installed immediately and tightened after applying silicone sealing compound.
–  Clean sealing surfaces. They must be free of oil and grease.
  N17-0012
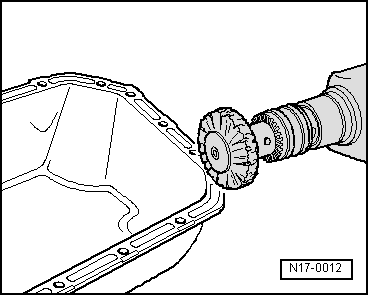
–  Cut off tube nozzle at forward marking (approx. 3 mm nozzle Ø).
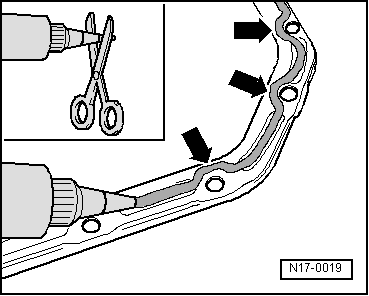
–  Apply silicone sealing compound, as shown, onto clean sealing surface on sump. Sealant bead must be:
t  2...3 mm thick.
t  Run bead along inner side of bolt holes -arrows-.
  Note
t  The sealant bead must not be thicker, otherwise excess sealant will enter the oil sump and may block the oil suction line strainer.
t  
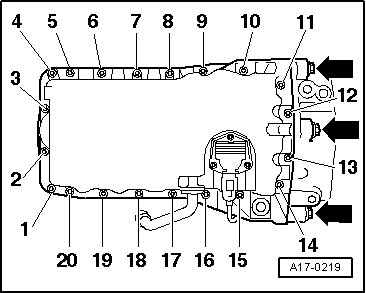
If gearbox is removed, sump must align smoothly with cylinder block.
t  If gearbox is installed, sump must rest against gearbox.
t  Let sealing compound dry for approx. 30 minutes after installing oil sump. Only then fill with engine oil.
–  Put sump in position immediately and tighten bolts as follows:
1 - Tighten all bolts between sump and cylinder block only very lightly and diagonally.
2 - Lightly tighten bolts securing sump to gearbox.
3 - Tighten all bolts securing sump to cylinder block slightly further in diagonal sequence.
4 - Tighten bolts securing sump to gearbox to 40 Nm.
5 - Tighten all bolts securing sump to cylinder block in diagonal sequence to 15 Nm.
  Note
t  When installing sump with engine out of the vehicle, ensure that sump is flush with cylinder block at flywheel end.
t  Let sealing compound dry for approx. 30 minutes after installing oil sump. Only then fill with engine oil.
Further assembly is basically the reverse of the dismantling procedure.
  N17-0019

Removing and installing oil pump with balancer shaft gear assembly > < Removing and installing sump, engine codes AXW, BLX, BLY, BLR