volkswagen Workshop Repair Guides

Volkswagen Workshop Service and Repair Manuals

Repairing trailing arm > < Removing and installing wheel bearing/wheel hub unit
Removing and installing trailing arm with mounting bracket
Special tools and workshop equipment required
   
t  Torque wrench -V.A.G 1332-
  W00-0428
t  Support -T10149-
Removing
–  Remove wheel.
–  Remove coil spring → Chapter.
  W00-1297
–  Remove bolt -arrow- securing handbrake cable -1- to trailing arm -2-.
  A42-0430
Vehicles with retainer for hand brake cable
–  Remove retainer -1- by pushing out inner pin of rivet -arrow-.
Continuation for all vehicles
  N42-10240
–  Unbolt coupling rod -1- from trailing arm.
–  Remove bolts -arrows-.
–  Mark installation position of mounting bracket on body.
  A42-0429
–  Remove bolts -arrows-.
–  Remove trailing arm with mounting bracket.
If the trailing arm is to be renewed, the mounting bracket must be removed from the longitudinal member.
The position of the mounting bracket relative to the trailing arm must then be adjusted → .
Determining position of mounting bracket in relation to trailing arm
  A42-0431
Dimension -a- is 34 ± 1mm.
1 - Mounting bracket
2 - Trailing arm
–  Tighten bolt when dimension -a- is set.
Installing
Threaded connection for trailing arm and wheel bearing housing may be tightened only after all other components (particularly the spring and shock absorber) of respective wheel suspension have been installed. To tighten, wheel suspension must be in extended position. Only then do trailing arm and wheel bearing housing move to the necessary position -arrows-.
  A42-0448
Position: threaded connection between trailing arm and wheel bearing housing
It is important to keep to the specified sequence for the following operations.
  N42-10019
–  Position trailing arm and mounting bracket on wheel bearing housing using bolts -2- but do not tighten yet.
–  Attach coupling rod -3- to trailing arm but do not tighten nut yet.
–  Raise wheel suspension using engine and gearbox jack -V.A.G 1383 A- and support -T10149- until mounting bracket contacts body.
  N42-10015
–  Tighten bolts -arrows- on position of old imprint.
–  Lower wheel suspension again using engine and gearbox jack -V.A.G 1383 A- and remove support -T10149- from wheel hub.
  A42-0431
–  Tighten bolts -2- for trailing arm to specified torque, observing the required component position → Fig..
  N42-10015
–  Bolt coupling rod -1- to wheel bearing housing and anti-roll bar.
  A42-0429
–  Bolt handbrake cable -1- to trailing arm -2--arrow-.
  A42-0430
Vehicles with retainer for hand brake cable
–  Attach retainer -1- by pushing in new inner pin of rivet -arrow-.
Continuation for all vehicles
–  Install coil spring → Chapter.
–  Install wheel and tighten bolts or nuts → Chapter.
–  Perform wheel alignment → Chapter.
  N42-10240
Specified torques
ComponentSpecified torque
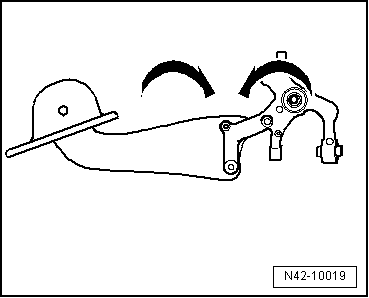
Trailing arm to wheel bearing housing
t  Use new bolts
90 Nm + 45°
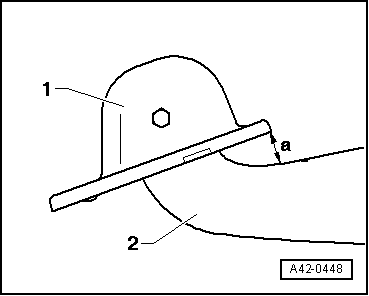
Trailing arm to mounting bracket
t  Use new bolt
90 Nm + 90°
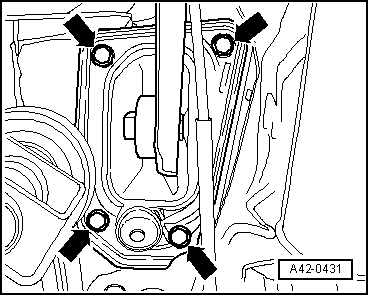
Mounting bracket to body
t  Use new bolts
50 Nm + 45°
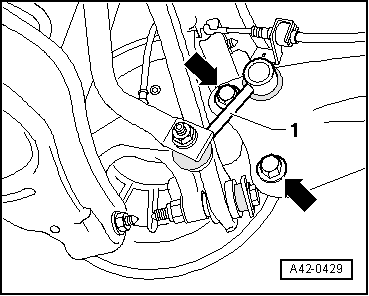
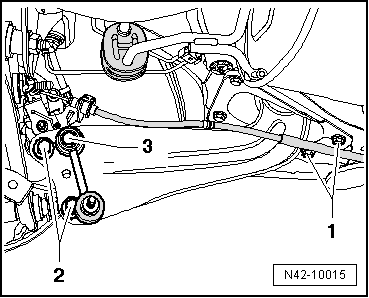
Coupling rod to trailing arm.
t  Use new nut
45 Nm
Handbrake cable to trailing arm
→ Brake systems; Rep. gr.46


Repairing trailing arm > < Removing and installing wheel bearing/wheel hub unit