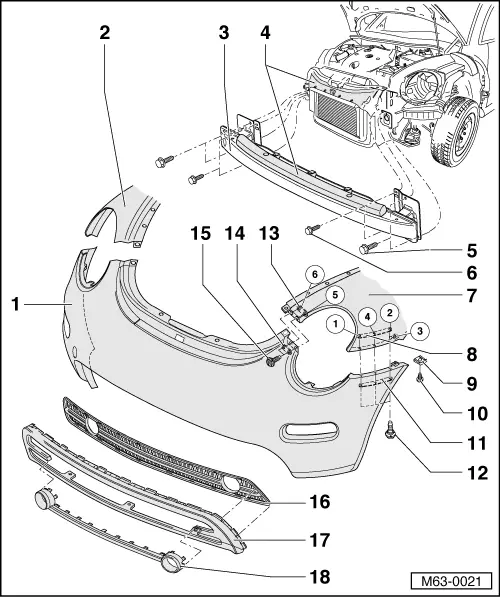
New Beetle Front Bumper Assembly: General Repairs & Overview
| Assembly overview |
Note| t | In the overview the removal and installation of the front bumper is described for vehicles 06.05. The removal and installation for vehicles 07.05 also applies although minor differences may be encountered. |
| t | The front bumper cover is a component part of the front end and must be removed together → Chapter. |
| t | It is essential that the tightening sequence of the bolts/screws -10-, -12-, -15- is observed to ensure conciseness of joints/shut lines, etc. |

| 1 - | Cover |
| q | Removing: |
| – | Removing headlight → Rep. Gr.94. |
| – | Remove wheel housing liners → Chapter |
| – | Removing front part → Chapter. |
| – | Dismantle headlight washer system, if necessary → Electrical system; Rep. Gr.92 |
| – | Remove bolts → Item and pull off clips → Item on left and right sides. |
| – | Unscrew bolts → Item and → Item |
| 2 - | Wing |
| 3 - | Bumper carrier |
| q | USA version: remove with impact damper → Chapter |
| 4 - | Damper |
| q | Bonded with butyl adhesive cord -AKL 450 005 05- |
| 5 - | Bolt/screw |
| q | Qty. 4 |
| q | 30 Nm |
| 6 - | Bolt/screw |
| q | Qty. 4 |
| q | 9 Nm |
| 7 - | Wing |
| 8 - | Base |
| q | With welded captive nuts |
| q | Qty. 2 |
| 9 - | Clip |
| 10 - | Bolt/screw |
| q | Insert with locking fluid -D 185 400 A2- |
| q | Note tightening sequence |
| 11 - | Base |
| q | With holes |
| q | Qty. 2 |
| 12 - | Bolt/screw |
| q | Insert with locking fluid -D 185 400 A2- |
| q | Qty. 6 |
| q | 6 Nm |
| q | Note tightening sequence |
| 13 - | Base |
| q | With welded captive nuts |
| q | Qty. 2 |
| 14 - | Base |
| q | With welded captive nuts |
| q | Qty. 2 |
| 15 - | Bolt/screw |
| q | Insert with locking fluid -D 185 400 A2- |
| q | Qty. 4 |
| q | 6 Nm |
| q | Note tightening sequence |
| 16 - | Air vent grille |
| q | Clipped into cover. |
| 17 - | Front spoiler |
| 18 - | Trim |