volkswagen Workshop Repair Guides

Volkswagen Workshop Service and Repair Manuals

Removing and installing brake drum, as of 10.99 > < Repairing rear brakes, drum brakes
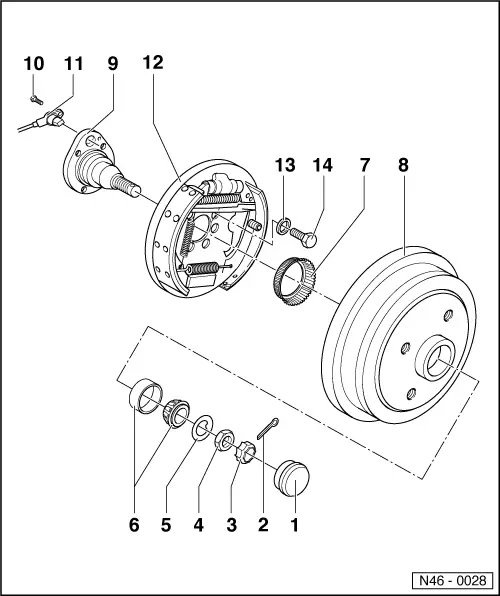
Removing and installing brake drum, up to 09.99
  Note
t  After replacing a wheel cylinder, a backplate and brake linings, depress brake pedal firmly once with vehicle stationary so that the brake linings are properly seated in their normal operating position.
t  After work for which the brake system had to be opened, bleed the brake system with brake filling and bleeding unit -VAS 5234- or extraction unit -V.A.G 1869/4-.
t  Before removing a wheel brake cylinder, brake carrier or disconnecting a brake line from the wheel brake cylinder, fit brake pedal actuator -V.A.G 1869/2- (release pressure in system for this).
   
1 - Grease cap
q   Pressing off and driving in → Running gear, axles, steering; Rep. Gr.42
2 - Split pin
q   Renew
3 - Locking ring
4 - Hexagon nut
q   Adjusting wheel bearing play → Running gear, axles, steering; Rep. Gr.42
5 - Thrust washer
6 - Outer wheel bearing
7 - ABS speed sensor rotor
8 - Brake drum
q   Vehicles with no ABS, 180 mm Ø
q   Wear limit 181.5 mm Ø
q   Vehicles with ABS, 200 mm Ø
q   Wear limit 201.5 mm Ø
q   Release adjustment before removing brake drum, → Chapter
q   Clean thoroughly, check for wear, damage, tolerances, damaged wheel bolt threads and perfect braking surface
q   Fill hub with multi-purpose grease
9 - Stub axle
10 - Hexagon socket head bolt, 10 Nm
11 - Speed sensor
q   Only vehicles with ABS
q   Before inserting sensor, clean inner surface of fitting hole and coat with lubricating paste G 000 650
12 - Brake backplate with brake shoes
q   Release adjustment before removing brake drum, → Chapter
13 - Dished spring
q   Larger contact surface to brake backplate
14 - Hexagon bolt, 60 Nm


Removing and installing brake drum, as of 10.99 > < Repairing rear brakes, drum brakes