volkswagen Workshop Repair Guides

Volkswagen Workshop Service and Repair Manuals

Removing and installing ribbed belt > < Additional information and removal instructions for vehicles with air conditioner
3-cyl. diesel engine, Mechanics
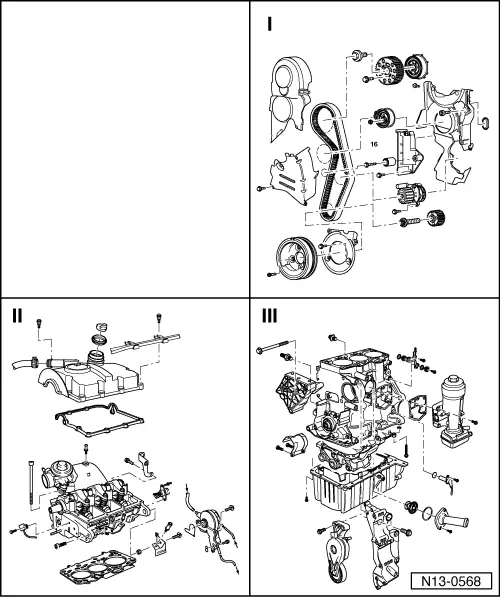
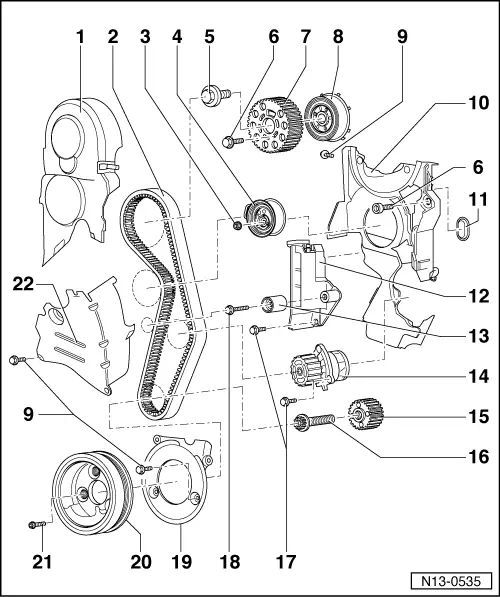
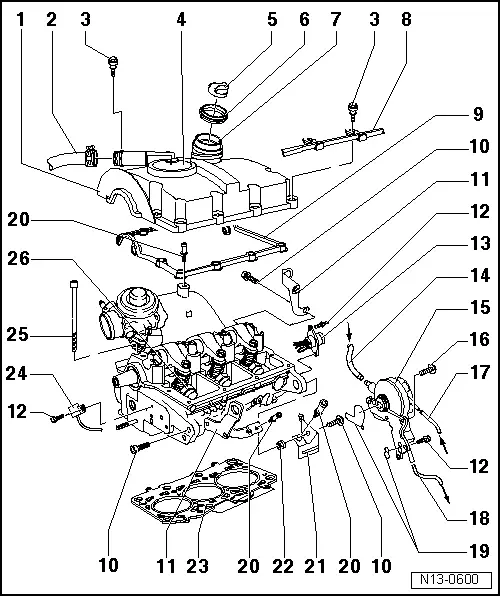
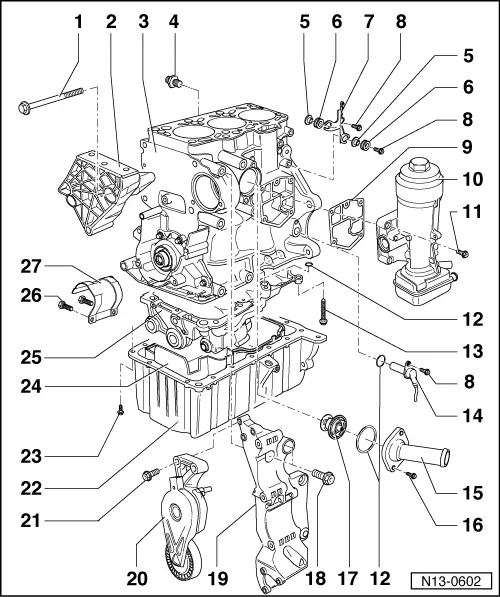
Dismantling and assembling engine
 
N13-0568

Notes:

  • ◆ If during repair work, metal shavings or larger quantities of small metal particles are found in the engine oil - caused, for example, by partial seizure of the crankshaft and conrod bearings - then, apart from thoroughly cleaning out the oil passages, it is necessary to renew the oil cooler.
  • ◆ All bearing and running surfaces must be oiled before assembling.

I    

II    

III    

 
N13-0535

Part I

  • Toothed belt guard - upper part
  • Toothed belt
    • ◆ Mark D.O.R. before removing
    • ◆ Check for wear
    • ◆ Do not kink
    • ◆ Removing, installing and tensioning
  • 20 Nm + 1/8 turn (45 °) further
  • Tensioning roller
  • 100 Nm
  • 25 Nm
  • Camshaft sprocket
 
N13-0535
  • Hub
    • ◆ With sender wheel
    • ◆ Counter-hold with T10051 to loosen and tighten
    • ◆ To remove, use puller T10052
    • ◆ Removing and installing => Page 15-47, Removing and installing camshaft
  • 10 Nm
  • Rear toothed belt guard
  • Sealing grommet
    • ◆ Renew if damaged
  • Toothed belt tensioner
  • Idler wheel
  • Coolant pump
    • ◆ Removing and installing
      => Page 19-18
  • Crankshaft toothed belt sprocket
 
N13-0535
  • 120 Nm + 1/4 turn (90 °) further
    • ◆ Renew
    • ◆ Counter-hold with 3415 to loosen and tighten
    • ◆ Do not additionally oil or grease the threads and shoulder
    • ◆ The quarter turn further can be done in several stages.
  • 15 Nm
  • 20 Nm
  • Toothed belt guard - lower part
  • Belt pulley/vibration damper
    • ◆ Can only be installed in one position. Holes are off-set
  • 10 Nm + 1/4 turn (90 °) further
  • Toothed belt guard - centre part
 
N13-0600

Part II

  • Cylinder head cover
    • ◆ With oil filler neck
    • ◆ Replace oil filler neck also if cylinder head cover is damaged
    • ◆ Before fitting, thoroughly clean sealing surface of cylinder head with clean rag
  • To turbocharger
  • 10 Nm
    • ◆ First hand tighten all bolts
    • ◆ Then first tighten both top bolts and the rest from inside to outside diagonally to specified tightening torque
 
N13-0600
  • Pressure regulating valve
    • ◆ For crankcase breather
  • Cap
    • ◆ Renew seal if damaged
  • Gasket
    • ◆ Renew if damaged
  • Oil filler neck
    • ◆ Renew
  • Bracket
    • ◆ With fuel pipe
  • Cylinder head cover gasket
    • ◆ Renew if damaged
  • 20 Nm
  • Lifting eye
  • 10 Nm
 
N13-0600
  • Central connector
    • ◆ For unit injector
  • From brake servo
  • Tandem pump
    • ◆ For fuel and vacuum supply
    • ◆ Removing and installing
      => Page 20-36
    • ◆ Checking => Page 20-32
  • 25 Nm
  • Supply hose
    • ◆ From fuel filter
      => Page 20-8
    • ◆ White or with white marking
    • ◆ Check securely seated
    • ◆ Secure with spring-type clips
 
N13-0600
  • Return hose
    • ◆ To fuel filter
      => Page 20-8
    • ◆ Blue or with blue marking
    • ◆ Check securely seated
    • ◆ Secure with spring-type clips
  • Gasket
    • ◆ Renew
  • Pin 10 Nm
    • ◆ For engine cover
  • Bracket
  • Tapered hexagon nut
 
N13-0600
  • Cylinder head gasket
    • ◆ Renew
    • ◆ Note identification
    • ◆ If replaced renew the complete
      coolant
  • Hall sender (G40)
    • ◆ For camshaft position
    • ◆ Unclip to remove sealing grommet from rear toothed belt guard
    • ◆ Checking:

=> Repair group 23; Servicing diesel direct injection system; Checking Hall sender for camshaft position

 
N13-0600
  • Cylinder head bolt
    • ◆ Renew
    • ◆ Note sequence when loosening and tightening
      => Page 15-21, removing and installing cylinder head
    • ◆ Insert washers into cylinder head before installing => Page 15-30, item 4, Servicing valve gear
  • Unit injector
    • ◆ Removing and installing

=> Repair group 23; Servicing diesel direct injection system; Removing and installing unit injectors

 
N13-0602

Part III

  • 45 Nm
  • Engine bracket
  • Cylinder block
    • ◆ Removing and installing sealing flange and flywheel
      => Page 13-19
    • ◆ Dismantling and assembling pistons and conrods
      => Page 13-46
  • Connection, 40 Nm
    • ◆ For oil return pipe from turbocharger
    • ◆ Renew
  • Spacer sleeve
  • Rubber bush
  • Bracket
    • ◆ For connectors for Hall senders for camshaft position (G40) and engine speed (G28)
 
N13-0602
  • 10 Nm
  • Gasket
    • ◆ Renew
  • Oil filter bracket
    • ◆ Dismantling and assembling => Page 17-9
  • 15 Nm + 1/4 turn (90 °) further
    • ◆ Renew
    • ◆ First fit upper left and lower right bolt, then tighten the four bolts diagonally
  • O-ring
    • ◆ Renew
  • 20 Nm
  • Engine speed sender
    • ◆ Checking:

=> Repair Group 01; Self-diagnosis; Interrogating and erasing fault memory

 
N13-0602
  • Connection
    • ◆ For thermostat
  • 15 Nm
  • Coolant thermostat
    • ◆ Removing and installing
      => Page 19-21
  • 45 Nm
    • ◆ Note tightening sequence
      Page => 19-10, Fig. 1
  • Compact bracket
    • ◆ For alternator, air conditioning compressor PAS vane pump and ribbed belt tensioning element
  • Tensioning element
    • ◆ for ribbed belt
  • 25 Nm
 
N13-0602
  • Sump
    • ◆ Clean sealing surface before installing
    • ◆ Install with silicone sealant
      D 176 404 A2
      => Page 17-17
    • ◆ To remove sump, gearbox must first be removed

=> 5-Speed manual gearbox 02J; Repair group 34; Removing and installing gearbox

  • 15 Nm
    • ◆ To remove the rear bolts near gearbox, the gearbox must be removed

=> 5-Speed manual gearbox 02J; Repair group 34; Removing and installing gearbox

  • Cover
    • ◆ With sealing tape
    • ◆ Clean strainer if soiled
 
N13-0602
  • Retaining frame
    • ◆ Before installing, check that the fitting sleeves for centring on cylinder block are in place and that the O ring is inserted in the retaining frame
    • ◆ Removing and installing =>13-33
  • 40 Nm
  • Protective cap
    • ◆ For drive shaft

Removing and installing ribbed belt > < Additional information and removal instructions for vehicles with air conditioner