volkswagen Workshop Repair Guides

Volkswagen Workshop Service and Repair Manuals

Dismantling and assembling reverse gear clutch -K2- > < Dismantling and assembling free-wheel
Automatic gearbox 001
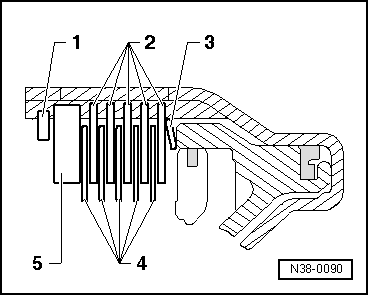
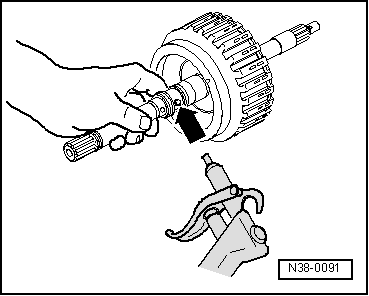
Dismantling and assembling 1st to 3rd gear clutch -K1-
 
N38-0088

Functional check of clutch

=>Fig.4

  • Circlip
    • ◆ Lever out with screwdriver
  • Thrust plate
    • ◆ Installing => Fig.2
    • ◆ Determining thickness => Fig. 3
  • Inner plate
    • ◆ Installing => Fig.2
    • ◆ Quantity
  • Outer plate
    • ◆ Installing => Fig.2
    • ◆ Quantity=> Page 00-4
  • Dished washer
    • ◆ Installing => Fig.2
  • Securing ring
    • ◆ Removing and installing =>Fig.1
 
N38-0088
  • Oil seal
    • ◆ Always renew
  • Piston cap
    • ◆ Moisten sealing ring with ATF before installing
  • Spring
    • ◆ Seat between piston and piston cap
  • Oil seal
    • ◆ Always renew
    • ◆ Sealing lip faces to clutch housing
  • Oil seal
    • ◆ Always replace
  • Piston
    • ◆ Spare part is allocated according to gearbox code letters
    • ◆ Installing => Page 38-8
  • Clutch housing with turbine shaft
  • Piston ring
    • ◆ Check that it is correctly located
    • ◆ Do not overstretch
 
N38-0089

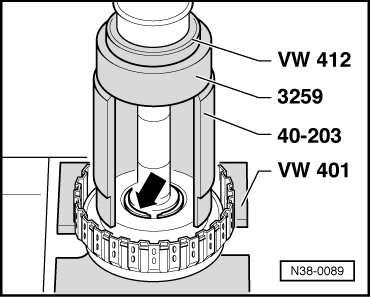
→ Fig.1     Removing and installing circlip

  • ‒ Press piston cap and spring down far enough for the circlip (arrow) to be inserted in the groove.
 
N38-0090

→ Fig.2     Installing outer and inner plates

Convex side of dished washer (small diameter) faces to clutch housing.

  • ‒ Place outer plates -2- and inner plates -4- on the dished washer -3-.
  • ‒ Place pressure plate -5- on the last inner plate.
  • ‒ Fit circlip -1- in the groove in the clutch housing.
 
N38-0092

→ Fig.3     Determining thickness for the pressure plate.

  • ‒ Measure play between pressure plate and circlip using a feeler gauge "A".

Component

Installed dimension

Wear limit

Clutch K1

0.45 ... 0.85 mm

1.05 mm

  • ‒ If the wear limit is reached on a used clutch, the plates must be replaced and the thickness for a new pressure plate must be calculated.
  • ‒ Allocate plates and pressure plate according to gearbox code letters.
 
N38-0127

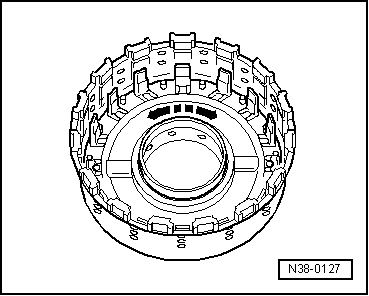
→ Fig.4     Functional check of clutch

  • ‒ Before installing the piston moisten sealing lip and sealing rings with ATF.
  • ‒ Turn piston slightly when installing.
  • ‒ It must be possible to turn the piston by hand in both directions (arrows) after it has been installed into clutches or brakes.
  • ◆ If this is not the case, the sealing lips or sealing rings may catch or become damaged.
  • ‒ If this defect occurs, remove piston again.
  • ‒ Check sealing lips or sealing rings for damage, renew if necessary.
  • ‒ Install piston again and check.
 
N38-0091
  • ‒ → Blow compressed air into the pressure channel -arrow-.
  • ‒ Keep the drilling on the opposite side closed.
  • ‒ The clutch piston must press the plates together.
  • ‒ Allow compressed air to escape. The set of plates must return to its rest position.

Dismantling and assembling reverse gear clutch -K2- > < Dismantling and assembling free-wheel