volkswagen Workshop Repair Guides

Volkswagen Workshop Service and Repair Manuals

Dismantling and assembling reverse gear brake > < Dismantling and assembling reverse gear clutch -K2-
Automatic gearbox 001
Dismantling and assembling 3rd and 4th gear clutch -K3-
 
N38-0184

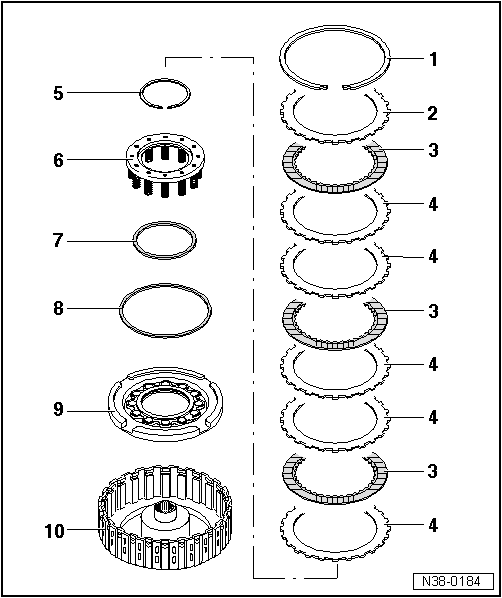
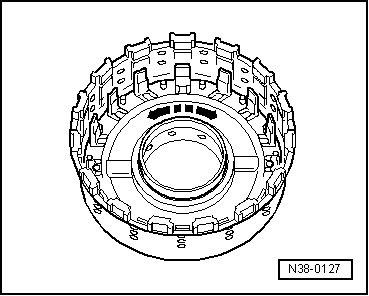
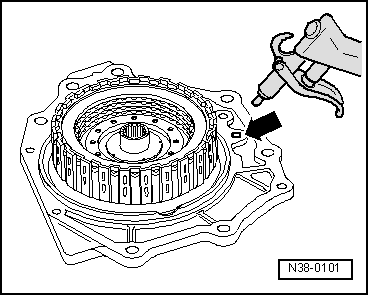
Take note of number of plates and location during dismantling stage => figure 2 .

Functional check of clutch

=>Fig.5

  • Circlip
    • ◆ Lever out with screwdriver
  • Thrust plate
    • ◆ Installing => Fig.3
    • ◆ Determining thickness => Fig. 4
  • Inner plate
    • ◆ Installing => Fig.3
    • ◆ Quantity
  • Outer plate
    • ◆ Installing => Fig.3
    • ◆ Quantity
 
N38-0184
  • Securing ring
    • ◆ Removing and installing => Fig.1
  • Spring supporting plate
    • ◆ With springs
  • Oil seal
    • ◆ Always replace
  • Oil seal
    • ◆ Always renew
  • Piston
    • ◆ Spare part is allocated according to gearbox code letters
    • ◆ Installing
  • Clutch housing
 
N38-0099

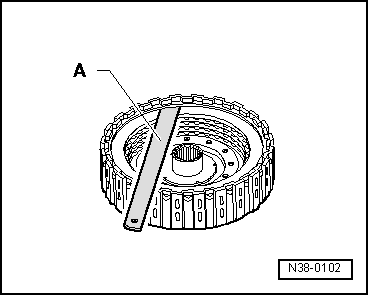
→ Fig.1     Removing and installing circlip (arrow)

  • ‒ Press down carefully on piston cap until the circlip an be installed.
 
N38-0185

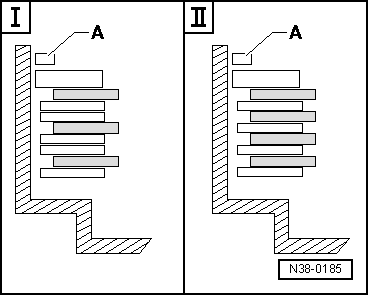
→ Fig.2     Observe different number and location of plates

I - -K3- with 3 inner plates

II - -K3- with 4 inner plates

A - Circlip

 
N38-0100

→ Fig.3     Installing outer and inner plates

  • ‒ Install outer plates -4- and inner plates -3- in clutch housing.
  • ‒ Place pressure plate -2- on the last inner plate.
  • ‒ Insert circlip -1- in the groove in the clutch housing.
 
N38-0102

→ Fig.4     Determining thickness for the pressure plate.

  • ‒ Measure play between pressure plate and circlip using a feeler gauge "A".

Component

Installed dimen.

Wear limit

Clutch K3

1.8 ... 2.2 mm

2.4 mm

  • ‒ If the wear limit is reached on a used clutch, the plates must be replaced and the thickness for anew pressure plate must be calculated.
  • ‒ Allocate plates and pressure plate according to gearbox code letters.
 
N38-0127

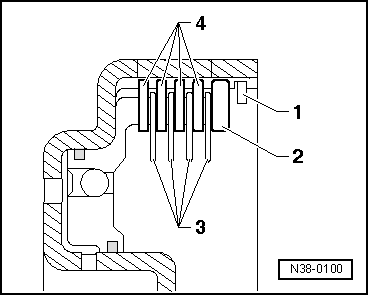
→ Fig.5     Functional check of clutch

  • ‒ Before installing the piston moisten sealing lips and sealing rings with ATF.
  • ‒ Turn piston slightly when installing.
  • ‒ It must be possible to turn the piston by hand in both directions (arrows) after it has been installed into clutches or brakes.
  • ◆ If this is not the case, the sealing lips or sealing rings may catch or become damaged.
  • ‒ If this defect occurs, remove piston again.
  • ‒ Check sealing lips or sealing rings for damage, renew if necessary.
 
N38-0101
  • ‒ Install piston again and check.
  • ‒ Place clutch -K3- on gearbox housing cover and press downwards.
  • ‒ → Blow compressed air into the pressure channel -arrow-.
  • ‒ The clutch piston must press the plates together.
  • ‒ Allow compressed air to escape. The set of plates must return to its rest position.

Dismantling and assembling reverse gear brake > < Dismantling and assembling reverse gear clutch -K2-