volkswagen Workshop Repair Guides

Volkswagen Workshop Service and Repair Manuals

Tightening torques > < Securing engine to assembly stand
4-Cyl. injection engine (2 valve, roller rocker finger), Mechanics
Removing and installing engine
Notes on installing

Installation is carried out in the reverse sequence, when doing this note the following:

Vehicles with manual gearbox

  • ‒ Check clutch release bearing for wear, renew if necessary.
  • ‒ Lightly grease clutch release bearing, release bearing guide sleeve and splines on input shaft with G 000 100.

Vehicles with automatic gearbox

  • ‒ Only use nuts approved in parts programme to secure torque converter to drive plate.

Continuation for all vehicles

  • ‒ Check whether the dowel sleeves for centralising engine/gearbox are in the cylinder block, install if necessary.
  • ‒ When swinging the assembly in, ensure that clearance exists between the drive shafts.
 
N10-0050
  • ‒ → When installing the engine mounting ensure that the pins on the bonded rubber mounting engage in the engine support bracket -arrows-.
  • ‒ Align engine mountings stress-free by rocking.

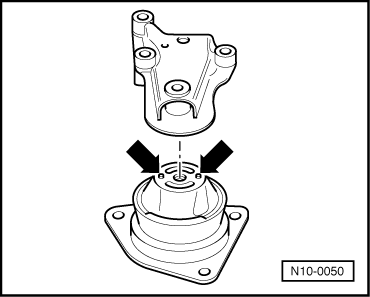
Note:

Assembly mounting tightening torques

.

  • ‒ Install drive shafts:

=> Running gear, axles, steering; Repair group 40; Servicing front suspension; Removing and installing drive shafts

  • ‒ Installing P.A.S. vane pump:

=> Running gear, axles, steering; Repair group 48; Assembly overview: vane pump, reservoir, hydraulic lines; Removing and installing power steering vane pump.

Vehicles with air conditioner

  • ‒ Install air conditioner compressor.

Continuation for all vehicles

  • ‒ Electrical connections and routing:

=> Electrical system; Repair group 97

  • ‒ Install ribbed belt => Page 13-9 .

Vehicles with manual gearbox

  • ‒ Installing clutch cable:

=> Repair group 30; Servicing hydraulic clutch control

  • ‒ Connecting selector mechanism to gearbox.

=> Repair group 34; Servicing gear change mechanism

Vehicles with automatic gearbox

  • ‒ Install selector cable on gearbox, adjust if necessary:

=> Repair group 37; Servicing selector mechanism; Dismantling and assembling selector mechanism

Continuation for all vehicles

  • ‒ Filling with coolant => Page 19-10
  • ‒ Install air cleaner:

=> Repair group 24; Servicing injection system; Dismantling and assembling air cleaner.

  • ‒ Perform the work sequence "Procedure after interrupting voltage supply".

=> Repair group 24; Engine control unit; Procedure after interrupting voltage supply.

Note:

The readiness code is reset or erased each time fault memory is erased.

  • ‒ Carry out a test drive and interrogate fault memory:

=> Repair group 01; Fault memory; Interrogating and erasing fault memory of engine control unit

Tightening torques > < Securing engine to assembly stand