volkswagen Workshop Repair Guides

Volkswagen Workshop Service and Repair Manuals

Renewing camshaft oil seals > < Checking camshaft timing adjustment
4-cyl. injection engine (4-valve, roller rocker finger), Mechanics
Servicing valve gear
Removing and installing camshaft adjuster and exhaust camshaft sprocket
 
W15-0114

Special tools, workshop equipment, test and measuring appliances and auxiliary items required

  • ◆ T10061 Key
  • ◆ T10073 Retaining plate
  • ◆ T10074 Locking pins
  • ◆ T10075 Locking flange
  • ◆ V.A.G 1331 Torque wrench (5...50 Nm)

Removing

  • ‒ First remove both toothed belts
    .
  • ‒ Turn crankshaft back slightly.
  • ‒ Remove the locking pins from camshaft adjuster and exhaust camshaft sprocket.
 
N15-0371
  • ‒ → First fit the retaining plate T10073 on the camshaft adjuster.
 
N15-0372
  • ‒ → Push locking pins -A- into the fitted holes in camshaft adjuster and camshaft housing onto stop.
  • ‒ Then lock exhaust camshaft sprocket with locking pin -B- in 2nd hole of the retaining plate T10073 and push into the camshaft housing fitted hole onto stop.

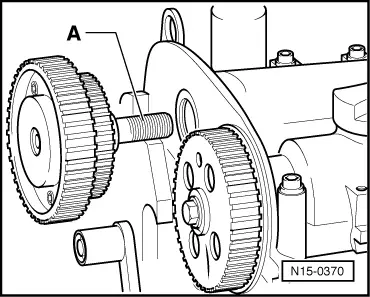
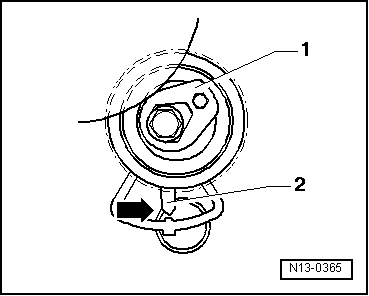
Note:

Turning the exhaust camshaft sprocket slightly with a ring spanner on the securing bolt until the fitted holes align will make locking easier.

  • ‒ Remove camshaft adjuster plug.
 
N15-0383
  • ‒ → Loosen camshaft adjuster central bolt in clockwise direction using key T10061.

Note:

The camshaft adjuster central bolt has a left-hand thread.

  • ‒ Remove the hexagon bolt from exhaust camshaft sprocket.

Note:

The hexagon bolt securing the exhaust camshaft sprocket has a right-hand thread and must be replaced.

  • ‒ Pull the locking pins T10074 carefully out of the retaining plate T10073 and take the retaining plate off the camshaft adjuster.
  • ‒ Remove the central bolt from camshaft adjuster and take the camshaft adjuster carefully out of the camshaft housing.
  • ‒ Place the face side of the camshaft adjuster on a clean surface.
  • ‒ Remove the exhaust camshaft sprocket.

Installing

  • ● The pistons must not be positioned at TDC.
  • ‒ Oil the threads and the bolt head contact surface of the central bolt for the camshaft adjuster.
  • ‒ Install the exhaust camshaft sprocket and fit a new bolt hand-tight.

Note:

Observe position of camshaft sprocket to camshaft keyway.

 
N15-0370
  • ‒ → Guide the central bolt -A- with a new washer through the camshaft adjuster onto stop.
  • ‒ Screw the central bolt several threads in the inlet camshaft (note left left-hand thread).
  • ‒ Now slide the camshaft adjuster carefully in the inlet camshaft oil seal.

Note:

When replacing the camshaft adjuster, the oil seal must also be replaced. Ensure that the oil seal is not damaged when guiding the camshaft adjuster in the camshaft housing.

  • ‒ Tighten the central bolt further by hand until the camshaft adjuster can still be turned lightly against the camshaft.

Note:

The camshaft adjuster must turn easily compared to the camshaft.

 
N28-0102
  • ‒ → Pull 4 pin connector off ignition transformer -arrow-.
  • ‒ Remove the ignition transformer and the inlet camshaft end cover.
 
N15-0373
  • ‒ → Insert coupling side of locating flange T10075 in the inlet camshaft housing so that the locating pin -arrow- of the tool locates in the small hole in the inlet camshaft axial bearing and the camshaft lugs -1- locate in the recess -2- of the tool.
 
N15-0389
  • ‒ → Turn inlet camshaft on hexagon of locating flange T10075 until the holes in the tool align with the threaded holes in the camshaft housing -arrows-.
  • ‒ Secure the locating flange with two M6X15 bolts and tighten them to 10 Nm.
 
N15-0384
  • ‒ → Turn the camshaft adjuster until the fitted holes in the camshaft adjuster and camshaft housing align -arrow-.
 
N15-0371
  • ‒ → Place the retaining plate T10073 on the camshaft adjuster.
 
N15-0372
  • ‒ → Push locking pin -A- in the fitted hole in the camshaft adjuster and camshaft housing onto stop.
  • ‒ Then secure exhaust camshaft sprocket by pushing locking pin -B- into 2nd hole in the retaining plate T10073 onto stop in the fitted hole of the camshaft housing.

Note:

The locking will be made easier when the exhaust camshaft sprocket is turned slightly with a ring spanner on the securing bolt, until the fitted holes align.

  • ‒ Fit new securing bolt to exhaust camshaft sprocket and tighten to 20 Nm. Then turn the bolt 1/4 turn (90 °) further.
 
N15-0383
  • ‒ → Then tighten central bolt of the camshaft adjuster (left-hand thread) and new washer to 40 Nm.
  • ‒ Then turn the bolt 1/4 turn (90 °) further.
  • ‒ Remove retaining plate T10073.
  • ‒ Lock exhaust camshaft sprocket again with locking pins T10074.

Install both toothed belts as follows:

Note:

If a piston is at TDC the valves could strike the piston when turning the camshafts.

  • ‒ Fit toothed belt for coupling the camshafts in a clockwise direction starting at top on inlet camshaft sprocket and then onto exhaust camshaft sprocket. The slack section of the toothed belt must be downwards. Note direction of rotation with used belts.
 
N13-0364
  • ‒ → Turn coupling drive tensioning roller clockwise towards marking window -arrow- using a hexagon key -1- (tensioning roller in untensioned position).
  • ‒ Press lower section of toothed belt for coupling the camshafts upwards with tensioning roller and fit tensioning roller securing bolt.
  • ‒ Tighten securing bolt hand tight. The lug in the base plate must engage in the hole in the cylinder head -2-.
 
N13-0365
  • ‒ → Then tension toothed belt by turning tensioning roller anti-clockwise, with a hexagon key item -1-, until the indicator -2- aligns over the lug in the base plate in the marking window -arrow-.
  • ‒ Tighten clamping nut on tensioning roller.
         Tightening torque: 20 Nm

Note:

The camshafts must remain secured against turning until the main dive toothed belt has been fitted.

 
N13-0147
  • ‒ → Set the crankshaft to TDC No. 1 cylinder. The tooth with end ground down must align with the mark on the oil pump.
 
N15-0381
  • ‒ → Remove the main toothed belt drive idler roller -arrow-.
  • ‒ Loosen securing bolt of the main belt drive tensioning roller.
  • ‒ Fit main drive toothed belt on in anti-clockwise direction starting at water pump then via tensioning roller, crankshaft and exhaust camshaft sprocket. Note direction of rotation for used belts.
  • ‒ Install the main toothed belt drive idler roller and tighten it to 50 Nm.
 
N15-0382
  • ‒ → Then tension toothed belt by turning the tensioning roller in direction of arrow until the indicator -3- aligns with the groove in the base plate -arrow-.
  • ‒ Tighten tensioning roller with Torx bit from V.A.G 1766.
         Tightening torque: 20 Nm
  • ‒ Remove locking flange T10075 and locking bolt T10074 from exhaust camshaft sprocket.
  • ‒ Rotate crankshaft two turns in engine direction of rotation.

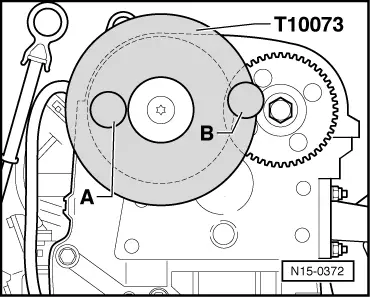
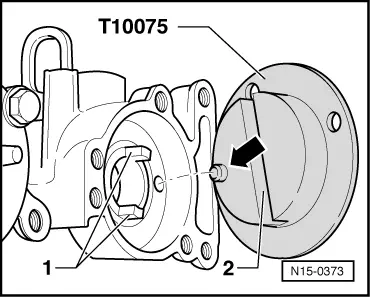
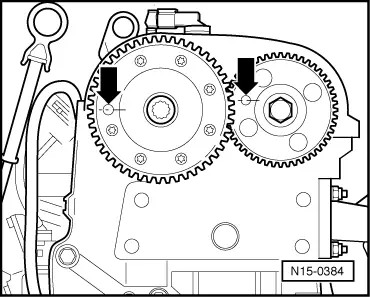
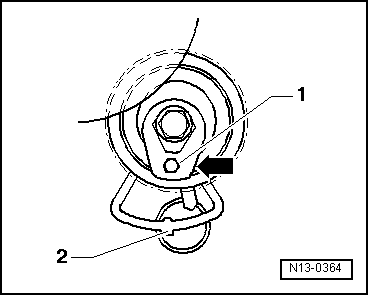
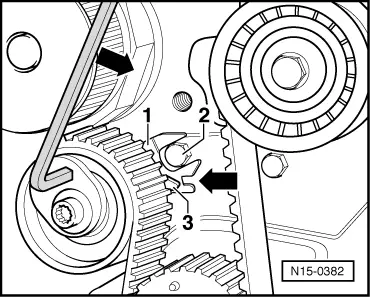
The holes in camshaft adjuster and exhaust camshaft sprocket must align with the fitted holes in camshaft housing.

 
N15-0373
  • ‒ Lock exhaust camshaft sprocket again with locking pin T10074.
  • ‒ → Insert coupling side of locking flange T10075 in the inlet camshaft housing so that the locking pin -arrow- of the tool locates in the small hole in inlet camshaft axial bearing and the camshaft lugs -1- locate in the groove -2- in the tool.
 
N15-0389
  • ‒ → Carefully turn inlet camshaft on hexagon of locking flange T10075 opposite to normal engine direction of rotation onto stop and hold.

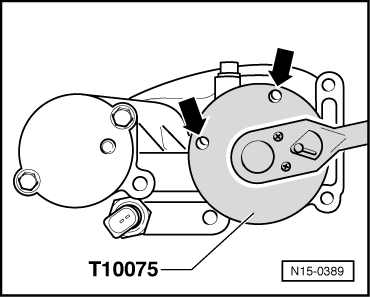
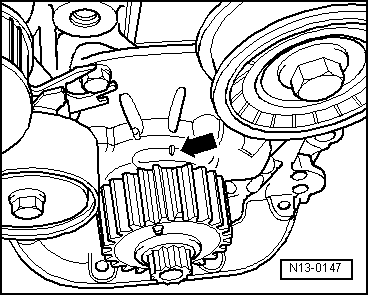
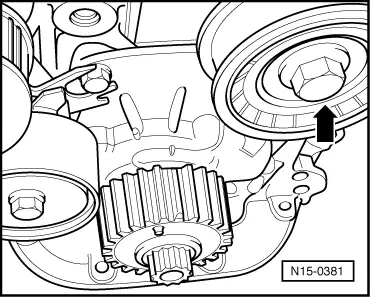
The tool must now move to the position which was attained during the adjustment process, i.e. the holes in locking flange T10075 must align with the threaded holes in the camshaft housing -arrows-.

Note:

If the original position of the locking and adjustment tool is not attained, both toothed belts must be removed, the camshaft adjuster must be loosened and the process repeated.

  • ‒ Fit the camshaft adjuster locking bolt and tighten to 25 Nm.
  • ‒ If the adjustment is OK remove gearbox side adjustment tool and refit the inlet camshaft end plate with ignition transformer.

The rest of the assembly is basically a reverse of the dismantling sequence.

Renewing camshaft oil seals > < Checking camshaft timing adjustment