volkswagen Workshop Repair Guides

Volkswagen Workshop Service and Repair Manuals

Safety precautions > < Dismantling and assembling fuel rail with injectors
Motronic inj. and ignition system (2-valve, roller rocker finger)
Servicing injection system
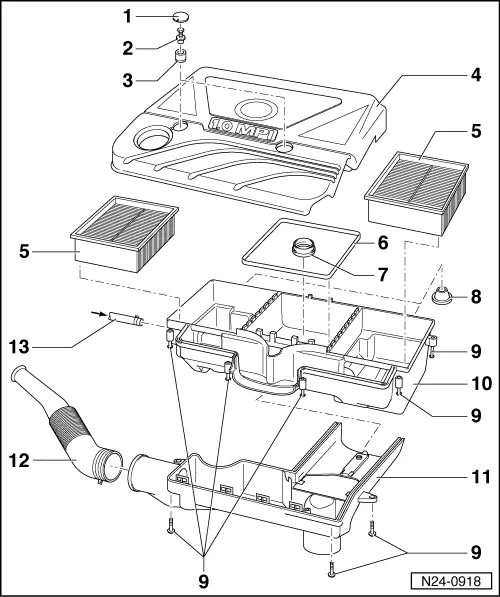
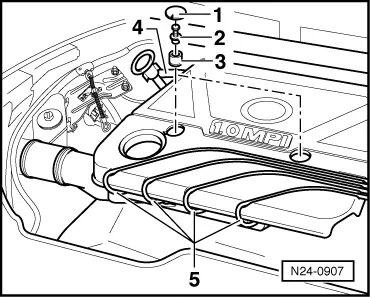
Dismantling and assembling air cleaner
 
N24-0918

Removing and installing air cleaner , Fig. 3

  • Plug
    • ◆ Renew if damaged
  • Hexagon bolt, 10 Nm
    • ◆ With guide for spacer
  • Spacer sleeve
  • Air cleaner upper part
  • Filter element
  • Gasket
    • ◆ Note installation position
    • ◆ Renew if damaged
 
N24-0918
  • Seal
    • ◆ Check securely seated
    • ◆ Renew if damaged
  • Stop
    • ◆ Check securely seated
    • ◆ Renew if damaged
  • 3 Nm
    • ◆ Notes on installing => Page 24-28
  • Air cleaner lower part
  • Air intake housing with regulating flap
    • ◆ Check intake air preheating => Page 24-95
  • Connecting piece for cold air intake
    • ◆ Note installation position
 
N24-0918
  • Crankcase breather hose
    • ◆ From oil separator:

=> Repair group 17; Removing and installing parts of lubrication system

 
N24-0640

→ Fig. 1     Resistance values for coolant temperature sender (G62)

The diagram is divided into two temperature ranges:

  •      A -     From 0...50 °C
  •      B -     From 50...105 °C

Examples:

  • ◆ 30 °C is in range A and corresponds to a resistance of 1.5...2.0 kω
  • ◆ 80 °C is in range B and corresponds to a resistance of 275...375 ω
 
N24-0744

→ Fig.2     Resistance values for intake air temperature sender (G42)

The diagram is divided into two temperature ranges:

  •      A -     From 0...50 °C
  •      B -     From 50...105 °C

Examples:

  • ◆ 20 °C is in range A and corresponds to a resistance of 2.3...2.6 kω
  • ◆ 80 °C is in range B and corresponds to a resistance of 290...330 ω
 
N24-0907

→ Fig. 3     Removing and installing air cleaner

Removing

  • ‒ Pull cold air intake hose off air cleaner upper part.
  • ‒ Remove plugs -1-.
  • ‒ Remove securing screws -2-.
  • ‒ Pull crankcase breather hose -4- off air cleaner housing.
  • ‒ Pull off EGR valve venting hose.
  • ‒ Unclip ignition cables -5- out of air cleaner upper part.
  • ‒ Remove air cleaner.

Installing

  • ‒ Installing the air cleaner is carried out in the reverse order.
 
N24-0907
  • ‒ → Tighten securing screws -2- to
         10 Nm.
    (Ensure that the spacer sleeves -3- are first fitted into the air cleaner upper part.)
  • ‒ Ensure that the ignition cables -5- are laid so that the loops of the cables do not touch the air cleaner housing.

Notes:

When installing, ensure that the connecting pipe over the warm air intake is not touching body work.

To secure the air cleaner lower part to the air cleaner upper part self tapping screws are used. If these screws are loosened or tightened with a power tool the thread in the air cleaner upper or lower parts can be damaged.

For this reason the use of a power tool can only be used when:

  • ◆ The maximum speed of the power tool is 300 rpm.
  • ◆ The tightening torque is set to a maximum of 6 Nm.

Safety precautions > < Dismantling and assembling fuel rail with injectors