volkswagen Workshop Repair Guides

Volkswagen Workshop Service and Repair Manuals

Allocating anti-roll bar >09.99 > < Servicing front suspension
Running gear, axles, steering
Servicing front suspension
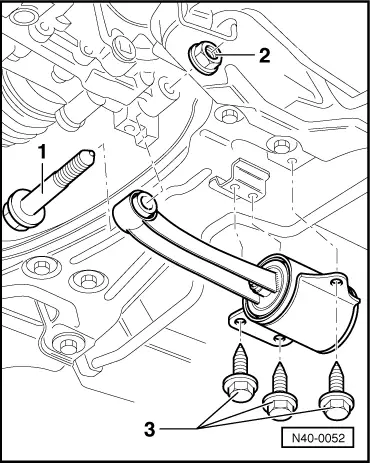
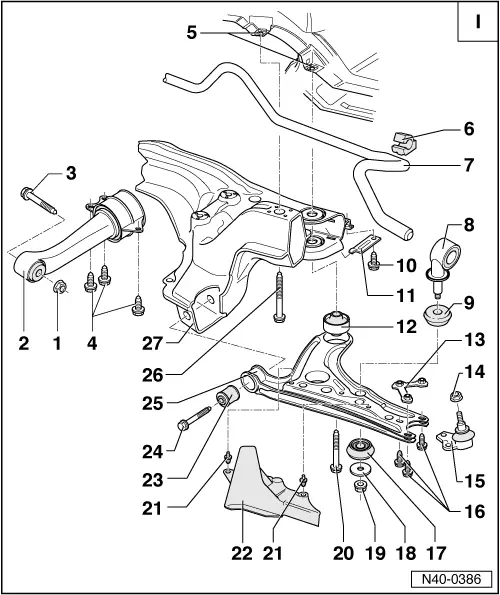
I - Assembly overview sub-frame, anti-roll bar, wishbone
 
N40-0386

Notes:

  • ◆ If a vehicle has to be moved after removing the drive shaft, first install outer joint and tighten to 50 Nm otherwise the wheel bearing will be damaged.
  • ◆ It is not permitted to carry out welding and straightening operations on load bearing suspension components or those components which locate the wheels.
  • ◆ Always renew self-locking nuts.
  • ◆ Always renew corroded nuts/bolts.
  • Hexagon nut
    • ◆ 40 Nm and turn 90° further
    • ◆ Renew each time after removing
 
N40-0386
  • Pendulum support
    • ◆ Unbolting and bolting on
      => Fig. 6
  • Hexagon head bolt
    • ◆ Renew each time after removing
  • Hexagon head bolt
    • ◆ Unbolting and bolting on
      => Fig. 6
    • ◆ Renew each time after removing
  • Captivated nut
    • The captive nut cannot be reworked. If the nut is damaged, replace complete mounting bracket.
  • Rubber mounting
    • Installation position:
    • Open side faces towards rear
 
N40-0386
  • Anti-roll bar
  • Connecting link
    • Installation position:
    • Eye with rubber bush points opposite to normal direction of travel
  • Connecting link mounting
    • ◆ Conical side to wishbone
  • 25 Nm
  • Clamp
  • Rear wishbone mounting
    • ◆ Installation position => Fig.4
    • ◆ Pressing out and in => Fig.3
  • Plate with nuts
  • 35 Nm
    • ◆ Renew each time after removing
 
N40-0386
  • Swivel joint
    • ◆ Checking
    • ◆ Removing and installing
      => Page 40-18
    • ◆ Before removing mark installation position. When renewing ball joint, set to centre of elongated hole and check track
  • Hexagon head bolt
    • ◆ 20 Nm and turn 90° further
    • ◆ Renew each time after removing
  • Connecting link mounting
    • ◆ Conical side to wishbone
  • Washer
    • ◆ Collar faces away from mounting
  • 25 Nm
    • ◆ Renew each time after removing
 
N40-0386
  • Hexagon bolt
    M 12 x 1.5 x 80
    • ◆ 50 Nm and turn 90° further
    • ◆ Renew each time after removing
  • Spreader rivet
  • Air deflector plate
  • Front wishbone mounting
    • ◆ Pressing out => Fig.1
    • ◆ Pressing in => Fig.2
  • Hexagon bolt, 70 Nm
  • Wishbone
  • Hexagon bolt
    M 12 x 1.5 x 100
    • ◆ 50 Nm and turn 90° further
    • ◆ Renew each time after removing
  • Sub-frame
 
N40-0039

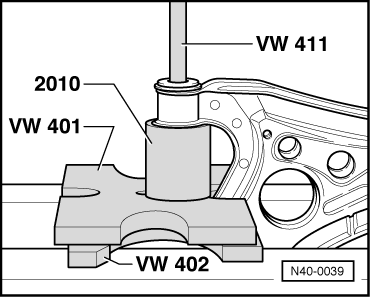
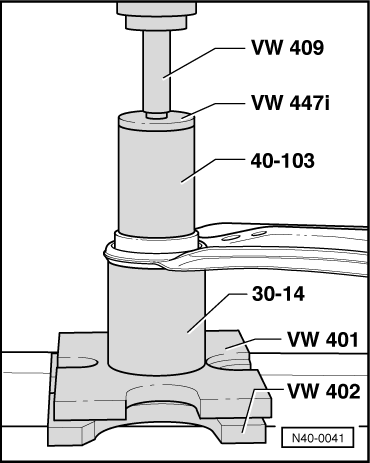
→ Fig.1     Pressing out front wishbone mounting

 
N40-0040

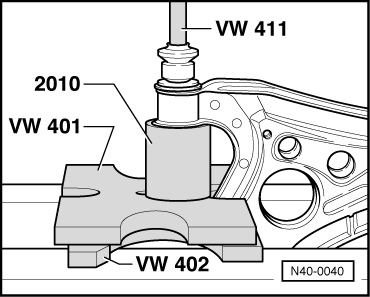
→ Fig.2     Pressing in wishbone front mounting

Note:

Before pressing in coat with acid-free lubricant e.g. soft soap or tyre assembly paste.

 
N40-0041

→ Fig.3     Pressing wishbone rear bush out

 
N40-0401

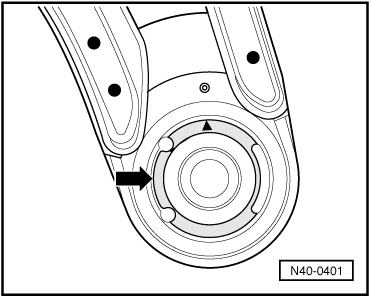
→ Fig.4     Installation position of rear wishbone mounting

One of the embossed arrows points towards the mark on wishbone.

The section of the mounting -arrow- must always point to outside of vehicle.

 
N40-0043

→ Fig.5     Pressing wishbone rear bush in

 
N40-0052

→ Fig.6     Unbolting and bolting on pendulum support

  •      1 -     Hexagon bolt
  •      2 -     Hexagon nut 50 Nm
  •      3 -     Hexagon bolt, 30 Nm
    • M8 x 20; strength class 8.1

Modification from 12.96

From vehicle identification No.: 6N ZVW 133102

modified hexagon bolts -3- have been introduced.

  • Hexagon bolts -3-, M8 x 22; strength class 9.1
    • Tightening torque; 20 Nm and turn 90° further
    • Renew hexagon bolts after each removal

Allocating anti-roll bar >09.99 > < Servicing front suspension