volkswagen Workshop Repair Guides

Volkswagen Workshop Service and Repair Manuals

Engine - fasten on the assembly stand > < Engine - remove and install
Notes on removal
Notes on removal
  Note
During the work sequence, the Battery -A- earth strap will have to be disconnected. Therefore, check first whether a code radio is installed. If so, first obtain the anti-theft system code.
–  The engine is removed toward the front, together with the transmission.
–  With the ignition turned off, disconnect the earth strap from the battery -A-.
–  All the ties opened or cut in order to remove the engine must be reinstalled at the same points upon installation.
–  Remove air filter. → Chapter.
   
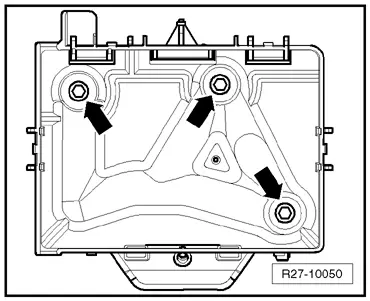
–  Remove the Battery -A- and the Battery -A- support -arrows- → Electrical equipment; Rep. Gr.27.
–  Open and close coolant reservoir cover to relieve the pressure in the cooling system.
  WARNING
Fuel system under pressure! Before disconnecting hose connections, wrap the connection points in a cloth. Then, reduce pressure and carefully disconnect the connections.
  R27-10050
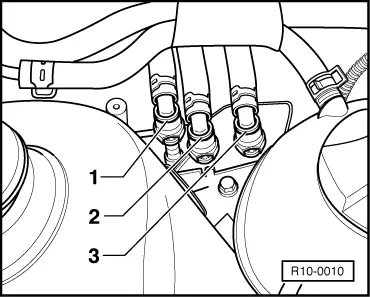
–  Disconnect the supply hose -1- as well as the return hose -2- at the connection points, and clean up the drained fuel with a cleaning cloth.
–  Disconnect the hose -3- from the Magnetic valve 1 for the activated charcoal reservoir - N80- for the activated charcoal filter.
  Note
To unlock fuel ducts, press the safety ring inwards.
–  Seal the ducts so as to prevent any dirt from entering the fuel system.
–  Observe the cleaning instructions → Chapter.
  R10-0010
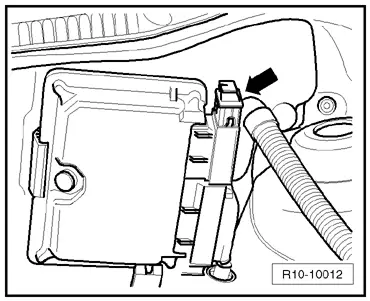
–  Disconnect the connector -arrow- from the Engine control unit -J623-.
–  Disconnect the vacuum hose from the servo brake in the vacuum tube.
–  Disconnect the vacuum and vent hoses from the engine.
–  Remove the lower engine noise insulation → General body repairs, exterior; Rep. Gr.50.
–  Remove the front tube from the exhaust manifold → Chapter.
  r10-10012
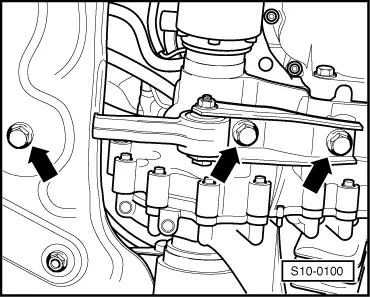
–  Remove pendulum support -arrows-.
–  Remove the transmission gearshift command: → Automatic/mechanical transmission; Rep. Gr. 34.
–  Remove the clutch hydraulic receiver cylinder: → Automatic / mechanical transmission; Rep. Gr. 30.
  Note
Clutch pedal must not be depressed.
–  Drain the cooling system → Chapter.
–  Disconnect the engine cooling system hoses with VW 5162 or Standard type clamp pliers -VAS 5024A-.
Vehicles with air conditioning
–  Remove the Poly-V belt → Chapter.
–  Remove the air conditioning compressor: → Aeration system ; Rep. Gr.87.
–  Observe additional notes and assembly works → Chapter.
Continued for all vehicles
–  Remove the right and left drive shaft from the transmission, and tie them to the body → Running gear; Rep. Gr. 40.
–  Disengage the connectors from the Radiator fan thermal switch -F18- and from the Radiator fan -V7-.
–  Disconnect and release all of the other electric harnesses necessary for the engine.
–  Remove the front panel with assembly parts: → Body - Repair ; Rep. Gr.50.
  S10-0100
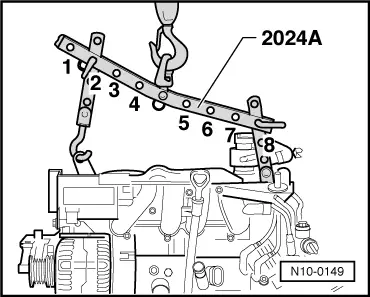
–  Install the Suspender or VW 055 -2024A- as shown in the illustration, and lift slightly using the Hydraulic hoist -V.A.G 1202 A-:
Pulley side: 3rd hole on the vertical rod and position 2 on the horizontal rod.
Flywheel side: 3rd hole on the vertical rod and position 8 on the horizontal rod.
  WARNING
Hooks and pins on the suspension device must be locked with safety locks -arrows-.
  Note
t  The horizontal rod's positions from 1...4, must face the pulley.
t  The holes in the vertical rods are counted from the hook.
  N10-0149
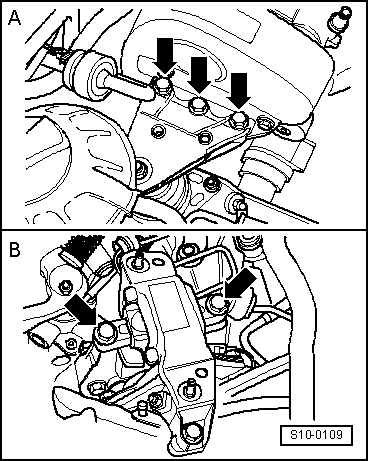
–  Remove the assembly on the transmission cushion -B- and on the engine cushion -A--arrows-.
–  Lower the assembly until it is clear of the transmission cushions.
–  Remove the assembly toward the front. If necessary, slightly turn and lower the assembly during this operation.
  Note
The assembly must be carried carefully when removed, so as to avoid damages to the body.
  S10-0109

Engine - fasten on the assembly stand > < Engine - remove and install