
Polo Mk4
| Transmission and clutch cases - repair |
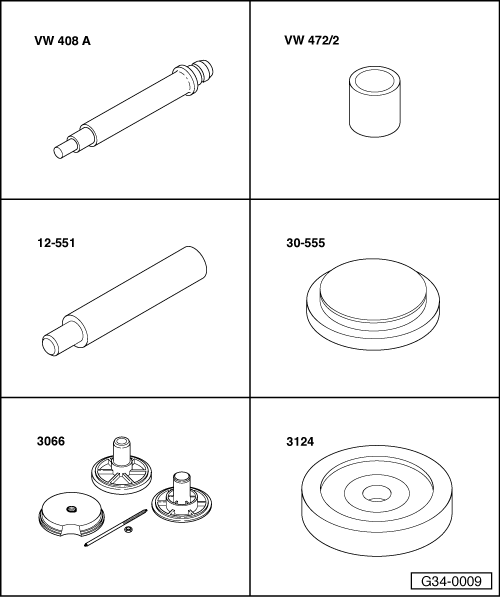
| Special tools and workshop equipment required |
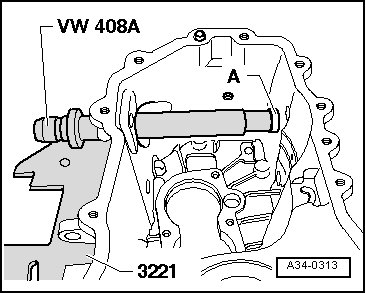
| t | Pressure pin -VW 408A- |
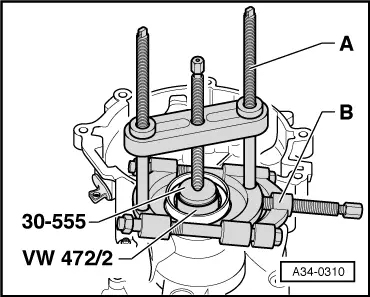
| t | Sleeve -VW 472/2- |
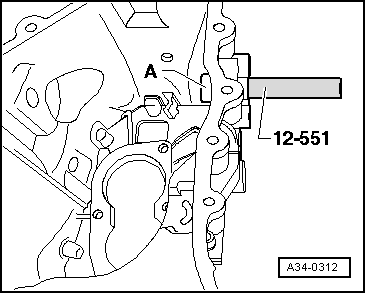
| t | Centring pin -12-551- |
| t | Pressure disc -30-555- |
| t | Assembly device -3066- |
| t | Pressure plate -3124- |

| t | Support -3221- |
| t | Multi-teeth socket SW 27 -3357- |
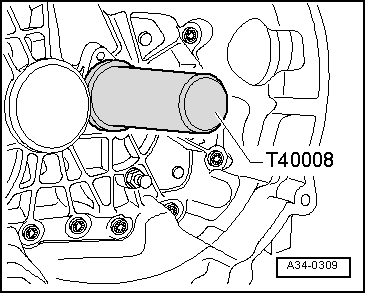
| t | Pressure tube -T 40008- |
| t | Torque wrench - 5 to 50Nm (enc. 1/2") -VAG 1331- |
| t | -2-Extractor 65 - 160 mm -KUKKO 18/1 - |
| t | -3-Spacer 12 - 75 mm -KUKKO 17/1 - |

| 1 - | Clutch case |
| q | Manufactured in aluminum or magnesium |
| q | Correspondence → Electronic Parts Catalogue |
| q | In case of replacement, always adjust differential → Chapter |
| 2 - | Sealing ring for primary shaft |
| q | Remove by leveraging with screwdriver. |
| q | Installation → Fig. |
| 3 - | Spherical pin |
| q | 20 Nm |
| q | Lubricate with grease, refer to → Chemical Materials Manual |
| 4 - | Sealing ring for the right propelling flange |
| q | Replace with the transmission installed → Chapter |
| 5 - | Bushing |
| q | For the sealing ring |
| q | Removal → Fig.. |
| q | Installation → Fig. |
| 6 - | Oil filling plug |
| q | 25 Nm |
| q | Use Multi-teeth socket SW 27 -3357- to remove and install |
| 7 - | O-ring |
| q | Always replace |
| 8 - | Speed sensor -G22- |
| 9 - | Screw |
| q | 5 Nm + 90° |
| q | Always replace |
| 10 - | Adjustment shim S2 |
| q | For the differential |
| q | Determine thickness → ChapterReference |
| 11 - | Outside ring on the tapered roller bearing |
| q | For the differential |
| q | Remove → Fig. |
| q | Install → Fig. |
| q | In case of replacement, always adjust differential → Chapter |
| 12 - | Screw |
| q | 5 Nm + 90° |
| q | always replace |
| 13 - | Outside ring on the tapered roller bearing |
| q | For the differential |
| q | Removal → Fig.. |
| q | Installation → Fig. |
| q | In case of replacement, always adjust differential → Chapter |
| 14 - | Adjustment shim S1 |
| q | For the differential |
| q | Always with 1-mm thickness |
| 15 - | Adjustment pin |
| q | 2 units |
| 16 - | Transmission case |
| q | Manufactured in aluminum or magnesium |
| q | Correspondence → Electronic Parts Catalogue |
| q | Repair → Chapter |
| q | In case of replacement, always adjust differential → Chapter |
| q | Apply Sealing putty -AMV 188 200 03- evenly on the sealing surface of the transmission case |
| 17 - | Oil draining plug |
| q | 25 Nm |
| 18 - | Sealing ring for the left propelling flange |
| q | Replace with the transmission installed → Chapter |
| 19 - | Bushing |
| q | For the selector lever shaft |
| q | Removal → Fig. |
| q | Installation → Fig. |
| 20 - | Magnet |
| q | Fastened on the case surface |
| 21 - | Reservoir lid |
| q | Apply Sealing putty -AMV 188 200 03- evenly on the sealing surface before installing |
| 22 - | Circlip |
| q | Install on the tapered roller bearing groove → Item |
| 23 - | Circlip |
| q | Install on the tapered roller bearing groove → Item |
| 24 - | Tapered roller bearing |
| q | For primary shaft |
| q | Removal → Fig.. |
| q | Installation → Fig. |
| 25 - | Tapered roller bearing |
| q | For pinion shaft |
| q | Removal → Fig. |
| q | Installation → Fig. |
|
|
|
|
 Note
Note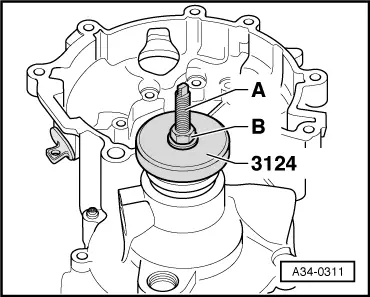
|
|
|
|