volkswagen Workshop Repair Guides

Volkswagen Workshop Service and Repair Manuals

IV - Constant velocity drive semi-shaft - repair > < Constant velocity drive semi-shaft - remove and install|Removal
Installation
Installation
Installation is performed in reverse sequence to the removal, considering the following:
  WARNING
t  Replace self-locking nuts and screws subject to angular torque
t  Check if the bellows for the drive semi-shaft are not damaged or twisted
t  Remove any residues of paint and/or corrosion on thread/splines from the external constant-velocity joint
   
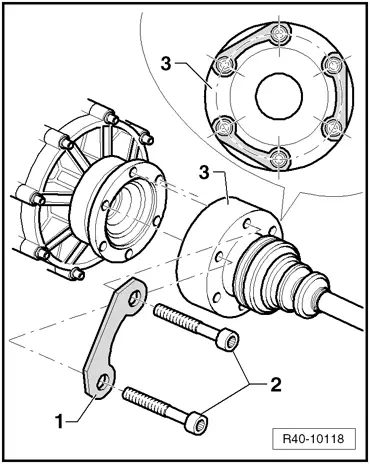
–  Install the drive semi-shaft -3- on the transmission drive flange and tighten the fastening screws -2-. Tightening torque, see → Anchor.
Continuation for vehicles without ABS:
–  Installation of the drive semi-shaft on the roller bearing case for vehicles without ABS.
Install the drive semi-shaft on the wheel roller bearing case as follows:
–  Clean the surfaces from the thread and the toothed area.
  R40-10118
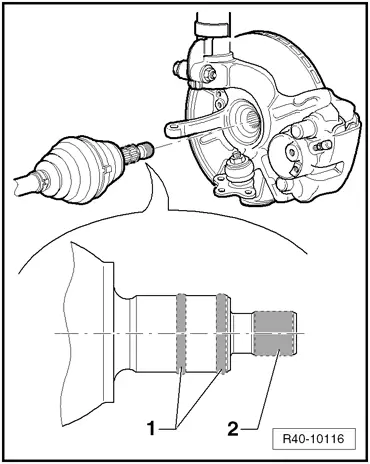
–  Lubricate the toothed area -1- using Molybdenum Paste -G 052 751 A1-. Refer to the → Chemicals Manual.
–  Lubricate the thread on the axle tip -2- and the thread on the fastening nut using Micro oil. Refer to the → Chemicals Manual.
–  Install the drive shaft on the wheel roller bearing case.
Continuation for vehicles with ABS:
–  Installation of the drive semi-shaft on the roller bearing case for vehicles with ABS.
Install the drive semi-shaft on the wheel roller bearing case as follows:
  R40-10116
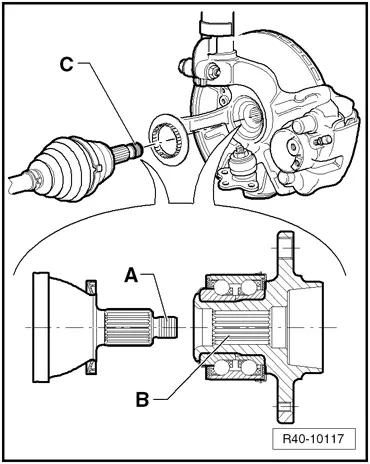
–  Clean the surface of the threads on the axle tip -A- and the toothed area -B-.
  Note
  R40-10117
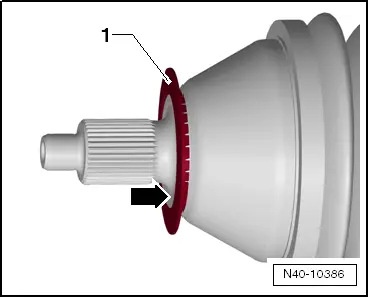
The deflector ring -1- must be aligned with the surface of the outer joint support -arrow-.
–  Install the drive shaft on the wheel roller bearing case.
Continued for all vehicles:
–  Install the fastening screws (screws on the old markings) for the wishbone swivel guide. Tightening torque, see → Anchor.
–  Install the coupling rod. Tightening torque, see → Anchor.
–  Install the steering terminal in the wheel roller bearing case. Tightening torque, see → Anchor.
–  Install the front wheel and tighten the screws. Tightening torque, see → Chapter.
–  Install and tighten the grooved nut (dodecagonal). Tightening torque, see → Chapter.
  Note
After the installation, check with a drive test check whether the car has no directional trend and if the steering wheel is not in the straight position (wheels forward). In case there is any irregularity, the geometry of the vehicle must be checked.
  N40-10386
Tightening torques
ComponentsTightening torques
Steering terminal to the wheel roller bearing case.
t  Use new fastening nuts
20 Nm + 90°
Wishbone swivel guide
t  Use new fastening screws
20 Nm + 90°
Rollover bar coupling rod
t  Use new fastening nuts
40 Nm
Thrust flange for shaft semi-drive
t  Use new fastening screws
Pre-torque to 10 Nm and then to
20 Nm + 180°


IV - Constant velocity drive semi-shaft - repair > < Constant velocity drive semi-shaft - remove and install|Removal