volkswagen Workshop Repair Guides

Volkswagen Workshop Service and Repair Manuals

Electrohydraulic steering boxG250 - remove and install > < Electrohydraulic steering box - remove and install|Removal
Installation
Installation
Installation is performed in reverse sequence to the removal, considering the following:
  WARNING
Replace self-locking nuts and screws subject to angular torque
t  
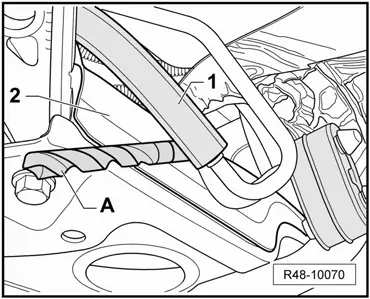
Use new sealants for the hoses/ducts
t  
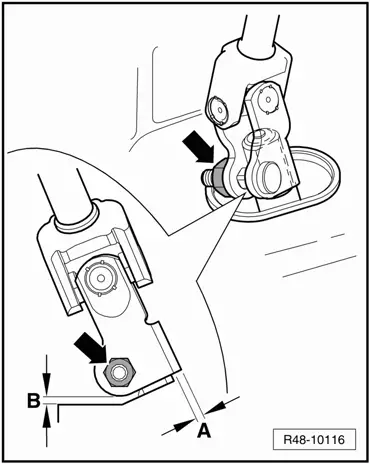
Lubricate the steering box joint with lubricant such as soap, for example, before installing the steering box
t  
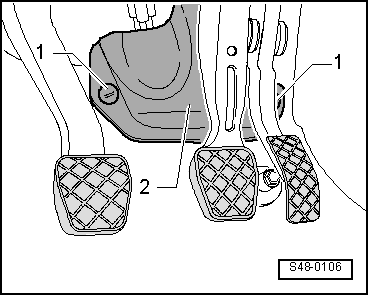
After fitting the steering box in the universal joint of the column, make sure that the joint is against the assembly plate, without twisting, and that it seals the opening for the pedal area correctly. There may be noises and even water infiltration
t  Make sure that the sealing surfaces are clean
t  When replacing the electrohydraulic steering box, also replace the steering yoke bellows
Before installing the auxiliary frame (sub-frame) screws, position the electrohydraulic steering box on the auxiliary frame and install the screws for the electrohydraulic steering box.
–  Install the auxiliary frame (sub-frame) → Chapter.
–  Install the steering box to the auxiliary frame. Tightening torque, see → Anchor.
–  Install the steering linkage bar to the steering arm. Tightening torque, see → Anchor.
–  Install the Electrohydraulic steering box -G250- → Chapter.
–  Install the return hose and tighten the connecting screw.
   
–  If the pressure duct extends beyond the auxiliary frame, the distance between the pressure duct and the auxiliary frame must be adjusted.
–  The distance between the pressure duct -1- and the auxiliary frame -2- must be of 10 mm.
–  To perform this operation, use a 10 mm drill bit -A- between the pressure duct -1- and the auxiliary frame -2-.
–  Then, tighten the pressure duct hollow screw → Item.
  Note
Make sure that the pressure duct does not interfere with the body and the auxiliary frame
–  Install the wheels and tighten the fastening screws → Chapter.
–  Fill with new hydraulic oil, using a hose with 400 to 500 mm of length and a funnel.
–  Use Hydraulic oil -G 004 000 M2-. Refer to the → Chemicals Manual.
–  Install the universal joint on the steering box pinion.
  Note
  R48-10070
Measurement -A- should be parallel to the steering box pinion axle and measurement -B- should be the minimal in order not to interfere with the lining.
–  Tighten the fastening nut -arrow-. Tightening torque, see → Anchor.
  R48-10116
–  Install the cover -2- and the plastic nuts-1-.
–  Install the Battery -A- → Electrical equipment; Rep. gr.27.
–  Connect the Battery -A- → Electrical equipment; Rep. gr.27.
–  Bleed the steering system → Chapter
–  Check the hydraulic oil level → Chapter.
  Note
After the installation, check with a drive test check whether the car has no directional trend and if the steering wheel is not in the straight position (wheels forward). In case there is any irregularity, the geometry of the vehicle must be checked.
–  Check the alignment → Chapter.
  S48-0106
Tightening torques
ComponentsTightening torque
Steering terminal to the wheel roller bearing case.
t  Use new fastening nuts
20 Nm + 90°
Rollover bar coupling rod
t  Use new fastening nuts
40 Nm
Wishbone swivel guide
t  Use new fastening screws
20 Nm + 90°
Steering box steering column
t  Use new fastening screws
20 Nm + 90°
Steering box to auxiliary frame
t  Use new fastening screws
50 Nm + 90°


Electrohydraulic steering boxG250 - remove and install > < Electrohydraulic steering box - remove and install|Removal