volkswagen Workshop Repair Guides

Volkswagen Workshop Service and Repair Manuals

Dismantling and assembling gearbox housing > < Dismantling gearbox
Assembling gearbox
Assembling gearbox
Clean sealing surfaces on both gearbox halves.
–  First install outer input shaft.
l  External input shaft must be prepared for this in advance. 1 new bearing with correct retaining ring must already be attached → Chapter.
   
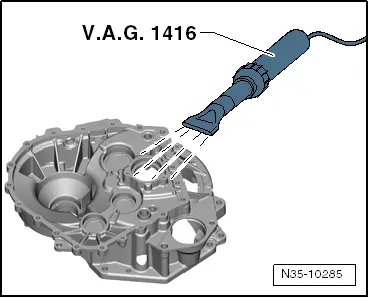
–  Heat clutch housing in area of outer input shaft to approx. 100 °C using a hot air blower.
l  If housing has been heated correctly then outer input shaft can be inserted by hand up to stop. This is done without force.
If bearing jams then clutch housing is »still too cold«.
Do not continue pressing!
–  Remove shaft again, heat clutch housing correctly.
  N35-10285
–  After cooling down: tighten 3 bolts.
Torque setting 8 Nm + 90°
–  Turn clutch housing around.
  N35-10264
–  Drive in outer, »new« oil seal with a plastic mallet until flush with clutch housing.
  WARNING
Only drive in oil seal until flush, in order to avoid closing off oil drilling located behind it. Otherwise, bearing can no longer be supplied with enough oil.
  N30-10271
–  Turn clutch housing back around.
  N35-10264
–  Insert inner input shaft with roller bearing.
Bearing is not allowed to be broken. Oil bearing.
–  Shift all locking collars of output shafts 2 and 3 »downwards«.
  N35-10287
–  Insert selector fork for 6th gear and reverse gear.
–  Fork cannot be turned in its position unless it is »all the way down«.
  N35-10450
–  Insert selector fork for 5th and 7th gears.
This selector fork can be inserted very easily if you raise the other selector fork a little.
  N35-10451
For the following steps:
Tapered roller bearings are destroyed very quickly if the cage is bent due to being inserted forcefully or knocked.
  N35-10447
–  Insert output shaft 2.
–  Watch out for both locking collars. Mouth »top« and mouth »bottom«-arrow- must be inserted correctly.
–  Output shaft 2 is placed on clutch housing, not in bearing race.
  N35-10452
–  Insert output shaft 3.
–  Watch out for mouth of selector fork and locking collar.
This shaft is also »placed« on clutch housing.
  N35-10453
–  Install differential.
–  Make sure that you do not strike bearing against clutch housing.
–  Carefully insert output shafts into bearings.
–  Raise inner input shaft slightly. This allows output shaft 2 to find its installation position.
–  Take out guide pin -3411-.
  N35-10454
–  On output shaft 1, shift »upper« locking collar upwards.
  N35-10455
–  Insert output shaft 1 »at an angle from above«.
Shaft should remain at an angle.
This is because selector forks must still be installed before shaft is set in installation position.
  N35-10456
–  First insert selector fork for 2nd and 4th gears into collar then swivel it to its guide.
  N35-10457
–  Insert selector fork for 1st - 3rd gears onto collar then swivel it to its guide.
  N35-10458
–  Raise inner input shaft slightly. In this way, you can move output shaft 1 into its installation position.
–  After insertion, position all selector forks in neutral.
–  Make sure all selector forks and pinion shafts are correctly seated.
1 - Turn shafts.
2 - Look at selector forks.
3 - Turn gears on shafts a little back and forth. Also on differential.
4 - Grip inner and outer input shaft from below. Turn shafts once.
l  It must be possible to turn all parts back and forth without catching.
  N35-10459
–  Insert magnet.
  N35-10247
–  Insert dowel sleeves.
It is essential to leave gearbox in this position.
  N35-10297
–  Mount support bridge -T10323- from below.
–  Turn spindle against inner input shaft until finger-tight.
  N35-10304
Shaft should only be supported. It is only allowed to be pushed up until gear for 7th gear on inner input shaft -A- touches synchromeshed gear for 3rd gear on output shaft 1 -B-.
It is adequate for spindle to touch shaft.
This prevents inadmissible force being applied to gearbox later on when gearbox housing is put on. Force should be absorbed by support bridge -T10323-.
–  Drip oil onto all exposed tapered roller bearings.
–  Prepare gearbox housing to be put on.
l  Make sure that gearbox housing is completely assembled.
l  Flange surface is cleaned.
l  Oil guide is installed.
  N35-10460
–  Apply a bead of assembly adhesive -AMV 174 003 02- onto flange of clutch housing.
l  »Thickness of adhesive bead«: maximum 1 millimetre.
Adhesive is applied with hand-cartridge gun -V.A.G 1628-.
–  Adhesive bead should seal oil space. Therefore, do not spray around holes.
–  Put on gearbox housing.
  Note
Do not grip cleaned flange surfaces when putting on gearbox housing.
  N35-10298
–  Make sure that selector forks locate in their sockets.
  N35-10305
–  Place large inner diameter of tube -VW 416 B- onto inner ring.
–  A second mechanic should hold gearbox housing in position as early as possible »when pressing on«.
–  Apply targeted blows with a plastic hammer to drive inner input shaft into its bearing.
–  Make sure seating on guide bushes is correct.
  N35-10306
–  Take a look at joint of retaining ring.
Ring is »narrower at top«. Its installation position is as well.
The retaining ring pliers also engage better like this.
  N30-10172
–  Install new retaining ring.
  N35-10246
–  Remove support bridge -T10323- from below.
  N35-10304
–  Screw new connecting bolts against gearbox housing. Do not tighten them yet.
–  A second mechanic turns gearbox whilst housing halves are being tightened.
  N35-10243
–  To do this: engage 1st gear.
  N34-11272
–  Use hub of clutch for turning.
This prevents tapered roller bearings from being damaged whilst being »seated in bearing seat«.
–  Tighten new connecting bolts.
Torque setting
Steel bolts: 20 Nm + 45°
Aluminium bolts: 10 Nm + 90°
–  Set gearbox to neutral.
  N35-10462
–  Knock cover of „inner input shaft“ in until flush.
  N35-10307
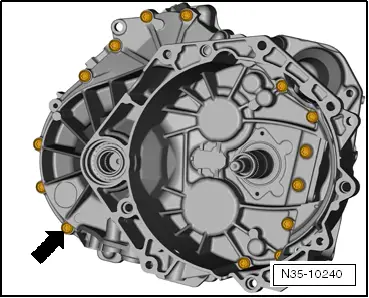
–  Install connecting bolts of housing halves at clutch end.
Torque setting
Steel bolts: 20 Nm + 45°
Aluminium bolts: 10 Nm + 90°
  N35-10240
–  Install drain plug.
  N34-11371
–  Install oil seals of input shafts → Chapter.
If large oil seal has already been renewed, you do not need to renew it again.
  N35-10308
–  Install parking lock.
–  Install new bolts.
Torque setting
  N35-10250
30 Nm
–  Installing mechatronic unit → Chapter.
–  Install flange shafts or stub shafts, installing new sealing rings as you do so → Chapter.
–  Install dual clutch → Chapter.
  N35-10239
–  Fill 1.7 litres of oil through parking lock.
  N35-10239
–  Install lever and cover.
  N34-11198
–  Fit cable support bracket.
Torque settings:
8 Nm
  N35-10238
–  Use your hand to press lever to stop in direction of cable support bracket.
  N34-11372
–  Put both breather caps -arrows- back on.
–  Take gearbox off assembly stand.
Assembly of gearbox is completed.
  N30-10235

Dismantling and assembling gearbox housing > < Dismantling gearbox