volkswagen Workshop Repair Guides

Volkswagen Workshop Service and Repair Manuals

Removing and installing condensate drain connection > < Removing and installing fresh air blower series resistor with overheating fuse
Removing and installing heat exchanger
Special tools and workshop equipment required
   
t  Drip tray for workshop hoist -VAS 6208-
  W00-10228
t  Hose clamps up to 25 mm -3094-
  W00-0079
t  Engine bung set -VAS 6122-
t  Compressed air gun, commercially available
Removing
–  Disconnect battery → Electrical system; Rep. gr.27.
  WARNING
The cooling system remains pressurised while the engine is warm!
Danger of scalding due to hot steam and coolant.
Reduce excess pressure by covering the cap of the coolant expansion tank with cloths and opening it carefully.
  W00-10435
–  Mark and clamp off coolant hoses in engine compartment using hose clamps up to 40 mm -3093- and remove from heat exchanger.
  N80-0373
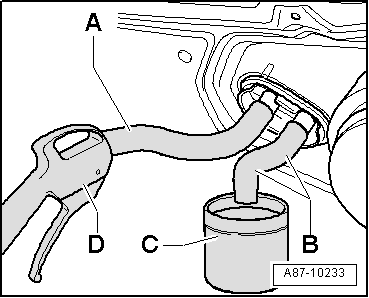
–  Push a piece of hose -A- and -B- onto both connections to heat exchanger.
–  Hold a container -C- under hose from lower connection -B-.
–  Using a compressed air gun -D-, carefully blow coolant out of heat exchanger into container -C- via hose -A-.
–  Remove heater and air conditioner unit → Chapter.
–  Dismantling heater and air conditioning unit → Chapter.
–  Remove heat exchanger.
Installing
Installation is carried out in the reverse order. When installing, note the following:
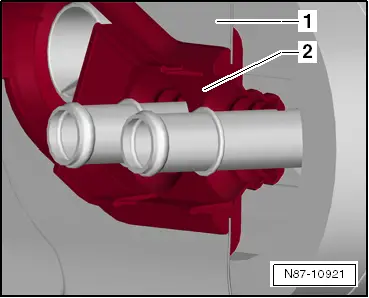
–  Pay attention to the installation position of coolant hoses and gasket between heat exchanger and plenum chamber bulkhead .
  A87-10233
Gasket between heat exchanger and plenum chamber bulkhead
  Note
After renewal of heat exchanger, renew coolant.
–  Fill coolant → Rep. gr.19.
  N87-10921

Removing and installing condensate drain connection > < Removing and installing fresh air blower series resistor with overheating fuse