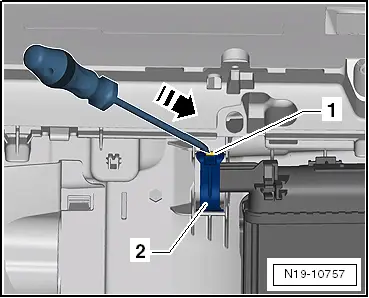
volkswagen Workshop Repair Guides

Volkswagen Workshop Service and Repair Manuals

Removing and installing radiator cowling with radiator fan > < Assembly overview - radiator, radiator fan
Removing and installing radiator
   
Removing and installing radiator
Special tools and workshop equipment required
t  Refractometer -T10007-
t  Drip tray for workshop hoist -VAS 6208-
t  Hose clip pliers -VAS 6340-
t  Cooling system charge unit -VAS 6096-
t  Adapter for cooling system tester -V.A.G 1274/8-

   
t  Refractometer -T10007 A-
Removing
–  Removing and installing front bumper → General body repairs, exterior; Rep. gr.63.
  WARNING
Steam may escape when expansion tank is opened. Wear eye protection and protective clothing to avoid eye injuries and scalding. Cover cap with cloth and open carefully.
–  Drain coolant → Chapter.
  W00-10827
–  Disconnect connector -2- from wiring harness -1- of radiator fan -2-.
–  To do this, unlock locking tab -arrow A-.
–  Disconnect connector -2- in -direction of arrow B-.
  N19-10756
Vehicles with radiator fan thermal switch -F18-
–  Unlock and disconnect connector -1- from radiator fan thermal switch -F18-.
  N19-10762
Continuation for all vehicles
–  Unlock locking tab -1- on filler neck of washer fluid reservoir in -direction of arrow A-.
–  Pull filler neck -1- of washer fluid reservoir off in -direction of arrow B-.
  N19-10761
–  Loosen clamps -arrows- and disconnect coolant hoses -1- at top of radiator.
–  Pull connectors off thermal switch and radiator fan.
–  Remove front left headlights → Electrical system; Rep. gr.94
Vehicles with air conditioner
  Note
To prevent damage to condenser or to refrigerant lines/hoses, ensure that the lines and hoses are not stretched, kinked or bent.
–  Remove condenser → Heating, air conditioning; Rep. gr.87.
  N19-10754
Continuation for all vehicles
–  Unlock retainers -2- on left and right side by pushing locking tab -1- in -direction of arrow- using a screwdriver.
  N19-10757
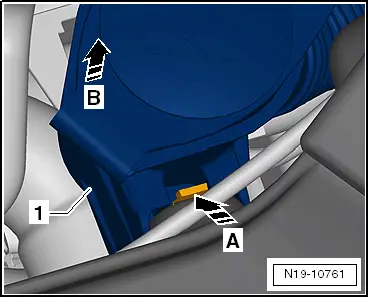
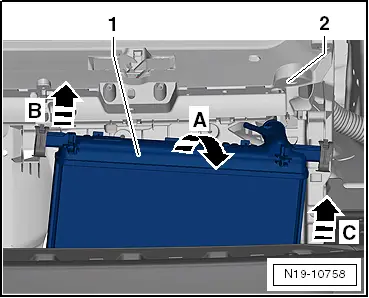
–  Tilt radiator -1- in -direction of arrow A-.
–  Pull right side of radiator -1- upwards in -direction of arrow B-.
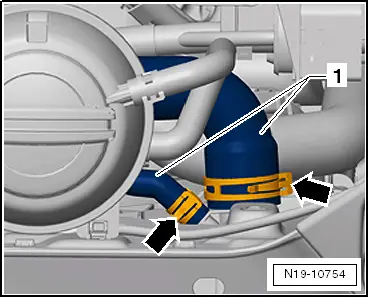
–  Tilt radiator -1- further forwards in -direction of arrow A- to release it from lock carrier.
–  Pull radiator -1- out of bottom mountings in -direction of arrow C-.
If the radiator is to be renewed:
–  Remove radiator cowl with radiator fan → Chapter.
–  Remove radiator fan thermal switch -F18- → Chapter.
Installing
Install in reverse order. In the process, note the following:
Vehicles with air conditioner
  Note
To prevent damage to condenser or to refrigerant lines/hoses, ensure that the lines and hoses are not stretched, kinked or bent.
–  Install condenser → Heating, air conditioning; Rep. gr.87.
–  Replenish coolant → Chapter.
–  Observe electrical connections and routing → Current flow diagrams, Electrical fault finding and Fitting locations.
–  Install front bumper → General body repairs, exterior; Rep. gr.63.
  N19-10758

Removing and installing radiator cowling with radiator fan > < Assembly overview - radiator, radiator fan