audi Workshop Repair Guides

Audi Workshop Service and Repair Manuals

Checking fuel gauge senderG > < Checking delivery rate of fuel pump
Removing and installing fuel delivery unit
Special tools and workshop equipment required
   
t  Union nut tool -3217-
  W00-0291
t  Removal wedge -3409-
Removing
–  Observe safety precautions → Chapter.
–  Observe rules for cleanliness → Chapter.
  WARNING
Large amounts of fuel can escape.
The fuel tank must not be more than 3/4 full when removing the fuel delivery unit, otherwise a large amount of fuel will escape.
–  Drain fuel tank if necessary → Chapter.
–  Move front right seat all the way forwards.
  W00-0016
–  Remove rear seat bench → Rep. gr.72.
–  Unclip cover -1- for fuel tank flange at retainers -arrows- using removal wedge -3409-.
  A20-10835
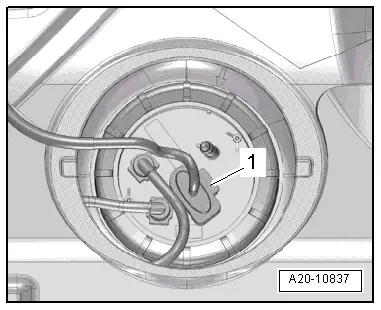
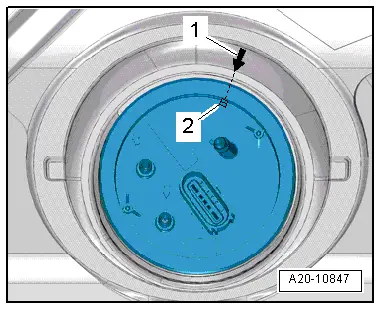
–  Release retainer catch and unplug electrical connector -1- on flange.
  WARNING
The fuel can become extremely hot. This can cause injuries.
t  In extreme cases the fuel lines and the fuel can reach a temperature of 100 °C. Allow the fuel to cool down before disconnecting the lines - danger of scalding.
t  Wear protective gloves.
t  Wear safety goggles.
Risk of injury - fuel system operates under high pressure.
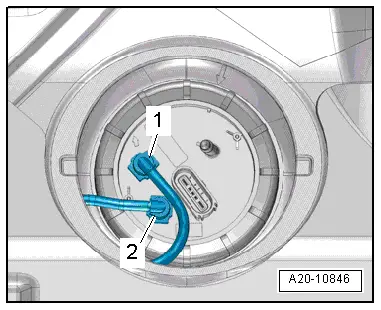
To reduce the pressure in the fuel system, wrap a clean cloth around the connection and carefully loosen the connection.
  A20-10837
–  Disconnect fuel lines -1- and -2- on flange (press release tab).
  A20-10846
  WARNING
Large amounts of fuel can escape.
The fuel tank must not be more than 3/4 full when removing the fuel delivery unit, otherwise a large amount of fuel will escape.
–  Unscrew union nut using union nut tool -3217-.
  A20-0708
–  Pull flange out of opening in fuel tank.
–  Take seal out of opening in fuel tank.
  WARNING
Safety risk from escaping fuel: the fuel delivery unit is still filled.
Use a cloth to catch escaping fuel.
–  Carefully pull fuel delivery unit -1- with fuel gauge sender out through opening in fuel tank.
  Note
When removing fuel delivery unit, make sure you do not bend float arm of fuel gauge sender -G-.
Installing
l  Tightening torque → Chapter „Fuel delivery unit and fuel gauge sender - exploded view“
Remaining installation steps are carried out in reverse sequence; note the following:
  Note
t  Renew seal.
t  Take care not to bend float arm of fuel gauge sender -G- when fitting fuel delivery unit.
–  Carefully guide fuel delivery unit -1- with fuel gauge sender in through opening in fuel tank.
  A20-10753
–  Install new seal for flange (seal must be installed dry).
  Caution
Leakage risk
The seal must not be pinched or damaged when installing the flange.
–  Press flange down against spring pressure and turn flange to installation position.
l  Lug -2- on flange must align with arrow -1- on fuel tank.
–  Connect fuel lines so they engage audibly.
–  Plug in electrical connector and make sure it is correctly engaged.
–  Install rear seat bench → Rep. gr.72.
–  Put at least 5 litres of fuel into tank after installing fuel delivery unit.
  A20-10847

Checking fuel gauge senderG > < Checking delivery rate of fuel pump