audi Workshop Repair Guides

Audi Workshop Service and Repair Manuals

Removing and installing the recirculated air flap positioning motor V113 > < Removing
Installing
Installing
   
–  Insert the positioning motors into the bracket ( → Chapter):
–  Temperature flap positioning motor -V68--C- with black gear wheel
–  Defrost flap positioning motor -V107--C- with white gear wheel
–  Connect the contacts “4” (or “5”) and “6” in both positioning motor connectors -B- and -D- to a 12 V DC power source one after another, the positioning motor moves into one direction up to the limit stop; interchanging positive and negative causes a change in rotation direction. Use an adapter cable -A- for this purpose → Chapter.
–  Move the gear wheels on positioning motors -C- and -E- to the stop positions shown in the illustration)
  A87-0362
–  Move the levers -A- (for the defrost flap) and -B- (for the temperature flap) on the air distributor housing of the air conditioner to the position shown.
  Note
Pay attention to the shorter tooth on both levers and the larger tooth space at this location.
  A87-0363
–  Insert the positioning motor bracket into the retainer -E-
  A87-0361
–  Now move the defrost flap positioning motor -V107--A- with the lever -B- and the temperature flap positioning motor -V68--C- with the lever -D- together. Ensure, in particular, that the gear wheels are in the right position relative to the levers.
  Note
If the gear wheel and lever do not coincide as specified, the positioning motor becomes blocked as soon as the large tooth no longer comes into contact with a broad tooth space.
  A87-0364
–  Lock the bracket in place with the catches -C- and -D- on the air-distributor housing
–  Then proceed as follows to check the function of the positioning motors:
  A87-0361
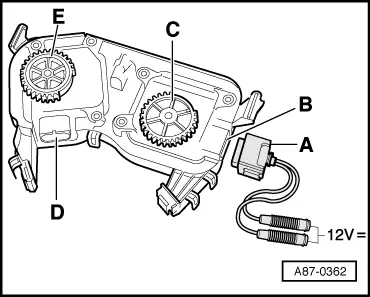
–  Connect the contacts “4” (or “5”) and “6” in the connector for each positioning motor to a 12V DC power source in consecutive order (using an adapter cable → Chapter).
–  Monitor the movement of the positioning motor. Wait until the positioning motor has reached an end position.
–  Now interchange the positive and negative connection in order to change the direction of rotation of the positioning motor. Wait until the positioning motor has reached an end position.
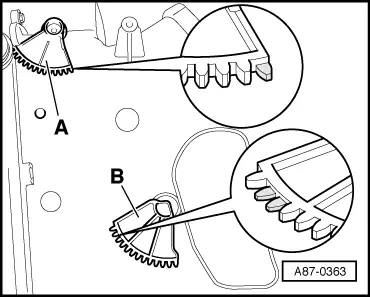
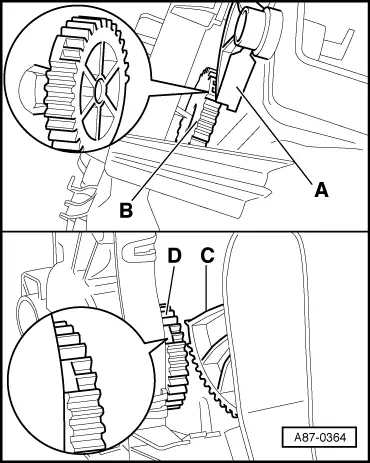
  Note
If the gears and levers of both positioning motors do not match as specified, the positioning motor becomes blocked or the air conditioner will emit noise during operation because the flaps are not closing properly.
Then reinstall all the parts removed in reverse order, paying attention to the following:
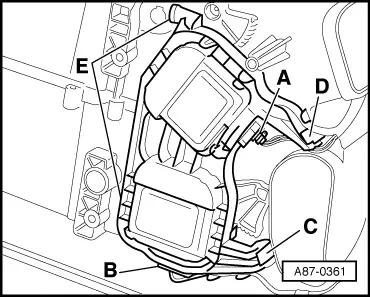
–  Lay the wiring harness so that it cannot come into contact with the moving components (e.g. positioning motor lever).
–  Interrogate fault memory → Chapter, erase fault memory → Chapter, and perform basic setting → Chapter.
  A87-0362

Removing and installing the recirculated air flap positioning motor V113 > < Removing