| –
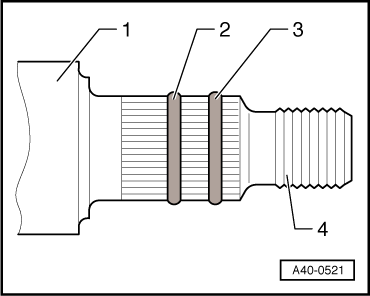
| Apply two beads of locking fluid -D 185 400 A2- on splines as illustrated. Bead diameter approx. 2 mm. |
| 2 - | Bead approximately in centre of splines |
| 3 - | Bead near beginning of splines |
| 4 - | Do not grease thread on outer joint (stub axle). |
| –
| Insert swivel joint in wheel bearing housing. |
| –
| Install new self-locking nut, counterholding with Torx key T40. Tightening torque: → Item. |
| –
| Insert drive shaft in wheel bearing. |
| –
| Secure swivel joint to wishbone (bolts on old marks). Tightening torque: → Item. Keep to specified sequence when installing bolts: |
| 1.
| Start threads of all bolts. |
| 2.
| Tighten centre bolt to specified torque. |
| 3.
| Tighten the two outer bolts to specified torque. |
| Use new locking plate with nut. |

Note! | Ensure sealing boot is not damaged or twisted. |
| –
| Tighten 12-point nut using 36 mm socket -T10125- → Item. |
| After installation, check position of steering wheel by test-driving vehicle. |
| Wheel alignment must be checked and adjusted if steering wheel is not in central position when driving straight-ahead. |
| –
| Check and adjust wheel alignment → Chapter. |
|
|
|
