Audi Workshop Service and Repair Manuals
HOME
FEATURES
MENU
INDEX
ABOUT US
Removing and installing centre armrest >
< Removing driver's storage compartment
A3 Mk1
Body
General Body Assembly, Interior (Repair groups 68, 69, 70, 72, 74) / Interior equipment / Storage compartments/covers
Removing and installing lower section of centre console
General Body Assembly, Interior (Repair groups 68, 69, 70, 72, 74)
Storage compartments/covers
Removing and installing lower section of centre console
◆
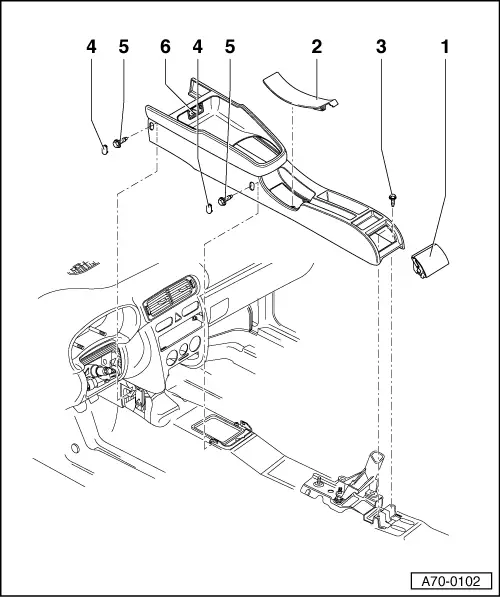
Removing
‒
Open cover for ashtray -1- and pull ashtray up and out.
‒
Remove bolts -3- (2x).
‒
Remove cover in front of handbrake.
‒
Lever out cover -4- (4x).
‒
Unscrew bolts -5- (4x).
‒
If necessary, remove centre armrest =>Page
68-13
‒
Manual gearbox: Press bottom of gaiter forward and fold upwards.
‒
Cut through hose clip with side cutting pliers and pull gaiter up and off together with gear lever knob.
‒
Use new hose clip when installing.
‒
Move gear lever to rear position.
‒
Automatic gearbox: Move selector lever to rear position.
‒
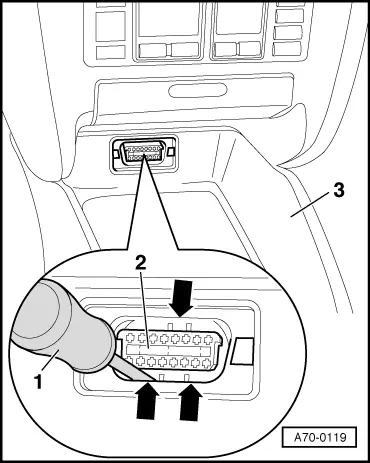
Unclip diagnostic connector => Fig.
2
‒
Pull handbrake lever up as far as possible.
‒
Lift rear of console and pull upwards to remove.
Rear ashtray
Cover in front of handbrake
Bolts (2x)
‒
Tightening torque 4 Nm
Cover (4x)
Bolts (4x)
‒
Tightening torque bolts -5- front 1.5 Nm.
‒
Tightening torque bolts -5- rear 4 Nm.
Diagnostic connector
Fig.2 Removing diagnostic connector
‒
Unclip diagnostic connector cover.
‒
Use screwdriver -1- to lever out clips (arrows) at diagnostic connector -2- (3x).
‒
When installing, diagnostic connector -2- must clip in audibly.
Body
General Body Assembly, Interior (Repair groups 68, 69, 70, 72, 74) / Interior equipment / Storage compartments/covers
Removing and installing lower section of centre console
Removing and installing centre armrest >
< Removing driver's storage compartment