audi Workshop Repair Guides

Audi Workshop Service and Repair Manuals

Removing and installing upper B-pillar trim > < Trims with head airbag
General Body Assembly, Interior (Repair groups 68, 69, 70, 72, 74)
Trims with head airbag
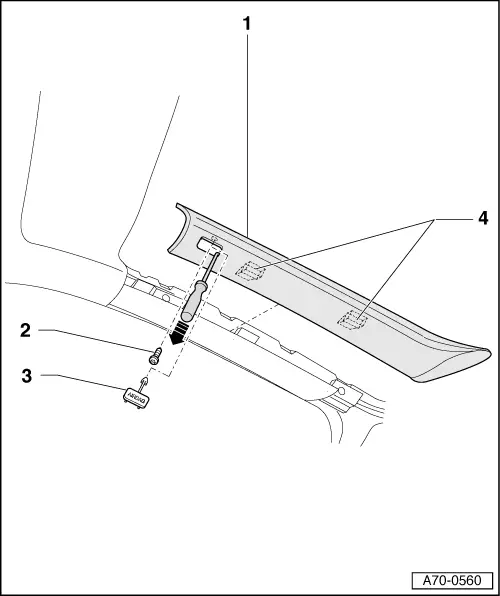
Removing and installing upper A-pillar trim
Important=>
  • Upper A-pillar trim
  • ◆ Removing
    • ‒ Lever off cover -3-.
    • ‒ Let cover -3- hang off trim -1-.
    • ‒ Unscrew bolt -2-.
 
A70-0560
    • ‒ Use screwdriver -5- (improvised tool => Fig.1) to grip A-pillar trim -1- in cut-out and unclip trim at upper clamp in direction of arrow.

Note:

When disassembling trim of A-pillar -1- only pull on side facing window.

    • ‒ Unclip trim -1- at clips -4- (2x).
  • ◆ Installing
    • ‒ Detach trim cap -3- from trim -1-.
    • ‒ Attach trim -1- at clamps -4-.

Note:

When installing of trim of A-pillar only press, do not knock onto side facing windscreen.

 
A70-0560
    • ‒ Press on trim -1-.
    • ‒ Attach and insert trim cap -3-.
  • Bolt
    • ‒ Tightening torque 4 Nm
    • ◆ Self-locking
    • ◆ Replace
    • ◆ Threaded bores for bolts must always be cleaned (e.g. with a thread tap).
  • Trim cap
  • Clip (2x)
  • Flat screwdriver

Fig.1    Bending screwdriver

 
A70-0565
  • ‒ Bend a flat screw driver with dimensions A approx. 3 mm and B approx. 10 mm.

Removing and installing upper B-pillar trim > < Trims with head airbag