audi Workshop Repair Guides

Audi Workshop Service and Repair Manuals

Removing and installing radiator fan control unit -J293 > < "Zexel" compressor
Heating, Air Conditioner
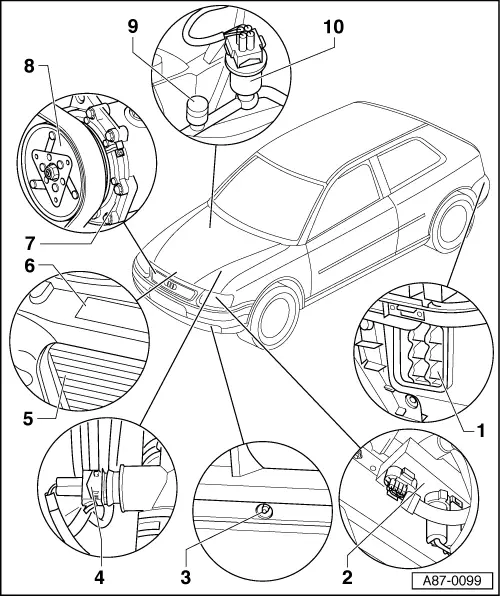
Components for the control and regulation of the air conditioner (in the engine compartment)
 
A87-0099

Notes:

  • ◆ After completing repair work, always interrogate and erase fault memory, perform basic setting, and check the encoding of -E87.
  • ◆ To drain the refrigerant circuit, bring the vehicle to a VW and Audi air-conditioning service centre.
  • ◆ Check refrigeration capacity .
  • ◆ Refrigerant circuit .
  • ◆ All components marked with * are actuated during the final control diagnosis .
 
A87-0099
  • ◆ Note the different codes for operating and display unit -E87 => Page 01-75.
  • ◆ An electrical check can be performed on all components marked with ** .
  • Vent frame for forced air extraction
    • ◆ The sealing lips on the vent frame must be able to move freely and close by themselves (checking ).

Note:

In order for the vehicle interior ventilation to work properly, the air ducts which run through the luggage compartment trim and lead to the two vent frames (under the bumper on the left and right) must be unobstructed.

 
A87-0099
  • Radiator fan control unit -J293 **.
    • ◆ Radiator fan control unit -J293 versions and vehicle wiring differ for vehicles with pressure switch -F129 and high-pressure sensor -G65.

=> Parts List

=> Current Flow Diagrams, Electrical Fault-Finding and Fitting Locations

    • ◆ Control unit -J293.
    • ‒ Switches radiator fans -V7 to 1st and 2nd speed
    • ‒ Actuates AC magnetic clutch -N25.
    • ‒ Processes the square-wave signal of high-pressure sensor -G65 and, if the refrigerant circuit pressure is OK, sends a positive signal to -E87 (only in vehicles with high-pressure sensor -G65).
 
A87-0099
    • ◆ Removing and installing
  • Ambient temperature sensor -G17 **
    • ◆ Removing and installing:
      Remove noise insulation, detach connector and unclip sensor from mount in bumper.
  • Refrigerant temperature control switch (too hot) -F14 **
    • ◆ Switches off compressor in the event of excessively high refrigerant temperatures.
    • ◆ Only installed in vehicles with pressure switch -F129.

=> Current Flow Diagrams, Electrical Fault-Finding and Fitting Locations

 
A87-0099
  • Condenser
Warning!
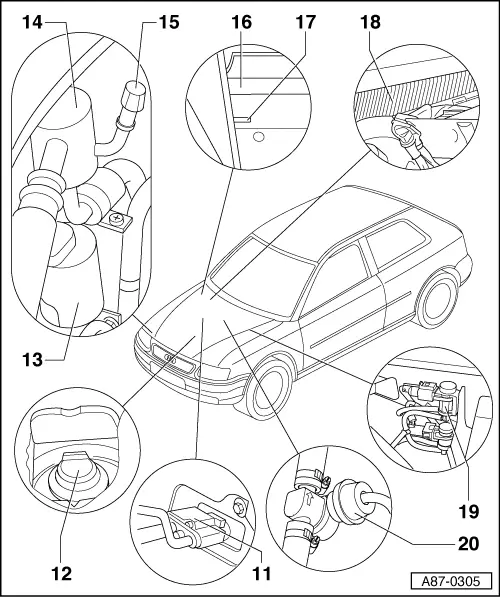
The condenser may be removed only if the refrigerant circuit is empty.
  • Adhesive label for air conditioner
    • ◆ Indicates filling quantity and type of refrigerant
  • Compressor
    • ◆ Removing and installing compressor bracket

=> Relevant Workshop Manual Engine Mechanical Components

    • ◆ Removing and re-attaching compressor from/to bracket
    • ‒ 4 cyl petrol engine.
    • ‒ 4 cyl diesel engine => Page 87-24.
 
A87-0099
Warning!
The compressor may be removed only if the refrigerant circuit is empty.
  • Air conditioner magnetic clutch -N25
    • ◆ Repairing

Notes:

  • ◆ Removing and installing ribbed belt.

=> Relevant Workshop Manual Engine; Mechanical Components; Repair group 13

  • ◆ Mark direction of ribbed belt before removing - reversing the direction of rotation can destroy the belt.
  • Service connection
    • ◆ High-pressure side
    • ◆ For measurement, drainage and filling at VW and Audi air-conditioning service centres.
 
A87-0099

Note:

Always screw on cap with seal.

  • Air conditioner pressure switch
    -F129 ** / high-pressure sensor
    -G65 **
    • ◆ High-pressure sensor -G65 will gradually replace air conditioner pressure switch -F129 (as of model year 1999, initially vehicles with 1.6 l engines).
    • ◆ Function, removing and installing pressure switch -F129 .
    • ◆ Check function of high-pressure sensor -G65 and signal emitted .
    • ◆ Remove and install high-pressure sensor -G65
 
A87-0305
  • Expansion valve
    • ◆ Removing and installing heat insulation .
Warning!
The expansion valve may be removed only if the refrigerant circuit is empty.
  • Condensation drainage valve
    • ◆ Checking, removing and installing .
  • Fluid reservoir
Warning!
The fluid reservoir may be removed only if the refrigerant circuit is empty.
 
A87-0305
  • Pre-volume
  • Service connection
    • ◆ Low-pressure end
    • ◆ For measurement and drainage at VW and Audi air-conditioning service centres.

Note:

Always screw on cap with seal.

  • Air flow flap
    • ◆ Removing and installing positioning motor -V71* (with potentiometer -G113) .
  • Fresh air intake temperature sensor
    -G89 **
    • ◆ Removing and installing .
 
A87-0305
  • Dust and pollen filter:
    • ◆ Removing and installing => Page 80-35.

Note:

The dust and pollen filter element should be replaced at regular intervals.

=> Maintenance manual

  • Two-way valve for refrigerant shut-off valve -N147 *
    • ◆ The two-way valve -N147 is only installed in vehicles with map-controlled engine cooling and one operating and display unit -E87 with one display (as of model year 2001).
    • ◆ Connection diagram for vacuum hoses for actuating the refrigerant shut-off valve => Page 87-53
 
A87-0305
    • ◆ The two-way valve is actuated by the operating and display unit -E87.
  • Refrigerant shut-off valve
    • ◆ The refrigerant shut-off valve is only installed in vehicles with map-controlled engine cooling and one operating and display unit -E87 with one display (as of model year 2001).
    • ◆ Ensure refrigerant flows in correct direction (arrow).

Removing and installing radiator fan control unit -J293 > < "Zexel" compressor