audi Workshop Repair Guides

Audi Workshop Service and Repair Manuals

Components for the control and regulation of the air conditioner (in the engine compartment) > < Sanden compressor
Heating, Air Conditioner
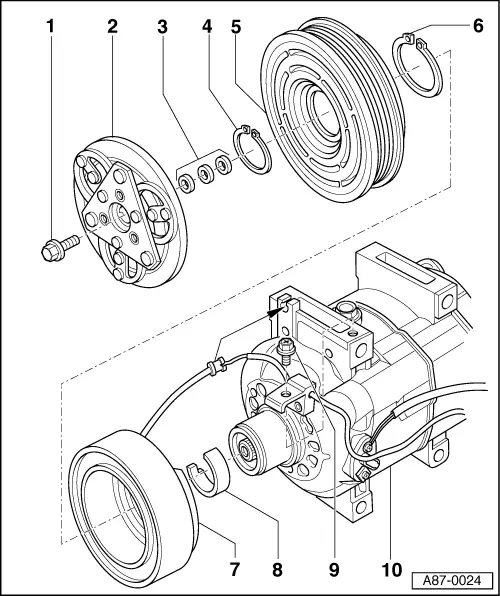
Repairing the air conditioner magnetic clutch -N25
"Zexel" compressor
 
A87-0024
  • Release and tighten bolt -15 Nm
    • ◆ Loosening and tightening => Fig.1
  • Detach clutch plate
    • ◆ Pulling off => Fig.2
  • Spacer
    • ◆ For adjusting the gap width
    • ◆ Checking gap width => Fig.6
  • Circlip
    • ◆ Replace
    • ◆ Install on correct side (flat side facing compressor)
    • ◆ Ensure correct seating in groove
 
A87-0024
  • Pulley
    • ◆ Pulling off =>Fig.3
    • ◆ Installing => Fig.4
  • Circlip
    • ◆ Replace
    • ◆ Install on correct side (flat side facing compressor)
    • ◆ Ensure correct seating in groove
  • Solenoid
    • ◆ Installing => Fig.5
  • Felt ring
    • ◆ Replace
  • Bolt
  • Compressor
 
A87-0025

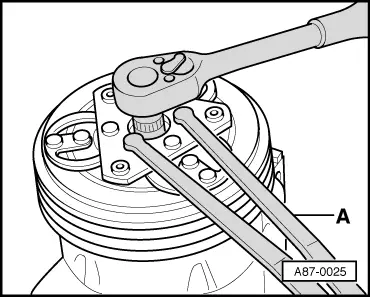
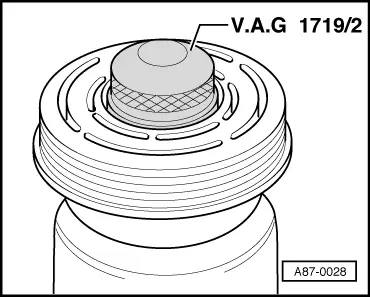
→ Fig.1    Loosening and tightening hexagon bolt

  • ‒ Counterhold using a commercially available 2-hole pin wrench -A- (pin-ø 4 mm).
  • ‒ Tighten bolt to 15 Nm.

 
A87-0026

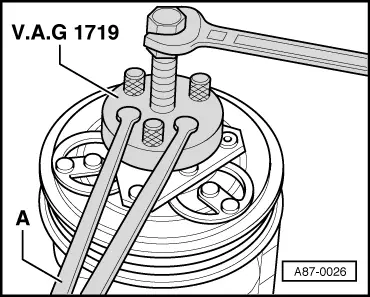
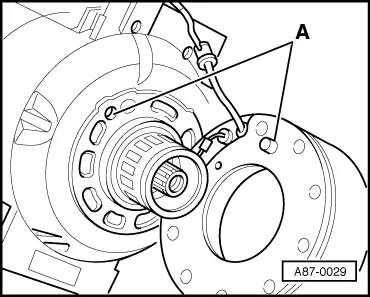
→ Fig.2    Detaching clutch plate

  • ‒ Counterhold with a commercially available 2-pin wrench -A-.
 
A87-0027

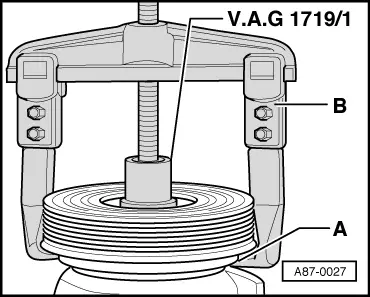
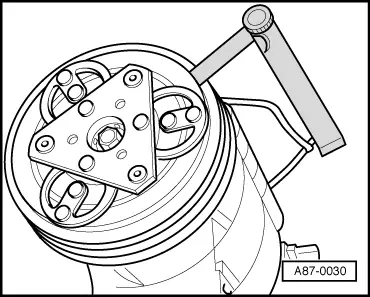
→ Fig.3    Removing pulley

  • ‒ Remove the felt ring.
  • ‒ Fit the special tool V.A.G 1719/1.
  • ‒ Position the two-arm puller -B- on the shoulder-A-, to prevent any damage to the pulley.

 
A87-0028

→ Fig.4    Installing pulley

  • ‒ Clean the contact surface.
  • ‒ Install the pulley with the special tool V.A.G 1719/2 and a plastic-headed hammer.
 
A87-0029

→ Fig.5    Installing solenoid

  • ‒ Place the lug -A- in the recess.

 
A87-0030

→ Fig.6    Checking gap width

  • ‒ Check the gap width between the pulley and clutch plate:
    • ‒ Gap width = 0.3 - 0.6 mm

Note:

The gap width must be within the tolerance over the entire periphery.

Components for the control and regulation of the air conditioner (in the engine compartment) > < Sanden compressor