audi Workshop Repair Guides

Audi Workshop Service and Repair Manuals

Reworking valve seats > < Checking hydraulic bucket tappets
4-cyl. Diesel Direct Injection Engine (TDI), Mech. Components
Servicing valve gear
Renewing valve stem seals
 
G15-0048

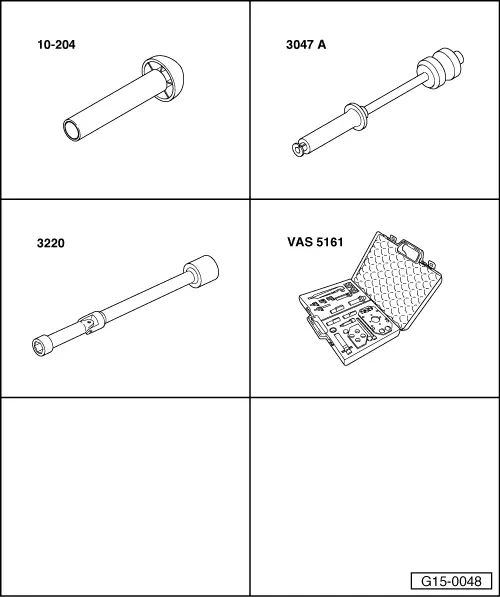
Special tools and workshop equipment required

  • ◆ Press-on tool 10-204
  • ◆ Puller 3047 A
  • ◆ Jointed spanner 3220
  • ◆ Disassembly and assembly tool VAS 5161

Removing

  • ● Cylinder head installed

Note:

When cylinder head was removed the valve stem seals can be replaced when using special tool 2037.

  • ‒ Removing camshaft .

Notes:

  • ◆ Make sure that the bucket tappets are not interchanged.
  • ◆ Mark allocation of bucket tappets on rear with a waterproof felt-tip pen.
  • ‒ Remove the bucket tappets from guides and put them down with the contact surface downwards.
 
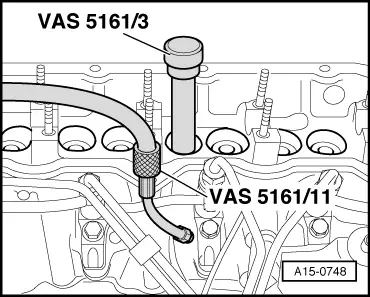
A15-0748
  • ‒ → Install pin VAS 5161/3 into bucket tappet guide.
  • ‒ Knock valve wedges of all valves loose using a plastic hammer.
  • ‒ Unplug connector console from glow plugs.
  • ‒ Remove all glow plugs using jointed spanner 3220.
  • ‒ Set piston of appropriate cylinder to "bottom dead centre".
  • ‒ Screw the adapter VAS 5161/11 hand tight into the threaded hole of the respective glow plug.
  • ‒ Connect adapter VAS 5161/11 via a commercially available intermediate piece to the pressure connection.
    • ‒ Minimum pressure: 6 bar
 
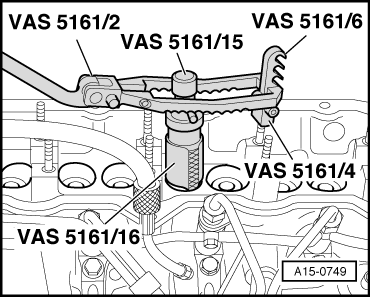
A15-0749
  • ‒ → Screw the catch part VAS 5161/6 with insertion fork VAS 5161/4 onto a stud on the cylinder head.
  • ‒ Push guide bush VAS 5161/16 into bucket tappet guide of the valve to be removed until limit stop.
    • ‒ Installation position of guide bush: Hatched areas face driving direction
  • ‒ Push assembly cartridge VAS 5161/15 into guide bush.
  • ‒ Attach pressure fork VAS 5161/2 to catch part VAS 5161/6 and push assembly cartridge down.
  • ‒ At the same time turn knurled screw of assembly cartridge towards the right until the tips of the valve wedges engage.
  • ‒ Slightly move the knurled screw back and forth. This causes the valve wedges to be pressed apart and taken into the cartridge.
  • ‒ Release the pressure fork.
  • ‒ Remove assembly cartridge, guide bush, valve plate and valve springs.
 
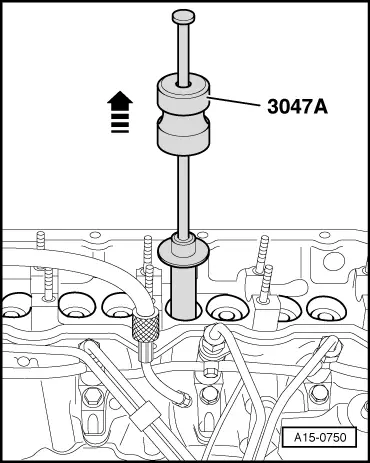
A15-0750
  • ‒ → Use 3047 A to remove valve stem seals.
 
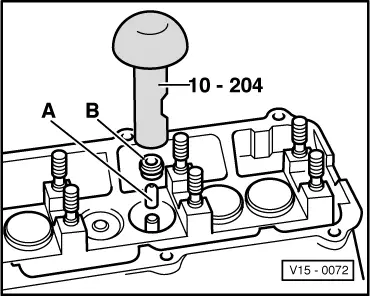
V15-0072

Installing

Note:

A plastic sleeve -A- is included with the new valve stem seals.

  • ‒ → To prevent damage to the new valve stem seals -B-, place plastic sleeve -A- on valve stem.
  • ‒ Lightly lubricate sealing lip of valve stem seal.
  • ‒ Push valve stem seal onto plastic sleeve.
  • ‒ Carefully press the valve stem seal onto the valve guide using press-on tool 10-204.
  • ‒ Remove plastic sleeve again.
 
A15-0445
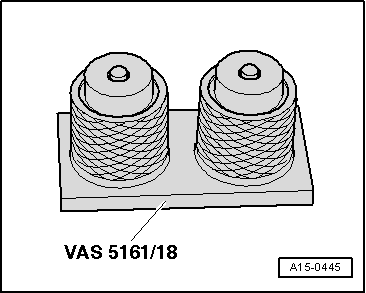
  • ‒ → If the valve wedges were taken out of the assembly cartridge they must first be inserted into the installing tool VAS 5161/18.

Note:

The large diameter of the valve wedges points upwards.

  • ‒ Push assembly cartridge VAS 5161/15 from the top onto installing tool and take up the valve wedges.
 
A15-0749
  • ‒ → Reinstall the assembly cartridge VAS 5161/15 into guide bush VAS 5161/16.
  • ‒ Push pressure fork down and pull knurled screw upwards by turning to left and right - thus the valve wedges are installed.
  • ‒ Take load of the pressure fork when knurled screw is still tight.
  • ‒ Insert bucket tappet.
  • ‒ Installing camshaft .

Notes:

  • ◆ After installing the camshaft, wait for about 30 minutes before starting the engine. Hydraulic valve compensation elements have to settle (otherwise valves will strike pistons).
  • ◆ After working on the valve gear, turn the engine carefully at least 2 rotations to ensure that none of the valves make contact when the starter is operated.

Tightening torque

Component

Nm

Glow plugs to cylinder head

15

Reworking valve seats > < Checking hydraulic bucket tappets