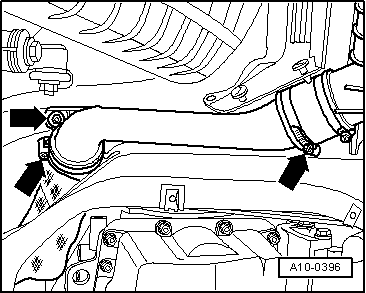
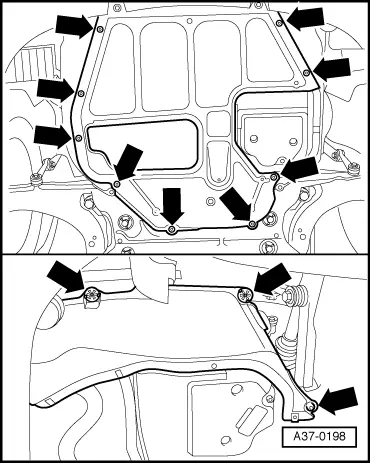
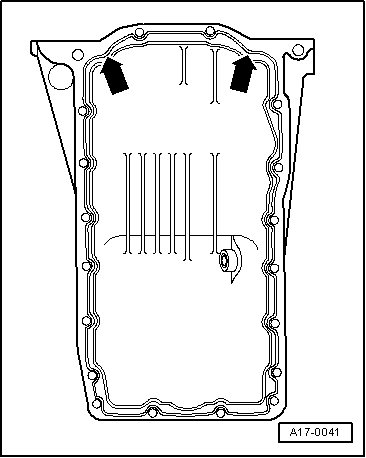
audi Workshop Repair Guides

Audi Workshop Service and Repair Manuals

Removing and installing oil pump > < Removing and installing parts of the lubrication system|Part II
4-cyl. Diesel Direct Injection Engine (TDI), Mech. Components
Removing and installing parts of the lubrication system
Removing and installing oil pan

Special tools, workshop equipment, and other items required

  • ◆ Electric drill with plastic brush attachment
  • ◆ Protective goggles
  • ◆ Silicone sealant D 176 404 A2

 
A10-0396

Removing

  • ‒ → Remove lower air duct pipe -arrows-.
 
A37-0198
  • ‒ → Remove noise insulation in centre and on right -arrows-.
  • ‒ Drain engine oil.

 
A17-0219
  • ‒ → Unscrew bolts of oil pan/gearbox -arrows-.
  • ‒ Slacken bolts -1 ... 20- diagonally.

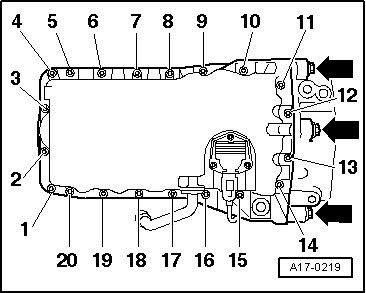
Note:

Loosen and tighten oil pan bolts with jointed wrench 3185. Unscrew using socket attachment 3249.

  • ‒ Remove sump: if necessary loosen it by striking lightly with a rubber hammer.
 
N17-0012
  • ‒ Carefully remove sealant residues from cylinder block. For this remove baffle plate.
Important
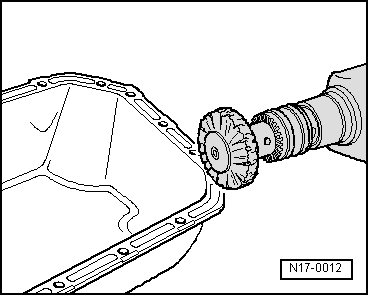
Wear protective glasses.
  • ‒ → Remove sealant residues from oil pan, e.g. with rotating plastic brush or similar.
  • ‒ Clean sealing surfaces: they must be free of oil and grease.

 
A17-0081

Installing

Installation is carried out in the reverse order; note the following:

  • ‒ → Cut off nozzle of tube at front marking (ø of nozzle approx. 3 mm).
 
A17-0041
  • ‒ → Apply the bead of silicone sealant onto the clean sealing surface of the oil pan, as illustrated.
    • ‒ Thickness of sealant bead: 2 ... 3 mm

Notes:

  • ◆ The oil pan must be installed within 5 minutes after applying the silicone sealant.
  • ◆ The bead of sealant must not be thicker than prescribed, as otherwise excess sealant will enter the oil pan and obstruct the strainer in the oil intake manifold.
  • ◆ Be particularly careful when applying the bead of sealant around the rear sealing flange (arrows in illustration).

 
A17-0219
  • ‒ Immediately install oil pan and tighten bolts in the sequence mentioned:
    • ‒ → Tighten bolts -1 ... 20- diagonally to 5 Nm.
    • ‒ Tighten bolts of oil pan/gearbox -arrows- to 45 Nm.
    • ‒ Tighten bolts -1 ... 20- diagonally to 15 Nm.

Notes:

  • ◆ When installing the oil pan with the engine out of the vehicle, ensure that the oil pan is flush with the cylinder block at the flywheel end.
  • ◆ After fitting oil pan assembly, the sealant must dry for approx. 30 minutes. Only then may the engine oil be filled.
  • ‒ Fill up with engine oil and check oil level.

Tightening torques

Component

Nm

Oil pan to cylinder block

15

Oil pan to gearbox

45

Oil drain plug

30

Removing and installing oil pump > < Removing and installing parts of the lubrication system|Part II