audi Workshop Repair Guides

Audi Workshop Service and Repair Manuals

Removing and installing vibration damper > < Dismantling and assembling engine
4-cyl TDI®-Engine, Mechanical Components
Dismantling and assembling engine
Removing and installing ribbed belt

Notes:

  • ◆ Mark the running direction with chalk or felt pen before removing the ribbed belt. If the belt runs in the opposite direction when it is refitted, this can cause breakage. Ensure that the belt is correctly seated in the pulleys when installing.
  • ◆ The following illustration shows the belt drive on vehicles with air conditioner.
 
A13-0380
  • Ribbed belt
    • ◆ Ribbed belt on vehicles without air conditioner=>Fig.13-6
    • ◆ Ribbed belt on vehicles with air conditioner=>Fig.13-6
    • ◆ A double ribbed belt is fitted on engines with AC compressor
    • ◆ Check for wear
    • ◆ Do not kink
    • ◆ Removing and installing
      =>Page 13-10
  • 23 Nm
  • Tensioner for ribbed belt
    • ◆ Swivel with open-ended spanner to slacken ribbed belt.
    • ◆ Secure tensioner in position using mandrel T10060
 
A13-0380
  • Vibration damper
    • ◆ With pulley for ribbed belt
    • ◆ Removing and installing
      =>Page 13-7
  • 45 Nm
  • 23 Nm
  • Alternator
    • ◆ Removing:
    • ‒ Detach battery earth strap.
    • ‒ Remove engine cover.
    • ‒ Slacken ribbed belt and take belt off alternator => Page 13-10.
    • ‒ Disconnect wiring from alternator
    • ‒ Detach connector.
    • ‒ Unscrew bolts from top and bottom from bracket.
    • ‒ Remove alternator
    • ◆ To facilitate the positioning of alternator knock back bushes for retaining bolts slightly.
 
A13-0380
  • Air conditioner compressor
    • ◆ After removing compressor secure to lock carrier with wire. Do not leave compressor suspended on refrigerant hoses.
    • ◆ Do not unscrew or disconnect refrigerant hoses or pipes.
    • ◆ To facilitate the positioning of air conditioner knock back bushes for retaining bolts slightly.
  • Spacer bush
    • ◆ Not fitted on all versions
  • Bracket for auxiliary assembly
    • ◆ Removing and installing
      =>Page 13-14
  • 45 Nm
    • ◆ Observe the tightening sequence =>Page 13-14
 
A13-0380
  • 23 Nm
  • 23 Nm
  • Vane pump
    • ◆ For power steering
    • ◆ Removing and installing:

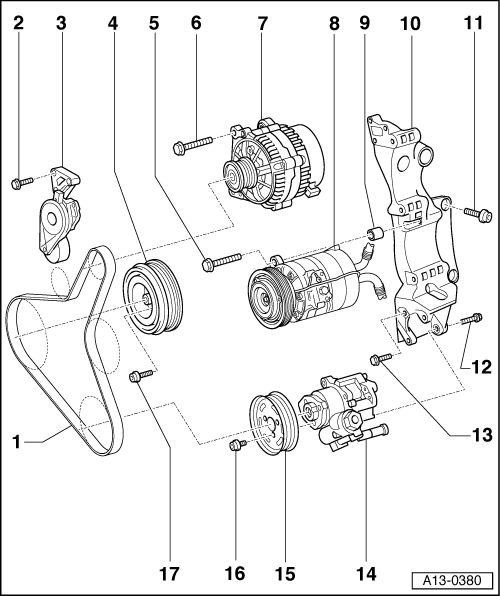
=> Running Gear, FWD and 4WD; Repair group 48

    • ◆ To facilitate the positioning of vane pump knock back bushes for retaining bolts slightly.
  • Belt pulley
    • ◆ For vane pump
  • 23 Nm
  • 10 Nm + 90° (1/4 turn) further
    • ◆ Replacing
 
A13-0097

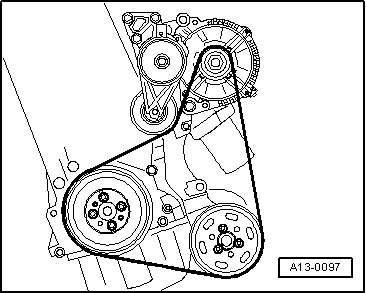
→ Fig.1    Ribbed belt routing on vehicles without air conditioner

 
A13-0098

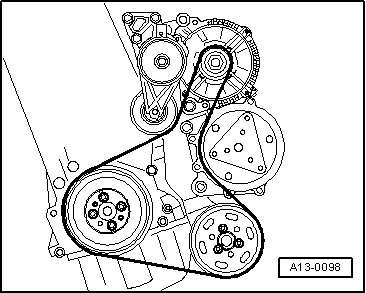
→ Fig.2    Ribbed belt routing on vehicles with air conditioner

Note:

Engines with an air conditioner compressor are fitted with a double ribbed belt.

Removing and installing vibration damper > < Dismantling and assembling engine