audi Workshop Repair Guides

Audi Workshop Service and Repair Manuals

Removing and installing fuel tank with attachments > < Overview of components: fuel tank with attachments
Fuel supply system - Diesel engines
Fuel supply system - four-wheel drive
Draining fuel tank

Observe safety precautions.

Observe rules for cleanliness => Page 20-3.

 
W00-1107

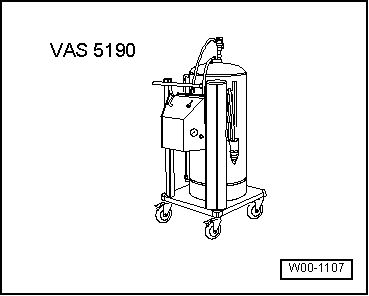
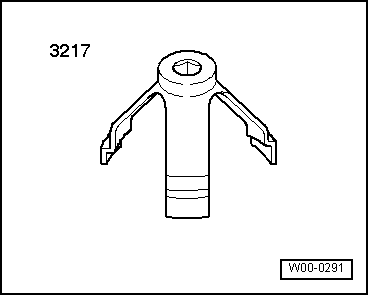
A - Procedure if tank is more than 1/3 full => Page 20-46.

B - Procedure if tank is less than 1/3 full => Page 20-51.

Special tools and workshop equipment required

  • ◆ VAS 5190

or

  • ◆ V.A.G 1433 A
 
W00-0291

  • ◆ Union nut spanner 3217

Work sequence

Warning
Secure earth wire of V.A.G 1433

A - Procedure if fuel tank is more than 1/3 full

  • ‒ Remove filler cap from fuel tank filler neck.
 
A20-0703
  • ‒ → Detach tapered adapter -2- from shaft end -1- of VAS 5190.
  • ‒ Mark drain hose -arrow- at distance a = 1415 mm from end of hose using insulating tape.
 
A20-0702
  • ‒ → Screw shaft end -1- of fuel extractor VAS 5190 onto fuel filler neck.
  • ‒ Push drain hose into fuel tank until marking on drain hose -arrow- coincides with shaft end.

Note:

 
A20-0865

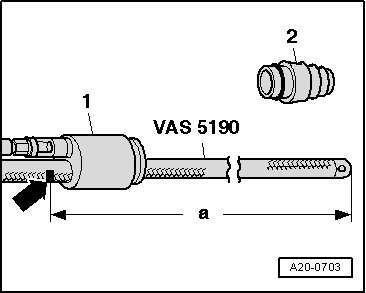
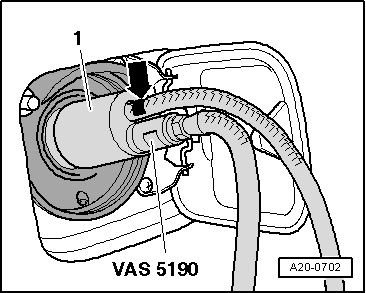
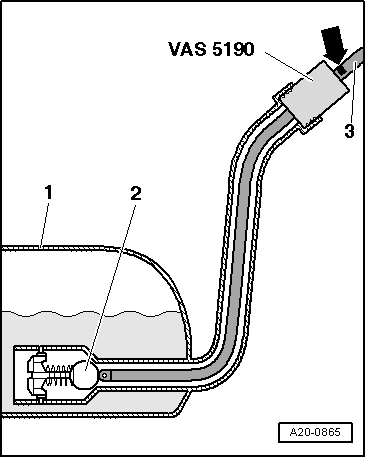
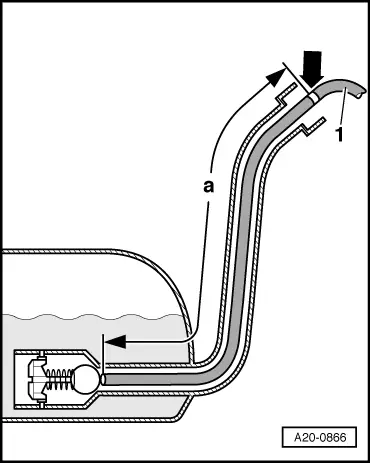
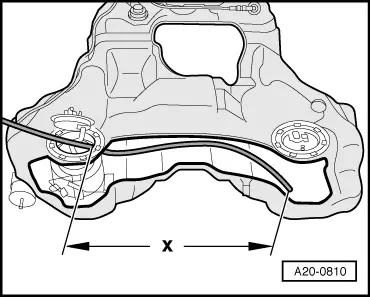
→ A ball valve -2- is located at the bottom end of the fuel filler neck in the fuel tank -1-. To avoid damaging the ball valve with the drain hose -3-, do not push the hose into the fuel tank further than the mark -arrow- applied earlier.

  • ‒ Drain tank as far as possible via fuel filler neck.
  • ‒ Carefully pull out drain hose.
 
A20-0866

Notes:

  • ◆ The procedure when using a fuel extractor without shaft end is basically the same.
  • ◆ → In this case, mark drain hose -arrow- at distance a = 1350 mm from end of drain hose using insulating tape. The drain hose is fitted properly when the marking on the hose coincides with the rim of the filler neck.
  • ◆ If the hose does not go in easily, lubricate lightly with engine oil. Do not use silicone lubricant.

  • ‒ Remove rear seat bench.

=> General body repairs, Interior; Repair group 72; Rear seats

 
A20-0378
  • ‒ Fold back floor covering under rear seat bench.
  • ‒ Detach cover for flange on fuel tank under rear seat bench (right side).
  • ‒ → Release and unplug electrical connector -arrow-.
Warning
  • ◆ The fuel system is under pressure. Place a cloth over the connection before opening the system. Then open the connection carefully to relieve pressure.

  • ◆ In extreme cases the fuel pipes/hoses or the fuel can reach a temperature of 100 C on vehicles with unit injector engine. Allow the fuel to cool down before disconnecting the pipes/hoses - acute danger of scalding.

  • ◆ Wear protective gloves.
  • ◆ Wear protective goggles.
 
A20-0379
  • ‒ → Press release catches and disconnect black fuel supply line -1- and blue fuel return line -2-.
 
A20-0106
  • ‒ → Remove union nut with spanner 3217.
  • ‒ Take flange of fuel delivery unit out of opening in fuel tank and move clear, with hoses connected.
  • ‒ Draw off fuel in right chamber of fuel tank.

 
A20-0810
  • ‒ → Insert drain hose to marking x = 800 mm through right opening in fuel tank and into left fuel chamber.
  • ‒ Draw off fuel in left chamber of fuel tank.
  • ‒ Re-install flange on right side => Page 20-70.

B - Procedure if tank is less than 1/3 full

  • ‒ Remove rear seat bench.

=> General body repairs, Interior; Repair group 72; Rear seats

  • ‒ Fold back floor covering under rear seat bench.
  • ‒ Detach cover for flange on fuel tank under rear seat bench (right side).
 
A20-0378
  • ‒ → Release and unplug electrical connector -arrow-.
Warning
  • ◆ The fuel system is under pressure. Place a cloth over the connection before opening the system. Then open the connection carefully to relieve pressure.

  • ◆ In extreme cases the fuel pipes/hoses or the fuel can reach a temperature of 100 C on vehicles with unit injector engine. Allow the fuel to cool down before disconnecting the pipes/hoses - acute danger of scalding.

  • ◆ Wear protective gloves.
  • ◆ Wear protective goggles.
 
A20-0379
  • ‒ → Press release catches and disconnect black fuel supply line -1- and blue fuel return line -2-.
 
A20-0106
  • ‒ → Remove union nut with spanner 3217.
  • ‒ Take flange of fuel delivery unit out of opening in fuel tank and move clear, with hoses connected.

  • ‒ Draw off fuel in right chamber of fuel tank.
 
A20-0810
  • ‒ → Insert drain hose to marking x = 700 mm through right opening in fuel tank and into left fuel chamber.
  • ‒ Draw off fuel in left chamber of fuel tank.
  • ‒ Re-install flange on right side => Page 20-70.

Removing and installing fuel tank with attachments > < Overview of components: fuel tank with attachments