-
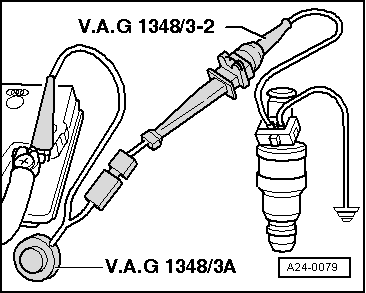
‒ → Connect one of the injector contacts to the engine earth using a test cable and crocodile clip from the V.A.G 1594 test.
-
‒ Connect the second injector contact to positive using remote control V.A.G 1348/3 A, adapter cable V.A.G 1348/3- 2 and an auxiliary cable.
-
‒ Start the final control diagnosis => Page 01-46. The fuel pump must be running.
-
‒ Check injectors for leaks (visual check). When the fuel pump is running, only 1 or 2 drops a minute should escape from each injector.
-
‒ If the fuel loss is greater than this, switch off the fuel pump (terminate final control diagnosis) and replace the faulty injector.
-
‒ If necessary, re-start the final control diagnosis.
Note:
The final control diagnosis cannot be re started until the ignition has been switched off briefly.
-
‒ Activate the V.A.G 1348/3 A remote control for 30 seconds.
-
‒ Perform measurements on all injectors.
-
‒ Once all four injectors have been actuated, place the measuring glasses on a level surface.
- Specified value: 85...105 ml
-
‒ If the measured value for one or more of the injectors is outside the tolerance range, switch off the fuel pump (terminate final control diagnosis) and replace the defective injector.
-
‒ If the measured values for all the injectors are outside the tolerance range, check the fuel pressure => Page 24-15.
Note:
When checking the injection quantity, also check the spray pattern. The spray pattern should be the same for all the injectors.
The installation of the fuel manifold together with injectors is performed in the reverse sequence. The following points should be noted when installing:
-
● Replace the O-rings at all opened connections. (When replacing the front O-ring, never pull the plastic cap off the injector head. - Pull the O-ring off over the plastic cap.)
-
● Moisten the O-rings with clean engine oil.
-
● Make sure that the injectors are installed in the correct positions.
-
● Check to make sure that the retainer clamps are properly seated.
|