
A4 Cabriolet Mk2
|
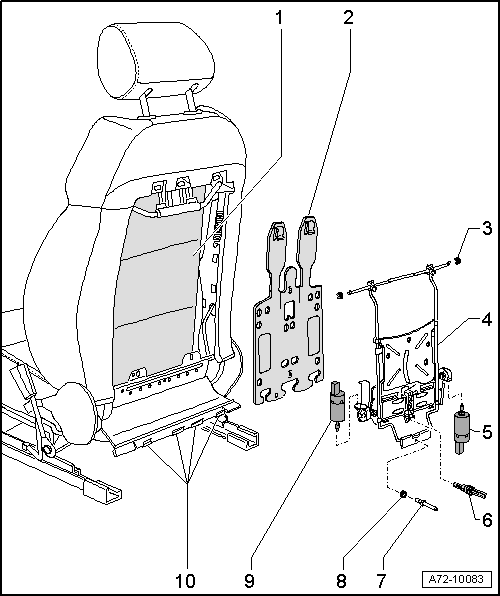
| 1 - | Backrest padding |
| 2 - | Lumbar support |
| q | Removing and installing → Item |
| 3 - | Clamp |
| 4 - | Frame for lumbar support |
| q | Removing: |
| – | Remove backrest cover panel → Chapter. |
| – | Use screwdriver to prise out fastening strips -10- (4x). |
| – | Place foil between padding and backrest frame as protection against metal particles. |
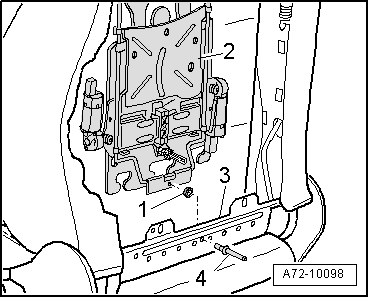
| – | Drill out rivet -7-. |
| – | Disengage lumbar support frame -4- at top left and right from backrest frame. |
| – | Unplug electrical connectors at control motors -5- and -9- for lumbar support. |
| – | Undo velcro fastener between lumbar support -2- and backrest padding -1-. |
| – | Disengage lumbar support at top of lumbar support frame. |
| – | Take out lumbar support. |
| q | Installing: |
| Installation is carried out in the reverse order, note the following: |
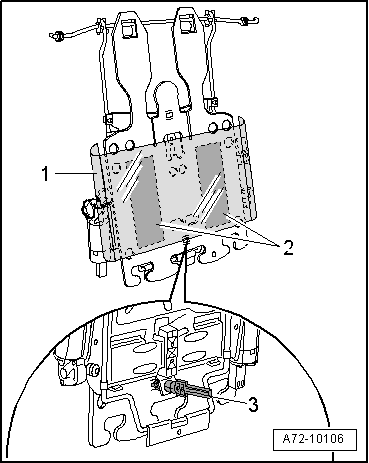
| – | Place plastic foil on velcro strips of lumbar support. Attach plastic foil to lumbar support → Fig.. |
| – | Make sure that the lumbar support is secured to the lumbar support frame using either the assembly lock or a suitable pin → Fig.. |
| – | Position lumbar support frame behind backrest frame and engage top left and right of lumbar support frame in mounting on backrest. |
| – | Rivet bottom of lumbar support frame to backrest frame. IMPORTANT: Place a plastic washer between lumbar support frame and backrest frame → Fig.. |
| – | Pull plastic foil out from between backrest padding and lumbar support. |
| – | Press velcro fastener of lumbar support onto backrest padding. |
| – | Plug electrical connectors into lumbar support motors. |
| 5 - | Control motor for lumbar support |
| q | Removing and installing → Chapter |
| 6 - | Assembly lock |
| For centralising lumbar support in lumbar support frame |
| 7 - | Rivet |
| q | Set rivet using special pop rivet pliers -V.A.G 1753 A- |
| q | IMPORTANT: Before riveting, position a plastic washer between lumbar support and backrest frame |
| 8 - | Plastic washer |
| 9 - | Control motor for lumbar support height adjustment |
| q | Removing and installing → Chapter |
| 10 - | Fastening strips |
|
|