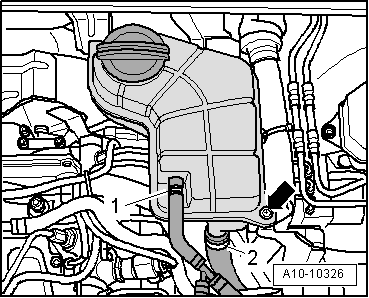
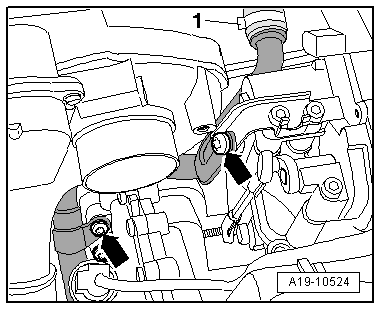
audi Workshop Repair Guides

Audi Workshop Service and Repair Manuals

Removing and installing turbocharger 1 control unitJ724 - vehicles with 3.0 ltr. engine > < Turbocharger for vehicles with 3.0 ltr. engine - exploded view
Removing and installing turbocharger on vehicles with 3.0 ltr. engine
Removing
  Caution
If the turbocharger has suffered mechanical damage (e.g. damaged compressor wheel), it is not sufficient merely to fit a new turbocharger. The following work must be performed in order to avoid further damage:
t  Check air cleaner housing, air filter element and air hoses for dirt and foreign particles.
t  Check the entire charge air system (including the charge air cooler) for foreign matter.
t  If foreign matter is found in the charge air system, clean all relevant ducts and hoses and renew charge air cooler if necessary.
–  Drain off coolant → Chapter.
   
–  Carefully pull engine cover panel off four retaining pins one after the other -arrows-.
  A10-10171
–  Unbolt coolant expansion tank -arrow-.
–  Detach electrical connector at coolant shortage indicator switch -F66- on coolant expansion tank (bottom).
–  Lay aside coolant expansion tank with coolant hoses -1- and -2- connected.
  A10-10326
–  Remove heat shield for turbocharger -arrows-.
  A26-10011
–  Move electrical wiring -1- to Lambda probe clear.
–  Unscrew nuts -arrows- securing starter catalytic converter to turbocharger and push starter catalytic converter to the side.
  A21-10222
–  Unplug electrical connectors -1- and -2-.
–  Remove banjo bolt -3- and disconnect oil supply line from turbocharger.
  A21-0347
–  Remove noise insulation -1- in wheel housing (left-side).
  A10-10179
–  Unbolt heat shield -1- for drive shaft (left-side).
  A10-0961
–  Cover opening -arrow- in gearbox to prevent small parts from dropping in.
–  Remove bolt -2- and detach oil return line from turbocharger.
  Note
t  Shown in illustration with intermediate pipe removed.
t  Disregard -item 1-.
  A21-0346
–  Remove bolts -arrows-.
–  Remove air ducts -1- and -2-.
  A10-10301
–  Unplug electrical connector -1- at air mass meter -G70-.
–  Detach air intake pipe -2- at air mass meter.
–  Detach clip -arrow- and remove air cleaner housing together with air mass meter.
  A10-10327
–  Pull crankcase breather hose off air pipe -arrow-.
–  Remove bolts -2- and -3-.
–  Disconnect air pipe from turbocharger.
  Note
Disregard -item 1-.
  A21-10028
–  Remove bolts -arrows-.
  A21-0348
–  Unscrew bolts -1- and -2- and disconnect air pipe from hoses -arrow-.
  A21-10016
–  Remove bolts -arrows-.
  Note
Place a cloth underneath to catch escaping coolant.
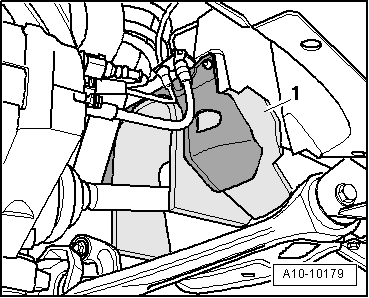
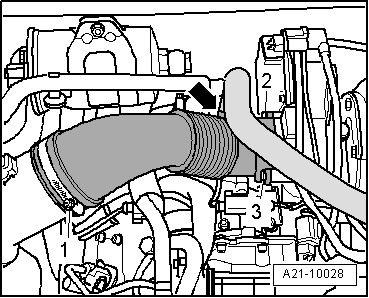
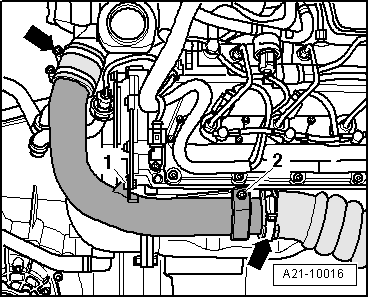
–  Detach coolant hose -1-.
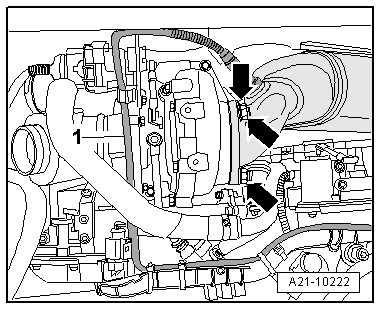
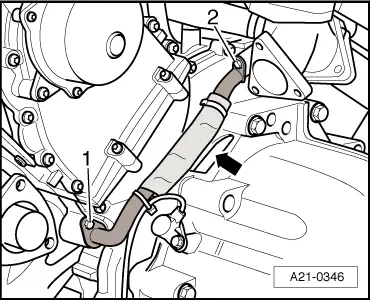
–  Push turbocharger slightly towards the rear and pivot rear coolant pipe towards the right.
–  Detach turbocharger.
Installing
Installation is carried out in the reverse order; note the following:
  Note
t  Renew gaskets, seals and O-rings.
t  Fill turbocharger with engine oil at connection for oil supply line.
t  Hose connections and hoses for charge air system must be free of oil and grease before assembly.
t  Secure all hose connections with the correct type of hose clips (same as original equipment) → Electronic parts catalogue.
t  To ensure that the charge air hoses can be properly secured at their connections, spray rust remover onto the worm thread of used hose clips before installing.
t  Fit all heat insulation sleeves in the original position when installing.
t  After installing turbocharger, allow engine to idle for approx. 1 minute and do not rev up immediately to ensure turbocharger is supplied with oil.
–  Install starter catalytic converter: vehicles without particulate filter → Chapter, vehicles with particulate filter → Chapter.
–  Install coolant pipe (rear) → Chapter.
–  Fill cooling system → Anchor.
Tightening torques
  A19-10524
ComponentNm
Turbocharger to:Intermediate flange30 + 90° 1)2)3)
Engine25
Oil return line to intermediate flange:9
Oil supply line to turbocharger15
Coolant pipe (rear) to cylinder head9
Air pipe to cylinder head9
Drive shaft heat shield to gearbox23
l  1) Renew bolts.
l  2) Coat with high-temperature paste; for high-temperature paste refer to → Electronic parts catalogue
l  3) 90° = one quarter turn.


Removing and installing turbocharger 1 control unitJ724 - vehicles with 3.0 ltr. engine > < Turbocharger for vehicles with 3.0 ltr. engine - exploded view