audi Workshop Repair Guides

Audi Workshop Service and Repair Manuals

Exploded view of intake manifold > < Wiring and component check using test box V.A.G 1598/31
Motronic injection and ignition system (8-cyl.)
Servicing Motronic injection system
Replacing Motronic control unit -J220

Note:

Unplugging connectors from engine control unit erases learned values, however content of fault memory is retained.

Removing engine control unit

Removing

 
A01-0121
  • ‒ Connect up vehicle diagnostic, testing and information system VAS 5051 and select vehicle system "01 - Engine electronics" from list. Ignition must be on.

→ Control unit identification and code -2- appear on display of vehicle diagnostic, testing and information system VAS 5051.

  • ‒ Always start by displaying control unit identification and printing it out.
  • ‒ Switch off ignition.
 
A27-0088
  • ‒ → Detach rubber seal of plenum chamber cover in direction of arrow.
  • ‒ Detach plenum chamber cover -1- to front.

 
A20-0833
  • ‒ → Use screwdriver to prise off the two caps -3-.
  • ‒ Slacken off hexagon nuts -4- by several turns.
  • ‒ Detach wiper arms -2- from wiper shaft by tilting slightly.
  • ‒ Completely unscrew hexagon nuts and detach wiper arms.
  • ‒ Pull off securing clips -1- and detach cowl panel grille -5-.
 
A10-0996

  • ‒ → Remove cover for electronics box in plenum chamber -arrows-.

 
A24-0483
  • ‒ → Use screwdriver to carefully prise off fastener -arrow-.

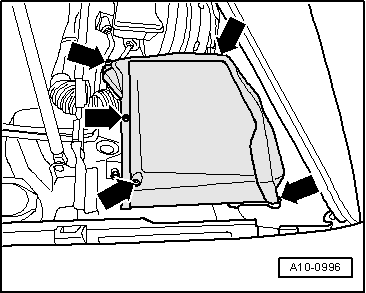
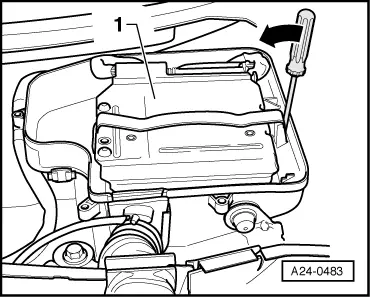
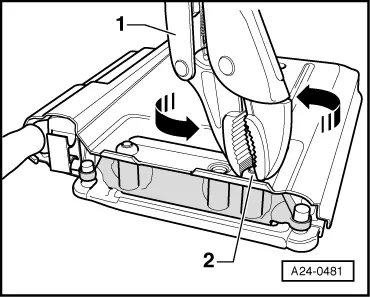
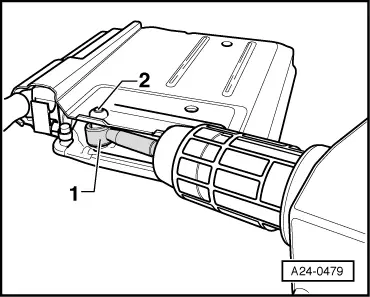
Note:

Item -1- in illustration shows engine control unit with protective enclosure.

 
A24-0477

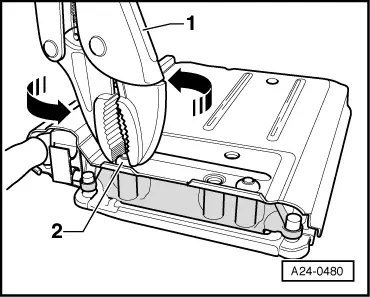
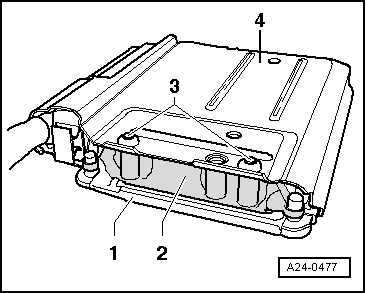
→ To render access to the connectors on the engine control unit more difficult, the engine control unit -1- is bolted by way of a catch -2- and shear bolts -3- to a protective enclosure -4-.

Locking fluid is applied to thread of shear bolts to make bolts more difficult to screw out.

Engine control unit must be separated from protective enclosure to unplug connectors from engine control unit (e.g. when connecting up test box or replacing engine control unit). This procedure is described in the following.

Tools required:

 
A24-0475
  • ◆ → Hot-air blower -1- (from wiring-harness repair set VAS 1978)
  • ◆ Nozzle attachment -2- (also from wiring-harness repair set VAS 1978)
  • ◆ Commercially available gripping pliers

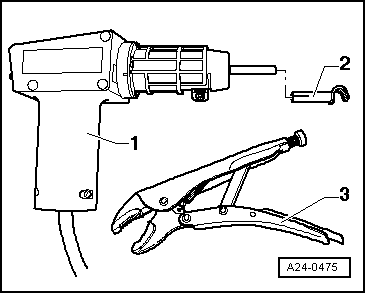
Procedure:

Attention:
To avoid damaging (scorching) wires, connectors, insulation and control units, always adhere exactly to the following operations and observe operating instructions for hot-air blower.

 
A24-0477
  • ‒ → Tilt engine control unit with protective enclosure towards engine compartment so that catch (item -2- in Fig.) becomes visible and place a clean cloth beneath engine control unit with protective enclosure.
 
A24-0476
  • ‒ → Make settings on hot-air blower as shown in illustration, i.e. set temperature potentiometer -2- to max. heat output and two-stage air flow switch -3- to position 3.

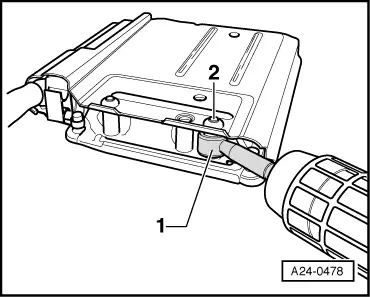
Note:

Then use hot-air blower to heat thread of catch into which shear bolts are screwed. This operation is designed to reduce the inhibiting action of the locking fluid on the shear bolt thread to make it easier to screw out the shear bolts afterwards.

Attention:
Heating the thread of the catch also greatly increases the temperature of the shear bolts and protective enclosure components. Take care to avoid burns. It is also important to ensure that only the thread is heated and none of the surrounding components if at all possible (these should be covered if necessary).
 
A24-0478
  • ‒ → Move nozzle -1- of hot-air blower towards thread of catch such that nozzle "surrounds" thread. Allow nozzle to rest on upper end of protective enclosure.
  • ‒ Switch on hot-air blower and heat thread for roughly 20 to 25 seconds.

 
A24-0481
  • ‒ → Then grasp head of bolt -2- with gripping pliers -1- and screw out shear bolt in direction of arrow.

Employ exactly the same procedure for the second shear bolt, taking particular care to avoid the control unit connectors in the immediate vicinity.

 
A24-0479
  • ‒ → Move nozzle -1- of hot-air blower towards thread of catch again such that nozzle "surrounds" thread. Allow nozzle to rest on upper end of protective enclosure.
  • ‒ Switch on hot-air blower and heat thread for roughly 20 to 25 seconds.

 
A24-0480
  • ‒ → Then grasp head of bolt -2- with gripping pliers -1- and screw out shear bolt in direction of arrow.

Engine control unit can now be separated from protective enclosure.

  • ‒ Release connectors of engine control unit and unplug.
  • ‒ Take out old engine control unit and insert new one.

Installing engine control unit

Install accordingly in reverse order of removal; protective enclosure is always to be refitted to engine control unit. New shear bolts must be used.

Perform the following after installing new engine control unit:

    • ‒ Adapt immobilizer to engine control unit -J248 (otherwise vehicle will not start).
    • ‒ Encode new engine control unit.
    • ‒ If vehicle is fitted with cruise control system (can be seen from steering column switch), this must be released in engine control unit.
    • ‒ Interrogate and if necessary erase fault memory.
  • Activate engine control unit in "Guided fault-finding" routine under diagnosis item "Replacing engine control unit".

Vehicle diagnostic, testing and information system VAS 5051 is to be used for this purpose.

Exploded view of intake manifold > < Wiring and component check using test box V.A.G 1598/31