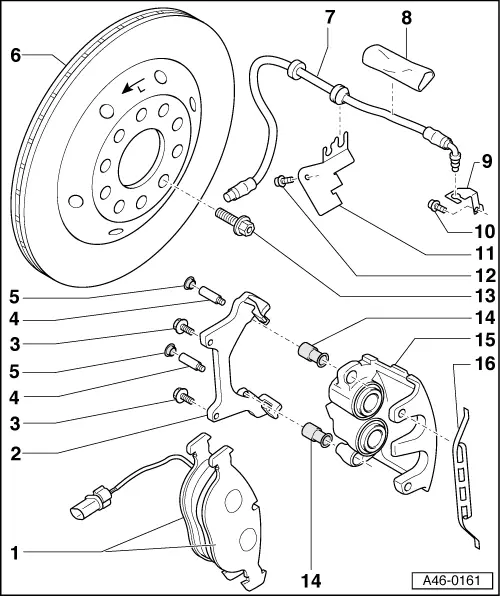
audi Workshop Repair Guides

Audi Workshop Service and Repair Manuals

Removing and installing brake pads > < Front brake FN2
Brake System
Front brake FN2
Servicing front brakes

Notes:

  • ◆ Always install the complete repair kit.
  • ◆ After replacing brake pads, depress brake pedal firmly several times with vehicle stationary so that the brake pads are properly seated in the normal operating position.
  • ◆ To draw off brake fluid from the reservoir, use a bleeder bottle which is used only for brake fluid. Brake fluid is poisonous and must on no account be siphoned by mouth through a hose.
 
A46-0161
  • ◆ The tightening torque of the brake pipes is 15 Nm.
  • ◆ Check that the brake caliper moves freely by moving it from side to side.
  • Brake pads

Note:

The inner pad (with expansion spring) has a wire for the wear indicator.

    • ◆ The outer brake pads are provided with an adhesive sheet on the backing plate of the pad. Remove the protective sheet before inserting pads.
 
A46-0161
    • ◆ Different versions => Parts List
    • ◆ Always replace all components on an axle
    • ◆ Removing and installing

Note:

Always clean the brake calipers (no grease) before inserting new brake pads. At the same time, make sure that all adhesive sheet residue on the contact surfaces of the outer brake pad is removed.

  • Brake carrier
    • ◆ Bolt to wheel bearing housing
  • Ribbed bolt, 190 Nm
    • ◆ Clean ribbing if reusing
 
A46-0161
  • Guide pin, 25 Nm
  • Trim cap
    • ◆ Remove
    • ◆ Attach cable for wear indicator
  • Brake disc
    • ◆ Always replace all components on an axle
    • ◆ Remove brake caliper prior to removing
    • ◆ Different designs on left and right
    • ◆ The arrow on the brake disc points in the running direction
    • ◆ Lubricate contact surfaces between brake disc and wheel hub with polyurea grease G 052 142 A2.

=> Brake System; Repair group 00; Technical data

 
A46-0161
  • Brake pipe, 15 Nm
    • ◆ Screw into brake caliper housing
    • ◆ Screw into brake hose, counterholding at hexagon on brake hose.
    • ◆ Hose must be attached without twisting
    • ◆ Ensure that lugs are properly seated in retainer grooves.
  • Brake pipe heat shield
    • ◆ Push over brake pipe
  • Bracket
    • ◆ Bolt to brake caliper housing
  • Hexagon bolt
    • ◆ Tightening torque 8 Nm
  • Bracket
    • ◆ Attach brake pipe
    • ◆ Bolt to wheel bearing housing
 
A46-0161
  • Hexagon bolt
    • ◆ Tightening torque 8 Nm
  • Wheel bolts
    • ◆ Tightening torque 140 Nm
  • Bush
    • ◆ Insert into brake caliper housing
  • Brake caliper housing
    • ◆ If assembly work is required, do not leave caliper hanging from brake hose but secure it to bodywork with wire
    • ◆ With the exception of "Replacing brake pads"=> Page 47-27, no further repairs may be performed on the brake calipers.
    • ◆ Hose must be attached without twisting

=> Brake System; Repair group 00; Technical data

 
A46-0161
  • Retaining spring
    • ◆ Insert in both holes in brake caliper housing
    • ◆ For removing and installing retaining spring, apply hand pressure in direction of arrow (stamped on spring) and remove.

Removing and installing brake pads > < Front brake FN2