audi Workshop Repair Guides

Audi Workshop Service and Repair Manuals

Final drive, differential, differential lock > < Dismantling and assembling input shaft
5 & 6-Speed manual gearbox 01E, Front-wheel drive
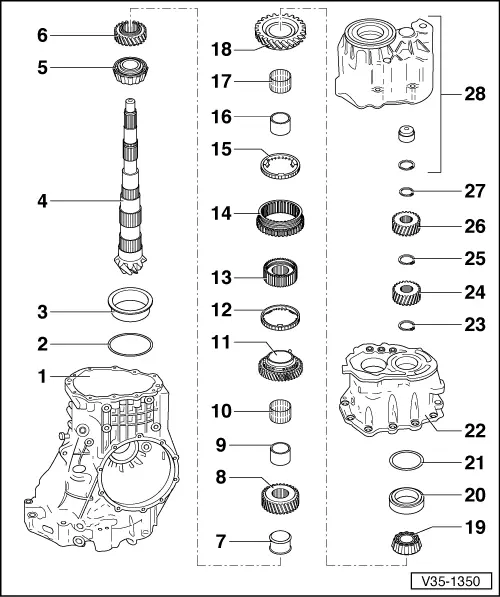
Dismantling and assembling drive pinion
 
V35-1350

Notes:

  • ◆ When installing new gears or a new final drive set (drive pinion and crown wheel)
    =>Technical data, Page 00-3.
  • ◆ Adjustments are required when renewing components marked 1) => Adjustment overview, Page 39-28.
  • Gearbox housing
    • ◆ Servicing
  • Shim "S3"
    • ◆ Adjustment overview => Page 39-28
  • Outer race for large taper roller
    bearing 1)
    • ◆ Pulling out => Fig.1
    • ◆ Pressing in => Fig.2 and Fig.3
 
V35-1350
  • Drive pinion1)
    • ◆ Paired with crown wheel (final drive set)
  • Inner race for large taper roller bearing1)
    • ◆ Pressing off => Fig.8
    • ◆ Pressing on => Fig.9
    • ◆ Low friction bearing; do not oil when measuring frictional torque
  • 4th speed gear
    • ◆ Pressing off => Fig.7
    • ◆ Pressing on => Fig.10
  • Spacer sleeve
  • 3rd speed gear
    • ◆ Pressing off together with item 9
      => Fig.6
    • ◆ Pressing on => Fig.11
 
V35-1350
  • Inner race for 2nd speed sliding gear
    • ◆ Pressing off together with item 8
      => Fig.6
    • ◆ Pressing on => Fig.12
  • Needle bearing for 2nd speed sliding gear
    • ◆ Lubricate with gear oil before installing
  • 2nd speed sliding gear
    • ◆ Pressing off => Fig.5
    • ◆ Before installing, fit spring and slide needle bearing onto hollow shaft
    • ◆ After installing, check axial clearance with a feeler gauge (0.15 ... 0.35 mm)
  • Synchro-ring for 2nd gear
    • ◆ Checking for wear => Fig.35-9
    • ◆ Synchro-ring with molybdenum coating
 
V35-1350
  • Synchro-hub for 1st and 2nd gear
    • ◆ Pressing off => Fig.5
    • ◆ Pressing on => Fig.13
    • ◆ Installation position: flush hub towards 2nd speed sliding gear
  • Locking collar for 1st and 2nd gear
    • ◆ Installation position: groove for selector fork faces towards 1st speed sliding gear
  • Synchro-ring for 1st gear
    • ◆ Checking for wear => Fig.35-9
  • Inner race for 1st speed sliding gear
    • ◆ Pressing off => Fig.5
    • ◆ Pressing on => Fig.14
 
V35-1350
  • Needle bearing for 1st speed sliding gear
    • ◆ Oil with gear oil before installing
  • 1st speed sliding gear
    • ◆ Before installing, insert spring
      => Fig.35-9
    • ◆ After pressing on -item 19-, check axial clearance using a feeler gauge (0.15 ... 0.50 mm)
  • Inner race for small taper roller bearing 1)
    • ◆ Pressing off=> Fig.4
    • ◆ Pressing on => Fig.15
    • ◆ Low friction bearing; do not oil when measuring frictional torque
  • Outer race for small taper roller bearing 1)
    • ◆ Driving out => Fig.16
    • ◆ Pressing in => Fig.17
 
V35-1350
  • Shim "S4"
    • ◆ Adjustment overview => Page 39-28
  • Bearing plate 1)
    • ◆ Servicing => Page 34-90
  • Circlip
    • ◆ Re-determining thickness (5-speed gearbox) => Page 34-67
    • ◆ Re-determining thickness (6-speed gearbox) => Page 34-69
  • 6th gear wheel
    • ◆ Not fitted on 5-speed gearbox
    • ◆ Pressing off => Page 34-61
    • ◆ Pressing on => Page 34-62
    • ◆ Installation position: shoulder towards inner race for small taper roller bearing
 
V35-1350
  • Circlip
    • ◆ Re-determining thickness (5-speed gearbox) => Page 34-67
    • ◆ Install behind -item 23- on 5-speed gearbox
    • ◆ Re-determining thickness (6-speed gearbox) => Page 34-69
  • 5th gear wheel
    • ◆ Pulling off => Page 34-56
    • ◆ Driving on => Page 34-74
  • Circlip
  • End cover
    • ◆ Servicing => Page 34-80
 
V35-1328

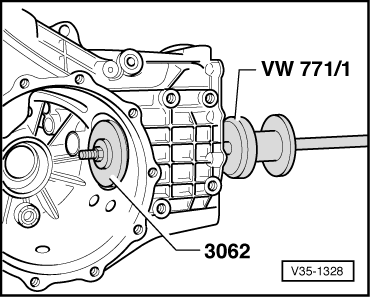
→ Fig.1    Pulling out outer race for large taper roller bearing

  • ◆ Stepped side of thrust pad 3062 rests against the outer race

 
V35-1330

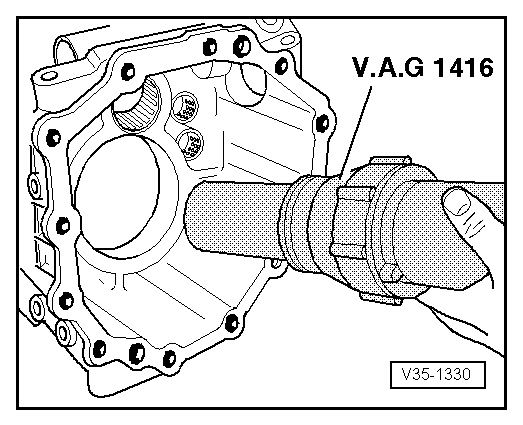
→ Fig.2    Heating gearbox housing in order to fit taper roller bearing outer race

  • ‒ Heat gearbox housing in area of bearing seat for approx. 15 minutes, to approx. 100 °C, with a hot air blower.
 
V35-1329

→ Fig.3    Inserting outer race for large taper roller bearing in gearbox housing and pressing home

  • ‒ Insert outer race only after heating gearbox housing and press home for 1 ... 2 minutes under a repair press until a heat exchange has taken place.

 
V35-1354

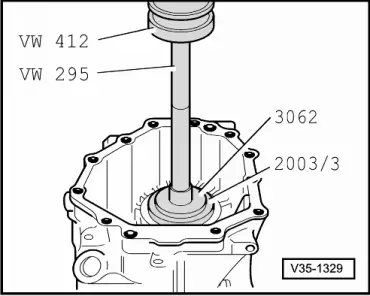
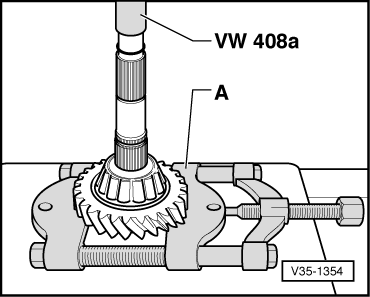
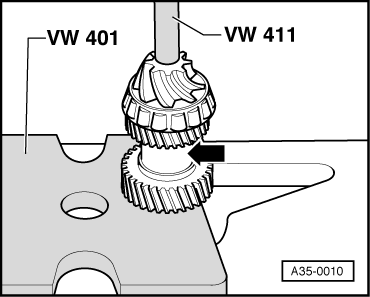
→ Fig.4    Pressing off inner race of small taper roller bearing for drive pinion together with 1st speed sliding gear

  •     A -    Separating device 22 ... 115 mm, e.g. Kukko 17/2
 
V35-1355

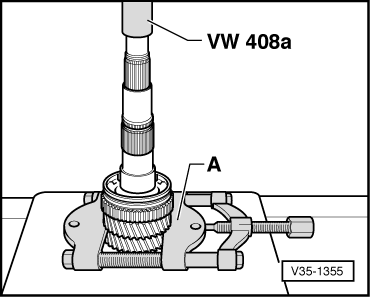
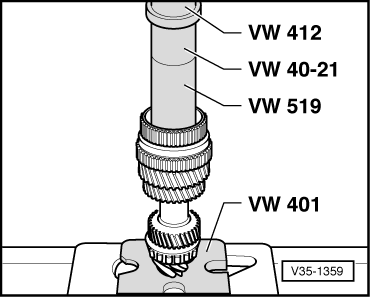
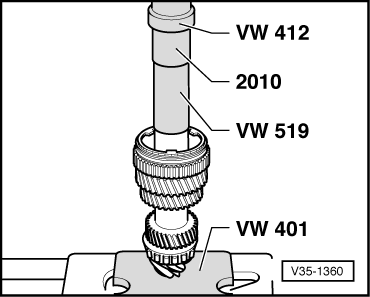
→ Fig.5    Pressing off 2nd speed sliding gear with locking collar/synchro-hub for 1st and 2nd speed gear and inner race for 1st speed sliding gear

  •     A -    Separating device 22 ... 115 mm, e.g. Kukko 17/2

 
V35-1356

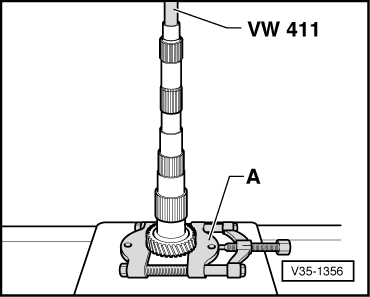
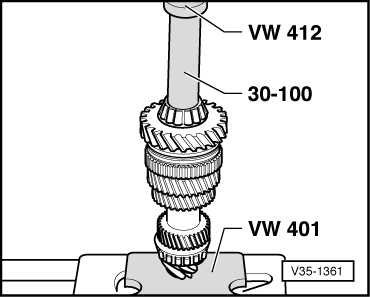
→ Fig.6    Pressing off 3rd speed gear together with inner race for 2nd speed sliding gear

  •     A -    Separating device 22 ... 115 mm, e.g. Kukko 17/2
 
V35-1353

→ Fig.7    Pressing off 4th speed gear

  •     A -    Separating device 22 ... 115 mm, e.g. Kukko 17/2

Note:

The 4th speed gear can also be pressed off together with the 3rd speed gear and the inner race for the 3rd speed sliding gear.

 
V35-1352

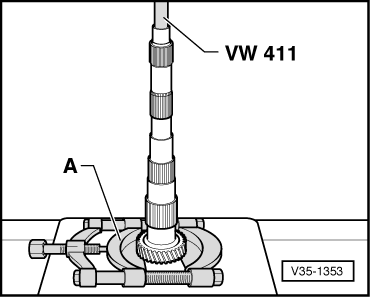
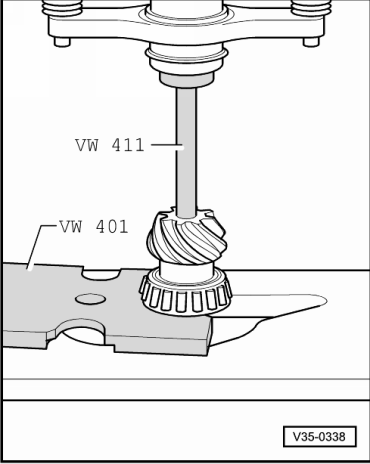
→ Fig.8    Pressing off inner race for large taper roller bearing

  •     A -    Separating device 22 ... 115 mm, e.g. Kukko 17/2
  • ◆ Bearing is destroyed when pressing off
 
V35-0338

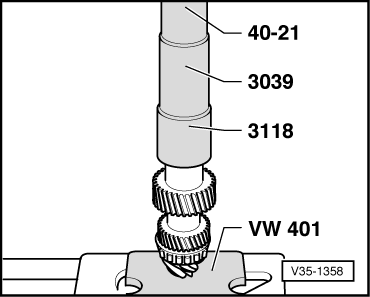
→ Fig.9    Pressing on inner race for large taper roller bearing

  • ‒ Heat inner race to approx. 100 °C and fit.
  • ‒ Press home ensuring there is no axial play.
 
V35-0339

→ Fig.10    Pressing on 4th speed gear

  • ‒ Heat gear to about 100 °C, fit and press home.
  • ◆ Installation position: shoulder towards 3rd speed gear

 
A35-0010

→ Fig.11    Pressing on 3rd speed gear

  • ‒ Insert spacer sleeve -arrow-.
  • ‒ Heat gear to about 100 °C, fit and press home.
  • ◆ Installation position: shoulder towards 4th speed gear
 
V35-1358

→ Fig.12    Pressing on inner race for 2nd speed sliding gear

  • ‒ Heat inner race to approx. 100 °C and fit.
  • ‒ Press home ensuring there is no axial play.

 
V35-1359

→ Fig.13    Fitting 2nd speed sliding gear and pressing on synchro-hub for 1st and 2nd speed gears

  • ‒ Oil needle bearing.
  • ‒ Fit needle bearing, sliding gear (with spring) and synchro-ring for 2nd speed gear.
  • ‒ Heat synchro-hub to approx. 100 °C and fit.
    • ‒ Installation position: flush hub towards 2nd speed sliding gear
  • ‒ Press home ensuring there is no axial play.
 
V35-1360

→ Fig.14    Pressing on inner race for 1st speed sliding gear

  • ‒ Heat inner race to approx. 100 °C and fit.
  • ‒ Press home ensuring there is no axial play.

 
V35-1361

→ Fig.15    Pressing on small taper roller bearing inner race for drive pinion

  • ‒ Oil needle bearing.
  • ‒ Fit needle bearing, sliding gear (with spring) and synchro-ring for 1st speed gear.
  • ‒ Heat inner race to approx. 100 °C and fit.
  • ‒ Press home ensuring there is no axial play.
 
V35-1333

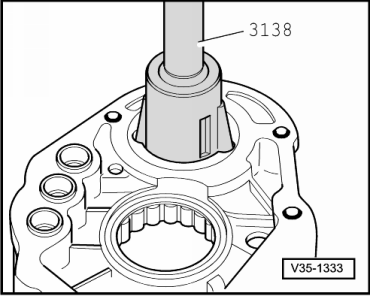
→ Fig.16    Driving out outer race for small taper roller bearing

 
V35-0987

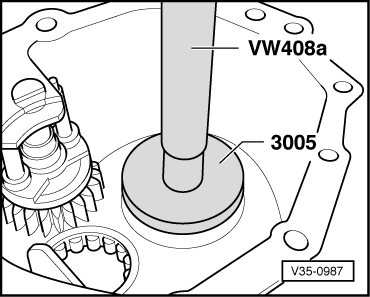
→ Fig.17    Pressing in outer race for small taper roller bearing

  • ‒ Insert shim "S4" into bearing flange behind bearing seat.
  • ‒ Press outer race for small taper roller bearing onto stop.

Final drive, differential, differential lock > < Dismantling and assembling input shaft