audi Workshop Repair Guides

Audi Workshop Service and Repair Manuals

Dismantling and assembling differential > < Removing and installing drive pinion
Automatic gearbox 01N
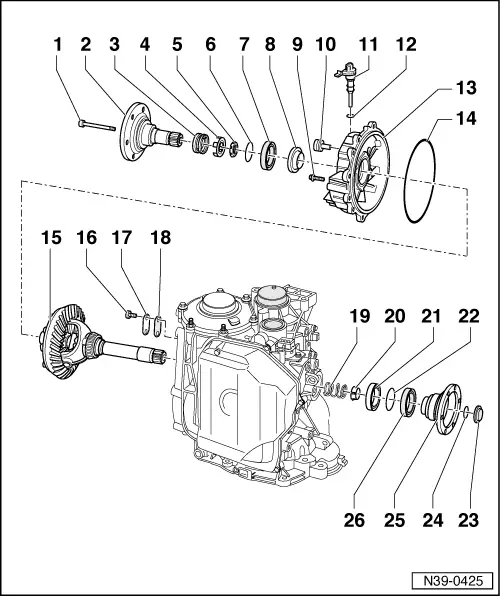
Dismantling and assembling final drive
Removing and installing differential
 
N39-0425

Notes:

  • ◆ The drive pinion does not need to be removed for removing and installing the differential
  • ◆ With the exception of the differential and the cover for axle breather, all the components shown in the illustration can be removed with the gearbox installed.
  • Bolt - 30 Nm
  • Flange shaft
    • ◆ Removing and installing
      => from Page 39-3
  • Spring
  • Thrust washer
    • ◆ Installation position:
      Shoulder towards spring, tongue to tapered ring
 
N39-0425
  • Tapered ring
    • ◆ With grooves to secure thrust washer
    • ◆ Installation position: Taper towards differential housing
  • Securing clip
    • ◆ Holds taper ring, thrust washer and spring in position when flange shaft is removed
  • Oil seal for flange shaft
    • ◆ Can be renewed with gearbox installed
  • Drive gear
    • ◆ For speedometer sender -G22
    • ◆ Remove oil seal for flange shaft before removing and installing
    • ◆ Install so that lugs on inner circumference face flange shaft; the taper faces differential
 
N39-0425
  • Bolt - 25 Nm
    • ◆ Apply sealant AMV 188 200 03 when installing
    • ◆ Tighten in stages and diagonally
  • Oil filler plug - 25 Nm
    • ◆ Clean metal particles off magnet
  • Speedometer sender -G22
  • O-ring
    • ◆ Renew
  • Cover for differential
    • ◆ When replacing, re-determine shim "S1" for crown wheel
      => from Page 39-92
  • O-ring
    • ◆ Renew
    • ◆ Can be renewed with gearbox installed
 
N39-0425
  • Differential
    • ◆ Remove with gearbox removed
    • ◆ Remove cover for differential and right drive flange to remove differential
    • ◆ Dismantling and assembling
    • ◆ The tapered ring has to be removed before installing differential
    • ◆ Re-determine shims "S1", "S2" and also shims "S3" and "S4" (for drive pinion) after renewing differential
  • Bolt - 10 Nm
    • ◆ Apply sealant AMV 188 200 03 when installing
  • Cover
    • ◆ For axle breather
 
N39-0425
  • Seal
    • ◆ Renew
  • Spring
    • ◆ When differential is installed, pull in together with grooved ball bearing -Item 39-14
  • Tapered ring
    • ◆ Installation position: Stepped collar faces grooved ball bearing
    • ◆ When differential is installed, pull in together with grooved ball bearing and spring
  • Grooved ball bearing
    • ◆ Removing and installing
      => from Page 39-13
    • ◆ Remove before removing differential gearbox
  • Circlip
    • ◆ Lever out with screwdriver
 
N39-0425
  • Sealing cap
    • ◆ Renew
    • ◆ To remove sealing cap, pierce with screwdriver and prise off
    • ◆ Drive in with socket attachment 30 mm A/F
  • Circlip
  • Drive flange
    • ◆ Removing and installing
      => from Page 39-8
  • Oil seal for drive flange
    • ◆ Removing and installing
      => from Page 39-8

Dismantling and assembling differential > < Removing and installing drive pinion