audi Workshop Repair Guides

Audi Workshop Service and Repair Manuals

Attaching rear final drive to engine stand > < Replacing flange shaft oil seals
Automatic Gearbox 01VFWD and 4WD
Removing and installing rear final drive
 
W00-0120

Special tools, testers and auxiliary equipment required

  • ◆ Engine/gearbox lifter V.A.G 1383 A

Removal

  • ‒ Remove rear section of exhaust system as from clamp(s):
    => corresponding Workshop Manual for Engine, Mechanical Components; Repair group 26; Removing and installing exhaust system
  • ‒ Remove heat shield above propshaft.
 
V39-1727
  • ‒ → Check whether there is a factory marking (paint dot) on propshaft. If there is no mark, make a coloured mark on rear axle drive -B- to indicate the position of propshaft flange -A-.
  • ‒ Unscrew fastening bolts for propshaft flange.

 
V39-1734
  • ‒ → Secure propshaft to handbrake cable bracket with wire.

Note:

If it is not possible to push propshaft up and off flange, lower final drive before tying up propshaft. When lowering final drive, prevent propshaft from dropping down, and do not bend centre joint further than maximum angle permitted => notes on Page 39-74.

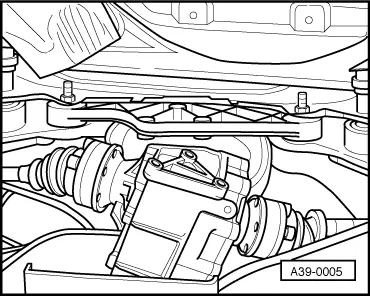
  • ‒ Detach left and right drive shafts from rear final drive

=> Running Gear, Front and Four-wheel Drive; Repair group 42; Arrangement of Rear Axle Components (vehicles with 4WD); Removing and installing drive shaft

 
A39-0003
  • ‒ → Support axle drive with gearbox lifter V.A.G 1383 A and universal mount V.A.G 1359/2.
  • ‒ Secure final drive with strap.

 
V39-1735
  • ‒ → Unscrew bolts -arrows- from front of cross member for rear axle drive.
  • ‒ Detach front cross member.
 
V39-1736
  • ‒ → Unscrew securing bolts -B- and -C- of rear cross member on rear final drive.
  • ‒ Lower final drive with gearbox jack.

Note:

The cross member -1- need not be removed.

Installing

Installation is carried out in the reverse order; note the following:

Notes:

  • ◆ Always renew self-locking nuts.
  • ◆ It is essential that the residues of locking fluid are cleaned out from the threaded holes in flange shaft on the rear final drive after removing the propshaft. Otherwise there is a danger that new bolts will seize and then shear when removing them again.
  • ◆ The threaded holes can be cleaned with a thread tap.
  • ◆ Replace gasket between propshaft and drive flange (remove protective sheet and bond gasket to flanged shaft). The adhesive surface must be free of grease.
  • ◆ Replace propshaft bolts (self-locking).
 
A39-0005
  • ‒ → Raise final drive with gearbox jack until both drive shafts can be connected.
  • ‒ Lightly tighten securing bolts for drive shafts.
  • ‒ Lift final drive and bolt to cross member and final drive support.
  • ‒ Bolt on propshaft => Page39-81

Notes:

 
V39-1727
  • ◆ → To prevent imbalance, install flanges of propshaft -A- and rear axle drive -B- in such a way that the coloured markings are in a line -arrows-.
  • ◆ After removing the propshaft from the rear final drive, the additional balance disc (thicker washer) that may be located between the lock plate and the bolt head must not be reinstalled.
  • ◆ Replace propshaft bolts (self-locking).
  • ‒ Checking gear oil level in rear final drive
    =>Page 39-92.
  • ‒ Stress-free alignment of exhaust system:
    => corresponding Workshop Manual for Engine, Mechanical Components; Repair group 26; Removing and installing exhaust system

Tightening torques

Component

Nm

Propshaft to final drive
(input flange)

55

Front cross member for rear final drive to body

40

Front cross member for rear final drive with exhaust system bracket to body

23

Rear cross member for rear final drive to subframe


50

Rear final drive on rear cross member


55

Drive shaft to flange shaft

M8

40

M10

77

Attaching rear final drive to engine stand > < Replacing flange shaft oil seals