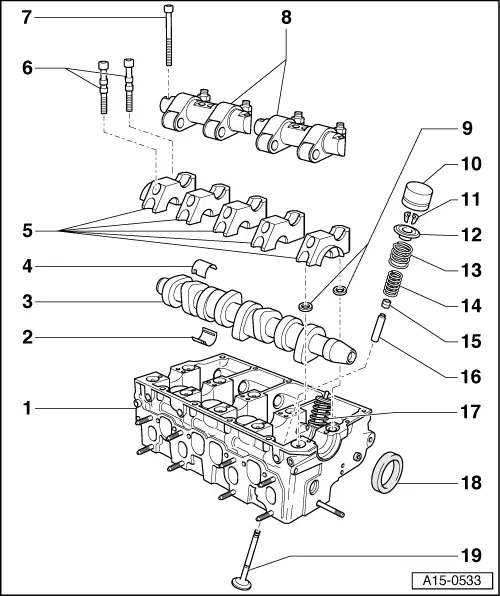
audi Workshop Repair Guides

Audi Workshop Service and Repair Manuals

Checking axial clearance of camshaft > < Checking compression pressure
4-Cyl. TDI®Engine, Mechanics
Servicing valve gear

Notes:

  • ◆ Engine is not to be started for approx. 30 minutes after installing camshaft, so as to allow hydraulic valve lifters to settle (valves would otherwise strike piston).
  • ◆ After working on valve gear, carefully crank engine through at least 2 revolutions to ensure that no valves make contact on starting.
  • ◆ Always replace gaskets and sealing rings.
  • ◆ Heed current information on the use of sealants.

=> Parts List

  • ◆ Removing and installing tandem pump:

=> Fuel supply - Diesel engines; Repair Group 20

 
A15-0533
  • Cylinder head
    • ◆ Checking valve guides => Page 15-85
    • ◆ Reworking valve seats=> Page 15-81
  • Bearing shell
    • ◆ Pay attention to installation position
    • ◆ Do not interchange used bearing shells (mark)
    • ◆ Make sure tabs are correctly seated in bearing covers and cylinder head
  • Camshaft
    • ◆ Checking axial clearance=>Page 15-54
    • ◆ Removing and installing=>Page 15-61
    • ◆ Check radial clearance with Plastigage
      Wear limit: 0.11 mm
    • ◆ Run-out: max. 0.04 mm
 
A15-0533
  • Bearing shell
    • ◆ Pay attention to installation position
    • ◆ Do not interchange used bearing shells (mark)
    • ◆ Make sure tabs are correctly seated in bearing covers and cylinder head
  • Bearing cap
    • ◆ Installation sequence=>Installing camshaft, Page 15-64
    • ◆ Seal bearing covers 1 and 5 with sealant =>Fig.15-53
    • ◆ Sealant

=> Parts List

  • 8 Nm + further 90° (1/4) turn
    • ◆ Replace
 
A15-0533
  • 20 Nm + further 90° (1/4 turn.) turn
    • ◆ Replace
    • ◆ Heed slackening off sequence
      => Page 15-63
    • ◆ Heed tightening sequence
      => Page 15-67
  • Valve lever shaft
    • ◆ Mark
    • ◆ Not to be interchanged
    • ◆ Heed slackening off sequence
      => Page 15-63
    • ◆ Heed tightening sequence
      => Page 15-67
  • Washer
    • ◆ For cylinder head bolts
    • ◆ Insert in cylinder head before mounting bearing covers
 
A15-0533
  • Hydraulic bucket tappet
    • ◆ Checking => Page 15-70
    • ◆ Removing and installing=>Page 15-73
    • ◆ Not to be interchanged
    • ◆ Set down with bearing surface downwards
    • ◆ Check axial clearance of camshaft before installing => Page 15-54
    • ◆ Lubricate contact surface
  • Valve cotters
  • Upper valve spring plate
  • Outer valve spring
    • ◆ Remove and install with cylinder head fitted=>Page 15-73
    • ◆ Remove and install with cylinder head removed using 2037
 
A15-0533
  • Inner valve spring
    • ◆ Remove and install with cylinder head fitted=>Page 15-73
    • ◆ Remove and install with cylinder head removed using 2037
  • Valve stem seal
    • ◆ Replacing => Page 15-73
  • Valve guide
    • ◆ Checking => Page 15-85
    • ◆ If wear limit is exceeded replace cylinder head
  • Pump/nozzle unit
    • ◆ Removing and installing:

=> TDI fuel-injection and preheating system (4-cyl. pump/nozzle unit); Repair Group 23; Servicing diesel direct injection system; Removing and installing pump/nozzle unit

 
A15-0533
  • Sealing ring
    • ◆ Removing and installing=>Page 15-55
  • Valves
    • ◆ Not to be reworked; only grinding-in permissible
    • ◆ Valve dimensions=>Fig.15-53
 
N15-0270

→ Fig.1    Sealing bearing covers 1 and 5

  • ‒ Apply a thin, even coat of sealant to the surfaces -1-.
  • ◆ Sealant

=> Parts List

Note:

Make sure no sealant gets into the grooves -arrows- or onto the other surfaces.

 
A15-0326

→ Fig. 2    Valve dimensions

Note:

Valves are not to be reworked. Only grinding-in is permitted.

Dimension

Inlet valve

Exhaust valve

ø a

mm

35.95

31.45

ø b

mm

6.980

6.956

c

mm

89.95

89.95

α

45

45

Checking axial clearance of camshaft > < Checking compression pressure