audi Workshop Repair Guides

Audi Workshop Service and Repair Manuals

Removing and installing vibration damper > < Moving lock carrier to service position
4-Cyl. TDI®Engine, Mechanics
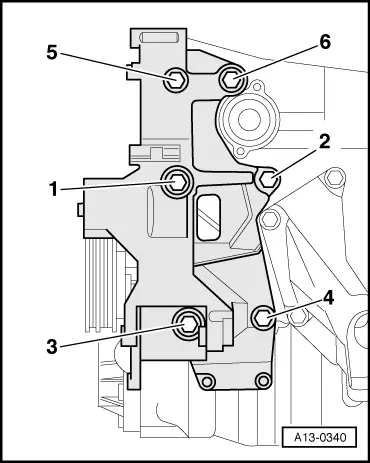
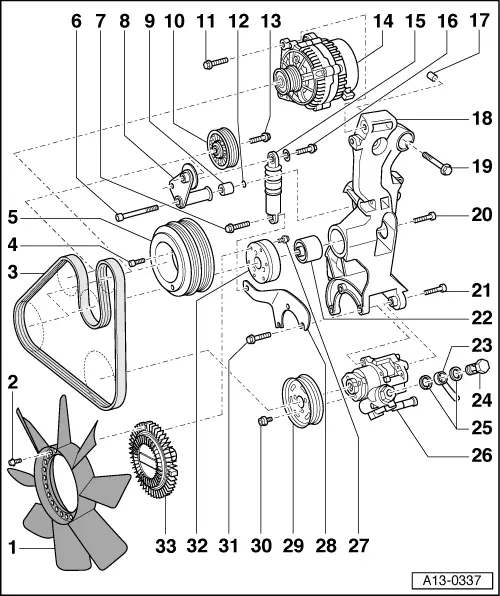
Dismantling and assembling engine
Ribbed belt drive for vane pump, alternator and viscous fan
 
A13-0337

Note:

Mark direction of ribbed belt with chalk or felt-tip pen prior to removal. Running a used belt in the opposite direction could destroy it. When installing belt, make sure it is properly seated on pulleys.

  • Fan wheel
    • ◆ for viscous fan
    • ◆ Removing and installing=>Page 19-34
  • 10 Nm
    • ◆ Self-locking
    • ◆ Replace
 
A13-0337
  • Ribbed belt
    • ◆ Removing and installing=>Page 13-23
    • ◆ Check for wear
  • 10 Nm + 1/4 turn (90 °)
    • ◆ Replace
  • Vibration damper
    • ◆ With pulley for ribbed belt
    • ◆ Can only be fitted in one position
  • 25 Nm
    • ◆ When installing, pay attention to O-ring -item 12-
 
A13-0337
  • 25 Nm
  • Lever
    • ◆ For tensioning roller
  • Spacer sleeve
    • ◆ Pay attention to installation position
    • ◆ Secured by O-ring -item 12-
  • Tensioning roller
  • 25 Nm
  • O-ring
    • ◆ Replace if damaged
  • 25 Nm
    • ◆ Self-locking
    • ◆ Replace
 
A13-0337
  • Alternator
    • ◆ Removing:
    • ‒ Disconnect battery earth strap-.
    • ‒ Detach engine cover and noise insulation underneath.
    • ‒ Slacken off ribbed belt and detach from alternator => Page 13-23.
    • ‒ Remove viscous fan and place in radiator cowl.
    • ‒ Unscrew wire from alternator.
    • ‒ Disconnect connector, expose wire.
    • ‒ Screw top and bottom bolts out of bracket.
    • ‒ Remove alternator.
    • ◆ To help align alternator on bracket, drive bush forr retaining screw back slightly
 
A13-0337
  • Tensioning element
    • ◆ For ribbed belt
  • 25 Nm
  • Dowel sleeve
    • ◆ Check correct fit in bracket
  • Holder
    • ◆ For alternator, vane pump and viscous fan
    • ◆ Removing- and installing=>Page 13-25
  • 45 Nm
    • ◆ Tightening sequence => Fig.13-15
  • 45 Nm
  • 25 Nm
 
A13-0337
  • Bearings
    • ◆ for viscous fan
    • ◆ Removing and installing=>Page 19-36
  • Pressure pipe
  • Banjo bolt, 50 Nm
  • Oil seal
    • ◆ Replace
  • Vane pump
    • ◆ For power steering
    • ◆ Removing and installing:
  • Ribbed bolt- 28 Nm
    • ◆ Replace
 
A13-0337
  • Holder
    • ◆ for tensioning element
  • Pulley
    • ◆ For vane pump
    • ◆ Brace with mandrel to unbolt
  • 25 Nm
  • 25 Nm
  • Pulley
    • ◆ for viscous fan
    • ◆ Removing and installing=>Page 19-34
  • Viscous coupling
    • ◆ Removing and installing=>Page 19-34
 
A13-0340

→ Fig.1    Tightening sequence of bracket for alternator, vane pump and viscous fan

Note:

When installing, pay attention to dowel sleeve at top right between bracket and cylinder block.

  • ‒ Tighten bolts -1 ... 6- hand-tight.
  • ‒ Tighten the bolts in the order as numbered -1 ... 6- to 45 Nm.

Removing and installing vibration damper > < Moving lock carrier to service position