audi Workshop Repair Guides

Audi Workshop Service and Repair Manuals

Servicing rear axle (four-wheel drive vehicles) > < Vehicle level senders for vehicles with automatic headlight range control
Running gear, Front-wheel drive and four-wheel drive
Vehicle level senders for vehicles with automatic headlight range control
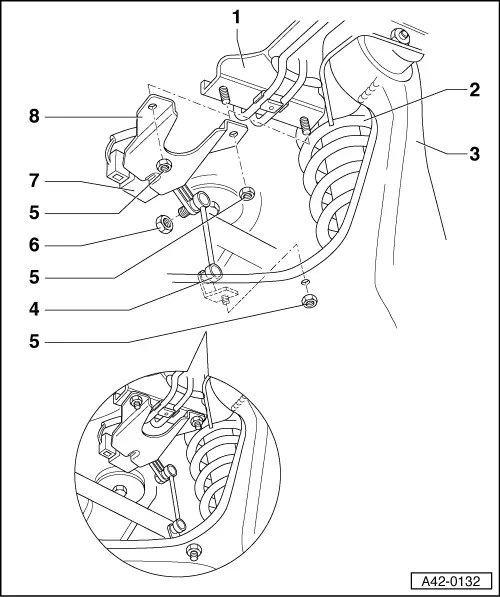
Vehicle level senders at rear axle

Vehicles with gas-discharge lamps feature automatic headlight range control as standard.

=> Electrical System; Repair Group 94

The automatic headlight range control function requires information on bump or rebound travel at front and rear axle.

For this purpose, position of rear axle (front-wheel drive) or left link (four-wheel drive) with respect to body is transmitted by way of a connecting link to rear left/rear right vehicle level sender -G76/ -G77. Sender then transmits electrical signals to headlight range control unit -J431.

Headlight range control unit -J431

=> Electrical System; Repair Group 94; Exploded View of Automatic Headlight Range Control; Removing and installing headlight range control unit -J431

The automatic headlight range control reacts to changes in vehicle level. Further details on operation can be found in Self Study Programme No. 192.

The following situations may produce a change in vehicle level:

  • ◆ Use of trailer
  • ◆ Different loads (vehicle unladen, partly laden or fully laden)
  • ◆ Driving style (fast/slow)
Attention:
Headlight setting

Headlight basic setting is always to be checked:

  • ◆ Following vehicle level sender installation work
  • ◆ Following replacement of vehicle level sender
  • ◆ Following removal/installation or replacement of rear axle on vehicles with front-wheel drive
  • ◆ Following removal/installation or replacement of left link on vehicles with four-wheel drive

Headlight basic setting

=> Electrical System; Repair Group 01; Self-diagnosis of automatic headlight range control; Basic setting

 
A42-0132
  • Rear subframe
  • Suspension strut
  • Lower link
  • Connecting link of rear left/rear right vehicle level sender -G76/ -G77-
  • Self-locking nut, 10 Nm
  • Hexagon nut, 4 Nm
 
A42-0132
  • Rear left/rear right vehicle level sender -G76/ -G77-
    • ◆ Removing and installing => Page 42-49 and

=> Electrical System; Repair Group 94; Exploded View of Automatic Headlight Range Control; Removing and installing rear left vehicle level sender -G76

    • ◆ Checked by self-diagnosis

=> Electrical System; Repair Group 01; Self-diagnosis of automatic headlight range control

    • ◆ Perform headlight basic setting following replacement

=> Electrical System; Repair Group 01; Self-diagnosis of automatic headlight range control; Basic setting

  • Bracket

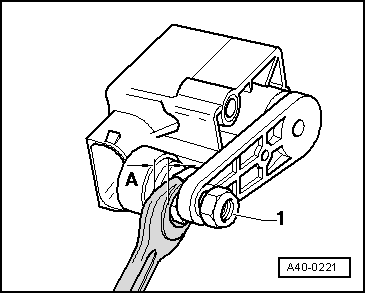
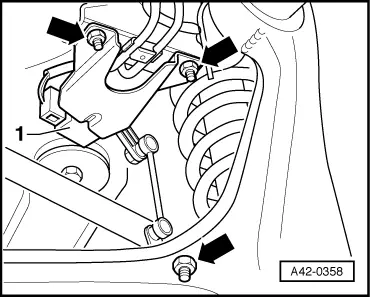
Replacing vehicle level sender in vehicle

Removing

Special tools and workshop equipment required

  • ◆ V.A.G 1331 Torque wrench
  • ◆ V.A.G 1332 Torque wrench

Notes:

  • ◆ Removal and installation of rear axle or lower link involves unfastening connecting link of rear left/rear right vehicle level sender -G76/ -G77 at lower link.
 
A40-0221
  • ◆ → For attaching connecting link to crank of rear left/rear right vehicle level sender -G76/ -G77, use 10 mm open-ended wrench with dimension -A- = 4 mm so as not to damage seal.
  • ‒ Dimension -A- = 4 mm
  •     1 -    Tightening torque: 4 Nm
  • ‒ Remove wheel.
 
A42-0358
  • ‒ → Unscrew nuts -arrows-.
  • ‒ Remove vehicle level sender -1-.

Installing

Install in reverse order.

Tightening torque of nuts -arrows- => Page 42-45

On installing headlight range control, ensure correct mutual positioning of crank and connecting link.

Note:

  • ◆ Connecting link must be vertical
  • ◆ Crank must face outwards at bottom
  • ‒ Perform headlight basic setting following replacement.

=> Electrical System; Repair Group 01; Self-diagnosis of automatic headlight range control; Basic setting

Servicing rear axle (four-wheel drive vehicles) > < Vehicle level senders for vehicles with automatic headlight range control