
A4 Mk2
|
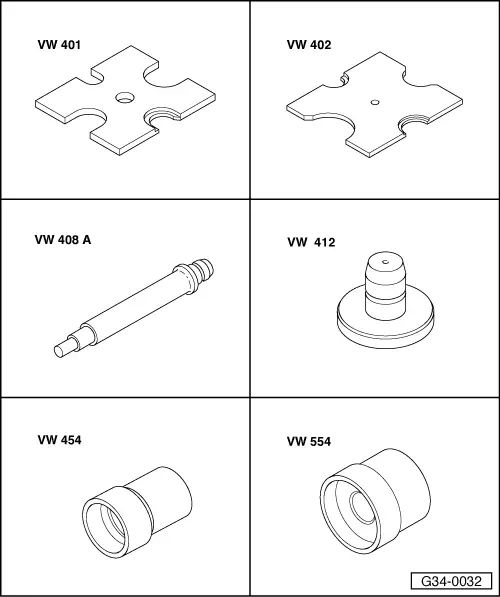
| Special tools and workshop equipment required |
| t | Thrust plate -VW 401- |
| t | Thrust plate -VW 402- |
| t | Press tool -VW 408 A- |
| t | Press tool -VW 412- |
| t | Press tool -VW 454- |
| t | Press tool -VW 554- |

| t | Punch -2005- |
| t | Thrust piece -2050- |
| t | Drift sleeve -30 - 100- |
|
|
|
 Note
Note| Due to the introduction of an oil seal with additional dust lip (from manufacture date 30 08 4 onwards) → Fig., the flange shaft → Fig. was provided with a groove. Select correct components from → Electronic parts catalogue. |

| 1 - | Flange shaft |
| q | Without vibration damper |
| q | Modification: from manufacture date 30 08 4 onwards with groove → Fig. |
| q | Select correct components from → Electronic parts catalogue |
| q | Pressing out → Fig. |
| q | Pressing in → Fig. |
| 2 - | Needle bearing |
| q | Pull out of flange shaft using internal puller -Kukko 21/1- and counter-support -Kukko 22/1-. |
| q | Press into flange shaft as far as it will go using press tool -VW 408 A-. |
| 3 - | Bolt |
| q | 15 Nm + 90° |
| q | For vibration damper |
| q | 3x |
| q | Apply locking fluid -AMV 185 101 A1- when fitting |
| 4 - | Vibration damper |
| q | Not fitted on all versions |
| q | Select correct part according to colour marking -arrow- or gearbox code → Electronic parts catalogue |
| 5 - | Oil seal |
| q | → Chapter „Renewing oil seal and ball bearing for flange shaft (rear) on gearbox“ |
| q | Levering out → Fig. |
| q | Preparing for installation (up to manufacture date 29 08 4) → Fig. |
| q | Driving in (up to manufacture date 29 08 4) → Fig. |
| q | Modification: from manufacture date 30 08 4 onwards with additional dust lip → Fig. |
| q | Driving in (from manufacture date 30 08 4 onwards) → Fig. |
| q | Select correct components from → Electronic parts catalogue |
| 6 - | Centre differential housing |
| q | Removing and installing (gearbox removed) → Chapter |
| q | Removing and installing (gearbox installed) → Chapter |
| 7 - | Oil collector |
| q | Insert in hole on gearbox cover |
| 8 - | Circlip |
| q | For flange shaft |
| q | Installation position → Fig. |
| 9 - | Circlip |
| q | For ball bearing and sleeve |
| q | Installation position → Fig. |
| 10 - | Sleeve |
| q | Can be removed and installed by hand once the circlip has been removed → Item |
| 11 - | Ball bearing |
| q | For flange shaft |
| q | → Chapter „Renewing oil seal and ball bearing for flange shaft (rear) on gearbox“ |
| q | Pressing out → Fig. |
| q | Pressing in → Fig. |
| 12 - | Flange shaft with vibration damper |
| q | Not fitted on all versions |
| q | Only renew as complete unit |
| q | Pressing out → Fig. |
| q | Pressing in → Fig. |