audi Workshop Repair Guides

Audi Workshop Service and Repair Manuals

Assembling body "II” > < Clutch "E” - exploded view of components
Dismantling and assembling clutch “E”
   
Dismantling
–  Place clutch “E”-item 1- into support element -T10283-.
  A37-10357
–  Detach circlip -1- and remove set of plates -2- from cylinder “E”.
  A37-10294
–  Press retaining plate down using workshop press with mounting bracket -T10276-.
–  Remove circlip -1-.
–  Release workshop press.
  A37-10239
–  Detach retaining plate -7-.
–  Detach dished spring -5-.
  A37-10620
–  Turn cylinder “E” upside down.
  WARNING
Wear safety goggles.
–  Carefully press piston “E” out of cylinder “E” by applying compressed air.
  A37-10359
Assembling
  Caution
Before assembly, check the components of clutch “E” for traces of wear and damage → Chapter.
–  Renew O-rings -2- and -4- for piston “E”, -item 3-.
–  Push piston “E”, -item 3- into cylinder “E”, -item 1- as far as stop.
–  Fit dished spring -5-.
–  Renew O-ring -6- on retaining plate -7-.
–  Fit retaining plate -7- into cylinder “E”-item 1-.
8 - Circlip
  A37-10620
–  Press retaining plate down using workshop press with mounting bracket -T10276-.
–  Fit new circlip -1-.
  Caution
Take care not to stretch circlip too far when installing. After installing, check that circlip is seated properly.
–  Release workshop press.
  A37-10239
–  Fit corrugated spring -2- in cylinder “E”-item 1-.
–  Fit outer plates -3- and friction plates -4- alternately.
–  Insert thick outer plate -5-.
  Note
Make sure that the rounded edges of the thick outer plate face friction plate -4- and not circlip -6-. The contact surface for the circlip is thus increased.
–  Insert circlip -6-.
  A37-10360
Adjusting clearance of clutch “E”
–  Clamp support leg of compressor tool -T10285- in vice.
–  Insert clutch “E” in compressor tool.
l  The input shaft projects out of drilling in base plate.
–  Position holding plate -T10291- onto outer plate of clutch “E”.
l  Avoid any contact between holding plate and circlip.
–  Fit centring pin of thrust piece -T10285/1- into drilling in holding plate.
–  Bring clutch “E” into correct position on holding plate of compressor tool.
l  Thrust piece must be positioned centrally below thrust plate of spindle.
–  Turn spindle of compressor tool downwards.
l  The markings on the inspection hole of the thrust piece must align -arrow-.
–  Insert dial gauge -VAS 6080- into measuring bridge -VW 382/7- and secure with knurled nut.
–  Position measuring bridge on upper rim of cylinder “E” as shown in illustration.
–  Check that measuring bridge is seated properly on rim of cylinder “E”.
–  Bring measuring tip into contact with outer plate and note value obtained.
–  Mark exact contact point on cylinder “E”.
–  Repeat measurement at two other points on outer plate (offset by 120°) and mark measuring points.
–  Determine average value from the three measurements under load.
–  Release spindle and remove holding plate.
  A37-10311
–  Use both hands to pull set of plates upwards in clutch “E” as far as stop.
–  With set of plates pulled up as far as stop, measure distance between upper rim of cylinder “E” and outer plate at one of the points marked (assistance of second mechanic required).
–  Repeat measurement at the two remaining markings on the outer plate.
–  Determine average value from the three measurements with set of plates pulled up as far as stop.
–  Determine clearance using the following formula:
  A37-10361
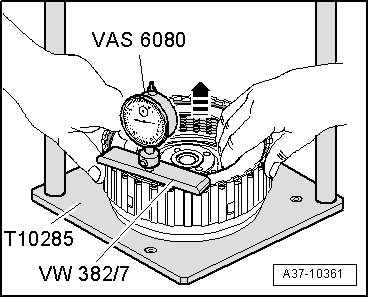
 Mean value of measurements under load
(value 1 + value 2 + value 3) : 3
Mean value of measurements with set of plates pulled up as far as stop
(value 1 + value 2 + value 3) : 3
=Clearance

–  Subtract mean value of measurement with set of plates pulled up as far as stop from mean value of measurements under load.
   
Clearance of clutch “E”, Automatic gearbox 01V, front-wheel drive
Gearbox code lettersSpecification
CJV, CJW, CJX, CJY, CJZ, DCS, DEQ, DES, DEU, DPS, DRD, DSS, EBV, EBW, EBX, EBZ, ECJ, EDC, EDE, EFP, EFR, EKC, EMA, ERY, ETK, ETL, ETU, ETV, ETW, ETZ, EYF, EZP, EZV, EZW, EZX, EZY, EZZ, FAC, FAD, FAE, FATF, FAH, FAJ, FAK, FED, FEE, FHV, FNL, FRT, GDE, GML1.78 ... 2.08 mm
CJQ, CJU, DDS, DDT, DRF, DUL, DUM, EBU, EBY, EZR, EZS, FAB, FEV1.41 ... 1.71 mm

   
Clearance of clutch “E”, Automatic gearbox 01V, four-wheel drive
Gearbox code lettersSpecification
CJP, CJR, CJS, CJT, DEV, DEW, DEX, DEY, DPT, DRK, DRN, DST, DTU, ECB, ECC, ECD, ECG, ECH, EDF, EKD, EKX, EMM, EMP, ETM, ETN, ETX, ETY, EUA, EYJ, EYK, EZB, FAM, FAN, FAP, FAQ, FAR, FAS, FAU, FAV, FAW, FAX, FAZ, FBA, FBB, FEF, FEG, FEJ, FEQ, FHD, FHF, FHG, FHH, FLC, FLV, FNM, FRU, FVE, FXL, GAK, GBG, GBH, GBJ1.78 ... 2.08 mm
DKB, DTV, EFQ, FAL, FEP, GBF1.41 ... 1.71 mm

   
If reading does not match specification:
–  Determine new circlip -1- according to following table.
  Note
-Item 2- can be disregarded.
l  If clearance is below specification: insert thinner circlip of appropriate thickness.
l  If clearance is above specification: insert thicker circlip of appropriate thickness.
  A37-10294
Available circlips - Thickness of circlips in mm
1.21.82.4
1.42.02.6
1.62.2 

–  Check clearance again after inserting circlip.
   

Assembling body "II” > < Clutch "E” - exploded view of components