audi Workshop Repair Guides

Audi Workshop Service and Repair Manuals

Removing and installing differential > < Removing and installing left flange shaft
Removing and installing cover for front final drive
Removing
  Note
t  Removing and installing cover for front final drive with gearbox installed → multitronic 01J, front-wheel drive; Rep. Gr.39, → multitronic 0AN, front-wheel drive; Rep. Gr.39
t  Observe the general repair instructions → Chapter.
t  Rules for cleanliness when working on the automatic gearbox → Chapter.
–  Remove the left flange shaft → Chapter.
–  Use new circlip -A- to press old circlip out of groove in flange shaft.
  Caution
Make sure that flange shaft (right-side) is installed before removing cover for front final drive. Otherwise the differential may fall out of the gearbox housing.
   
–  Unscrew bolts for front final drive cover in sequence -11 ... 1-.
  Caution
t  Detach cover for front final drive slowly and carefully from gearbox housing. The differential may otherwise fall out of the gearbox.
t  A differential which has fallen to the ground can no longer be installed. Renew gearbox if differential has fallen to the ground.
t  Make sure that the bearing races and shims for the differential do not drop out of the gearbox housing and the front final drive cover.
t  Bearing races and shims cannot be re-allocated to their original positions by the workshop if they have dropped out.
  A39-0414
–  Secure differential -arrow- to prevent it falling out.
  A39-0415
Installing
–  Check that magnet is fitted under plastic cover in cover for front final drive.
  A39-0416
–  Renew O-ring -1- in cover for front final drive.
–  Make sure cover -2- is securely seated.
  A39-0417
–  Check that differential -arrow- is correctly seated in gearbox.
  A39-0415
–  Fit cover for front final drive onto gearbox housing.
–  Renew all bolts in cover for front final drive.
–  If fitted, insert guard plate -B- between cover for final drive and bolt -1-.
  Note
The guard plate -B- serves to protect the breather hole -arrow A- against the ingress of dirt and water.
  A39-10163
Tightening sequence:
  Caution
t  
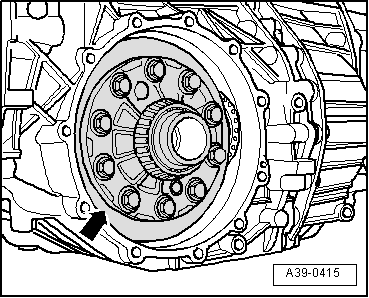
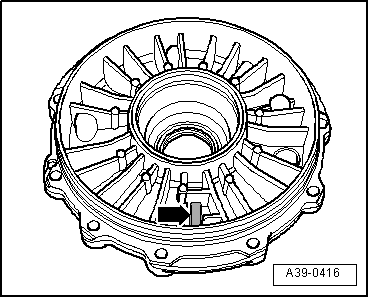
Fit the three bolts with spacers at the positions shown -arrows-.
t  Make exclusive use of genuine bolts → Electronic parts catalogue.
  Note
On certain gearboxes, spacers are not fitted at the points indicated by the -arrows-; in this case make sure to fit the bolts without spacers.
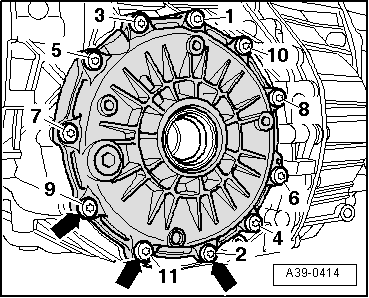
–  Tighten bolts securing cover for front final drive in two stages in the sequence shown:
1.  Initially hand-tighten bolts in sequence -1 ... 11-.
2.  Tighten bolts in sequence -1 ... 11- in several stages to final torque.
–  Check oil seal for flange shaft (left-side) and renew if necessary → Chapter.
–  Fit the left flange shaft → Chapter.
–  Fill up with gear oil and check gear oil level in front final drive → multitronic 01J, front-wheel drive; Rep. Gr.39, → multitronic 0AN, front-wheel drive; Rep. Gr.39.
  Caution
Risk of damaging the gearbox.
Depending on the design status, the multitronic 01J and 0AN gearboxes require different gear oils. Use is only to be made of the corresponding replacement gear oil in the front final drive → Electronic parts catalogue.
Tightening torque
  A39-0414
ComponentNm
Cover for front final drive to gearbox housing25 1)
Oil filler plug to cover for front final drive30 1)
l  1) Renew bolts.


Removing and installing differential > < Removing and installing left flange shaft