audi Workshop Repair Guides

Audi Workshop Service and Repair Manuals

Removing and installing seat position sensor - equipment version with seat occupied recognition system controlling deactivation > < Exploded view of seat position sensor
Removing and installing seat position sensor - equipment version with seat occupied sensor for belt-fastened recognition
Replacement seat position sensors are available with wiring harness and 10-pin connector (black). The following wires with connectors are incorporated into the wiring harness:
t  Wire with connector for belt buckle coupling (driver seat)
t  Wire with connector for belt buckle coupling (front passenger seat)
t  Wire with connector for coupling for seat occupied sensor (front passenger side) -G128-
Removing
  WARNING
t  Observe safety regulations for pyrotechnic components → Chapter.
t  Before handling pyrotechnic components (e.g. unplugging the electrical connector) the mechanic must discharge static electricity by briefly touching the door striker plate, or similar.
–  Remove front seat:
t  Standard seat and sports seat (with manual adjustment) → Chapter „Removing and installing front standard seat (with manual adjustment)“.
t  Standard seat, sports seat (with electric adjustment), convenience seat and super sports seat → Chapter „Removing and installing front standard seat (with electric adjustment)“.
–  Attach front seat to seat repair stand -VAS 6136- → Chapter.
   
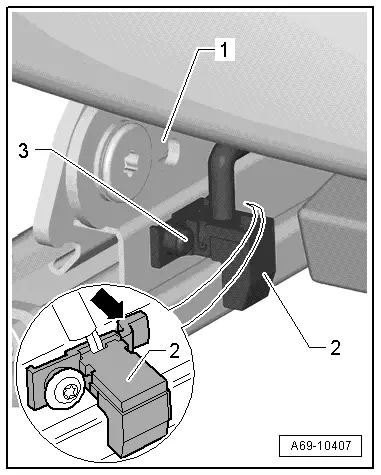
–  Remove bolt -3-.
–  Disengage hook -arrow- of seat position sensor -2- from lower seat pan frame -1-.
–  Open up corrugated tube and remove wire with connector for belt buckle (10-pin):
t  Connector point connectors → Chapter
t  Modular wire routing with corrugated tube at front seat → Chapter
  A69-10407
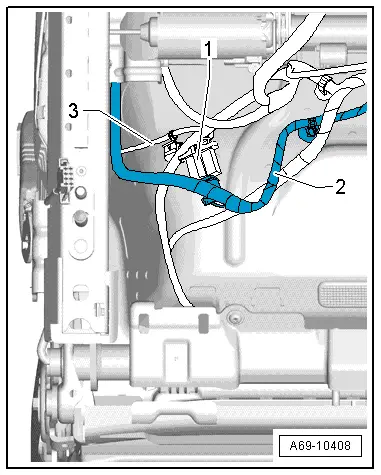
Driver's seat:
–  Unfasten cable ties / cable clips as far as electrical connector -1-.
–  Unplug electrical connector.
2 - Wiring to 10-pin connector (black) and driver side seat position sensor -G553-
3 - Wiring to belt buckle
  Note
Leave connector -1- with wire and cable clip on upper seat pan frame.
–  Detach seat position sensor with wires from lower seat pan frame.
  A69-10408
Front passenger's seat:
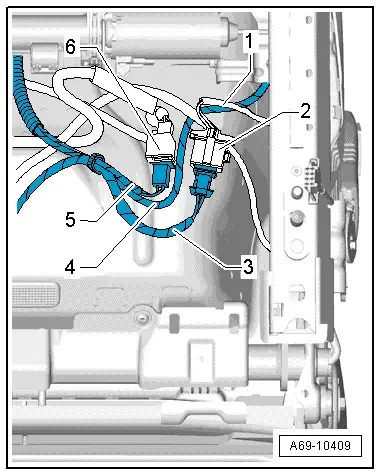
–  Unfasten cable ties / cable clips as far as electrical connectors -2- and -6-.
–  Unplug electrical connectors.
1 - Wiring to belt buckle
3 - Wiring to 10-pin connector (black) and belt buckle
4 - Wiring to 10-pin connector (black) and front passenger side seat position sensor -G554-
5 - Wiring to seat occupied sensor (front passenger side) -G128-
  Note
Leave connectors -2- and -6- with wires and wiring clips on upper seat pan frame.
–  Detach seat position sensor with wires from lower seat pan frame.
Installing
  WARNING
t  Observe safety regulations for pyrotechnic components → Chapter.
t  Before handling pyrotechnic components (e.g. plugging in the electrical connector) the mechanic must discharge static electricity by briefly touching the door striker plate, or similar.
Installation is carried out in the reverse order; note the following:
  Note
Make sure electrical connectors are fitted correctly (as far as stop) and engage audibly.
  WARNING
The battery must be connected with the ignition switched on. If pyrotechnic components (e.g. airbag or belt tensioner) are inexpertly repaired, this may result in unwanted triggering after connecting the battery. There must not be anyone in the vehicle while you are connecting the battery.
–  With ignition switched on, connect battery earth wire → Electrical system; Rep. gr.27.
  Note
If the airbag warning lamp -K75- indicates a fault following installation, you must interrogate, erase and then re-interrogate the event memory → Vehicle diagnostic tester.
Tightening torque → Chapter
  A69-10409

Removing and installing seat position sensor - equipment version with seat occupied recognition system controlling deactivation > < Exploded view of seat position sensor