audi Workshop Repair Guides

Audi Workshop Service and Repair Manuals

Exploded view of storage compartment > < Exploded view of seat pan
Dismantling and assembling seat pan
  Note
t  There are different upper seat pan frames: with or without seat depth adjustment → Electronic parts catalogue.
t  Dismantling and assembly is described for a seat pan without seat depth adjustment. The dismantling and assembly procedures for a seat pan with seat depth adjustment are similar.
t  When removing the seat pan, take care not to damage bushes in pivot points (bolted connection between upper and lower frames). These bushes cannot be renewed with the equipment available to workshops.
t  It is not possible to separate the upper and lower seat pan frames on the following front seats: standard seat (with manual adjustment) and sports seat (with manual adjustment).
t  The upper and lower seat pan frames can be separated and renewed separately on the following front seats: standard seat (with electric adjustment), sports seat (with electric adjustment), convenience seat and super sports seat.
Dismantling seat pan
  WARNING
t  Observe safety regulations for pyrotechnic components → Chapter.
t  Before handling pyrotechnic components (e.g. unplugging the electrical connector) the mechanic must discharge static electricity by briefly touching the door striker plate, or similar.
–  If possible, move front seat to topmost position in order to minimise pre-tension of torsion bar.
–  Remove front seat:
t  Standard seat, sports seat (with electric adjustment), convenience seat and super sports seat → Chapter „Removing and installing front standard seat (with electric adjustment)“.
–  Remove front seat backrest → Chapter.
–  Detach padding from seat pan:
t  Standard seat (with electric adjustment) and convenience seat → Chapter „Removing and installing seat cover and padding (seat pan without seat depth adjustment)“.
t  Sports seat (with electric adjustment) → Chapter „Removing and installing seat cover and padding (seat pan with seat depth adjustment)“.
   
Separating upper frame and lower frame
–  Unplug electrical connector at seat longitudinal adjustment motor.
–  Remove torsion bar → Chapter.
–  Remove bolts -2- (4x).
–  Remove bolt -3-.
–  Lift upper frame -1- off lower frame -4-.
  A72-10791
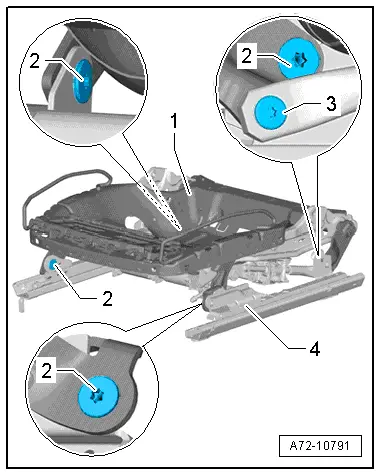
–  When doing so, pay attention to bushes -1- in pivot points on lower seat pan frame -2-.
  Caution
t  When separating or assembling upper and lower frames, take care not to damage bushes -1- inserted in all pivot points.
t  The bushes cannot be renewed with the equipment available to workshops.
t  The corresponding components must be renewed if the bushes are damaged.
Renewing upper frame
  Note
If upper frame is renewed, wiring and electrical and electronic components indicated must be removed and installed in new upper frame.
–  Separate upper and lower frame → Anchor.
–  Remove retainer with seat adjustment control unit with memory function → Chapter and → Chapter.
–  Remove seat height adjustment motor → Chapter.
–  Remove seat rake adjustment motor → Chapter.
–  Remove seat position sensor:
t  → Chapter „Removing and installing seat position sensor - equipment version with seat occupied sensor for belt-fastened recognition“.
t  → Chapter „Removing and installing seat position sensor - equipment version with seat occupied recognition system controlling deactivation of front passenger airbag“.
–  Detach wiring harnesses and individual wires from upper seat pan frame.
–  Install electrical and electronic components and wiring removed earlier in new upper frame.
Install in reverse order of removal.
Renewing lower frame
  Note
If lower frame is renewed, seat position sensor must be removed and installed in new lower frame.
–  Separate upper and lower frame → Anchor.
–  Remove seat position sensor:
t  → Chapter „Removing and installing seat position sensor - equipment version with seat occupied sensor for belt-fastened recognition“.
t  → Chapter „Removing and installing seat position sensor - equipment version with seat occupied recognition system controlling deactivation of front passenger airbag“.
–  Unplug electrical connector at seat longitudinal adjustment motor.
–  Install electrical and electronic components and wiring removed earlier in new lower frame.
Assembling seat pan
The seat pan is assembled in the reverse order of dismantling; note the following:
  WARNING
t  Observe safety regulations for pyrotechnic components → Chapter.
t  Before handling pyrotechnic components (e.g. plugging in the electrical connector) the mechanic must discharge static electricity by briefly touching the door striker plate, or similar.
  Note
Make sure electrical connectors are fitted correctly (as far as stop) and engage audibly.
  WARNING
The battery must be connected with the ignition switched on. If pyrotechnic components (e.g. airbag or belt tensioner) are inexpertly repaired, this may result in unwanted triggering after connecting the battery. There must not be anyone in the vehicle while you are connecting the battery.
–  With ignition switched on, connect battery earth wire → Electrical system; Rep. gr.27.
  Note
If the airbag warning lamp -K75- indicates a fault following installation, you must interrogate, erase and then re-interrogate the event memory → Vehicle diagnostic tester.
Tightening torques → Chapter
  A72-10793

Exploded view of storage compartment > < Exploded view of seat pan