
A4 Mk3
 Note
Note
|
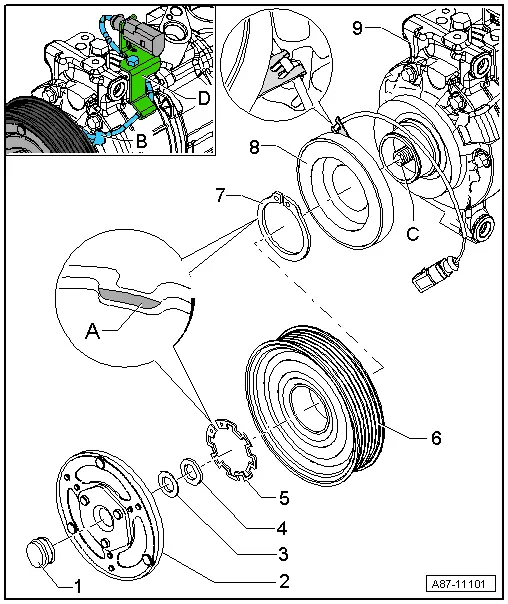
| 1 - | Cap |
| q | Not always fitted |
| 2 - | Clutch plate |
| q | Replace |
| q | Screwed to the air conditioner compressor drive shaft. |
| – | Clean the contact surfaces of the clutch plate and pulley before screwing on |
| – | Clean the thread of the compressor shaft before screwing on the clutch plate |
| – | After tightening, check and if necessary correct the gap between the pulley and clutch plate → Chapter |
Note| The thread of the new clutch plate is pre-greased at the factory with a pre-determined quantity of a specific grease. |
| q | Different versions → Electronic parts catalogue |
| q | With overload safeguard; tripped in the event of excessive torque (e.g. stiff air conditioner compressor) and the pulley just free-wheels without driving the air conditioner compressor with the magnetic clutch -N25- activated. |
| Detaching/attaching |
| – | To detach, hold the compressor shaft -C- in position and use a suitable tool to turn the clutch plate in arrow direction (anti-clockwise) as described for the drive plate on an air conditioner compressor with no magnetic clutch → Chapter |
| q | Tightening torque 30 Nm |
| 3 - | Plate |
| 4 - | Spacer |
| q | For setting the gap between the clutch plate and pulley |
| q | Checking gap → Chapter |
| 5 - | Circlip |
| q | Replace |
| q | Ensure correct positioning (flat side facing air conditioner compressor) |
| q | On fitting the circlip, take care not to bend it open more than necessary for installation. |
| – | Ensure correct insertion of the circlip. The bevelled side -A- faces away from the air conditioner compressor (flat side faces compressor). |
| 6 - | Pulley |
| q | The pulley is sensitive to impact and should therefore be treated with care. |
| q | Clean the air conditioner compressor flange before fitting the pulley. |
| q | Different versions (depending for example on type of engine) → Electronic parts catalogue |
| q | If the pulley cannot be detached by hand from the air conditioner compressor flange, refer to → Chapter |
| 7 - | Circlip |
| q | Replace |
| q | Ensure correct positioning (flat side facing air conditioner compressor) |
| q | On fitting the circlip, take care not to bend it open more than necessary for installation. |
| – | Ensure correct insertion of the circlip. The bevelled side -A- faces away from the air conditioner compressor (flat side faces compressor). |
| 8 - | Solenoid |
| q | Pay attention to correct positioning of the holder for the cable -B- on installation. |
| q | Depending on the version, the connector -D- may be attached to the air conditioner compressor with a holder |
| 9 - | Air conditioner compressor |
| q | Different models may be fitted depending on the engine version and country version of the vehicle → Electronic parts catalogue. |
| q | Clean the air conditioner compressor flange before fitting the pulley. |
| q | Clean the thread of the compressor shaft and apply a small quantity of grease to the thread. |