audi Workshop Repair Guides

Audi Workshop Service and Repair Manuals

Fuel filter and supplementary fuel pumpV393 > < Bleeding fuel system
Removing and installing fuel tank with attached components
Special tools and workshop equipment required
   
t  Engine and gearbox jack -V.A.G 1383 A-
t  Drip tray
Removing
–  Observe safety precautions → Chapter.
–  Observe rules for cleanliness → Chapter.
  WARNING
Risk of accident caused by weight of fuel tank
Fuel tank must be empty when it is removed.
–  Drain fuel tank → Chapter.
  W00-0120
–  Remove rear seat bench → Rep. gr.72.
–  Unscrew cover for flange -arrows-.
  A20-0803
–  Unplug electrical connector -1- on flange.
Vehicles with auxiliary heater:
–  Unplug electrical connector -2- for metering pump for auxiliary heater on flange.
  A20-10423
All vehicles (continued):
–  Open tank flap.
–  Clean area around fuel filler neck.
–  Remove filler cap -arrow- from fuel filler neck.
  Note
Seal off opening of fuel filler neck with a piece of clean foam to prevent dirt from dropping into the tank.
  A20-1253
–  Remove rear right wheel.
–  Remove rear right wheel housing liner → Rep. gr.66.
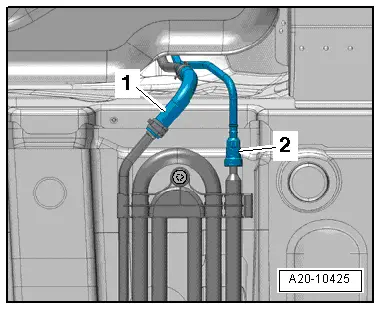
–  Remove bolts -1- and -2- for fuel filler neck.
–  Remove rear section of exhaust system → Rep. gr.26.
  WARNING
The vehicle can tip over on the lifting platform when the rear axle is removed.
BEFORE loosening the subframe bolts, take steps to ensure that the vehicle does not tip forwards on the lifting platform (e.g. put a weight of about 50 kg in the luggage compartment).
–  Remove rear axle → Rep. gr.42.
  WARNING
The fuel can become extremely hot. This can cause injuries.
t  In extreme cases the fuel lines and the fuel can reach a temperature of 100 °C. Allow the fuel to cool down before disconnecting the lines - danger of scalding.
t  Wear protective gloves.
t  Wear safety goggles.
Risk of injury - fuel system operates under high pressure.
To reduce the pressure in the fuel system, wrap a clean cloth around the connection and carefully loosen the connection.
  Note
  A20-10422
Place drip tray underneath to catch escaping fuel.
–  Press release tab and disconnect fuel return line -2-.
–  Detach fuel supply line -1-.
Vehicles with auxiliary heater:
–  In addition, disconnect fuel line leading to auxiliary heater at metering pump.
–  Unplug electrical connector at metering pump.
  A20-10425
All vehicles (continued):
–  Position engine and gearbox jack -V.A.G 1383 A- below vehicle to support tank.
–  Support fuel tank using engine and gearbox jack -V.A.G 1383 A-.
  A20-10443
  WARNING
Risk of accident caused by weight of fuel tank
Fuel tank must be empty when it is removed.
–  Remove bolts -1 ... 4- and detach bracket -5- for exhaust system.
–  Then lower fuel tank using engine and gearbox jack -V.A.G 1383 A-, simultaneously guiding fuel tank down by hand.
Installing
Installation is carried out in the reverse order; note the following:
l  Tightening torques → Chapter „Fuel tank with attached components - exploded view“
  Note
Secure all hose connections with the correct type of hose clips (same as original equipment) → Electronic parts catalogue.
–  Check that fuel lines are clipped onto fuel tank.
  A20-10371
–  Position fuel tank and securing straps on underbody using engine and gearbox jack -V.A.G 1383 A-.
–  When installing fuel tank, make sure that fuel filler neck is correctly inserted into opening on body.
–  Attach bracket -5- for exhaust system and tighten securing strap bolts -1 ... 4-.
  A20-10371
–  Connections -1- and -2- on filler neck must be free of corrosion to ensure proper earth connection to body.
–  Tighten bolts -1- and -2- for fuel filler neck.
  WARNING
Safety risk due to electrostatic discharge.
After installation, use an ohmmeter to check the electrical connection between the metal ring on the fuel filler neck and a bare metal part on the body:
Specification: approx. 0 Ω
–  Install rear axle → Rep. gr.42.
–  Install rear section of exhaust system → Rep. gr.26.
–  Install rear right wheel housing liner → Rep. gr.66.
–  Install cover for flange → Fig..
–  Install rear seat bench → Rep. gr.72.
Vehicles with auxiliary heater:
–  Bleed fuel supply line leading to metering pump → Chapter.
  A20-10422

Fuel filter and supplementary fuel pumpV393 > < Bleeding fuel system